Infrastructure
Bridge materials calculator — a lumber list from a bridge record
Turn a bridge structure's recorded dimensions into deck boards, stringers and fasteners, exportable as a PDF for quotes and work orders — with the spacing and stock-length assumptions stated, and a clear line at the span where the answer becomes an engineer's job.
The bridge materials calculator turns a bridge's recorded dimensions into a lumber list — how many stringers, how many deck boards, what lengths, and roughly what fasteners. It is for the everyday question "what do I put on the truck to replace that", answered from the record you already have.
What it needs from you
Four dimensions off the bridge record:
- Length — the span.
- Width — the deck width.
- Decking thickness.
- Decking board width.
These are the standard dimension fields on a Bridge structure, so if the bridge is recorded properly the calculator has everything it needs. If a number is missing, fill it in on the structure rather than guessing here — the record is the thing worth having right. On a maintenance item whose bridge is short of one, the notice where the calculator would be carries an Add them now link straight into that structure's edit form, on the field app as well as on the dashboard.
Dimensions are stored in millimetres and displayed in your own preferred units, so it does not matter which you think in.
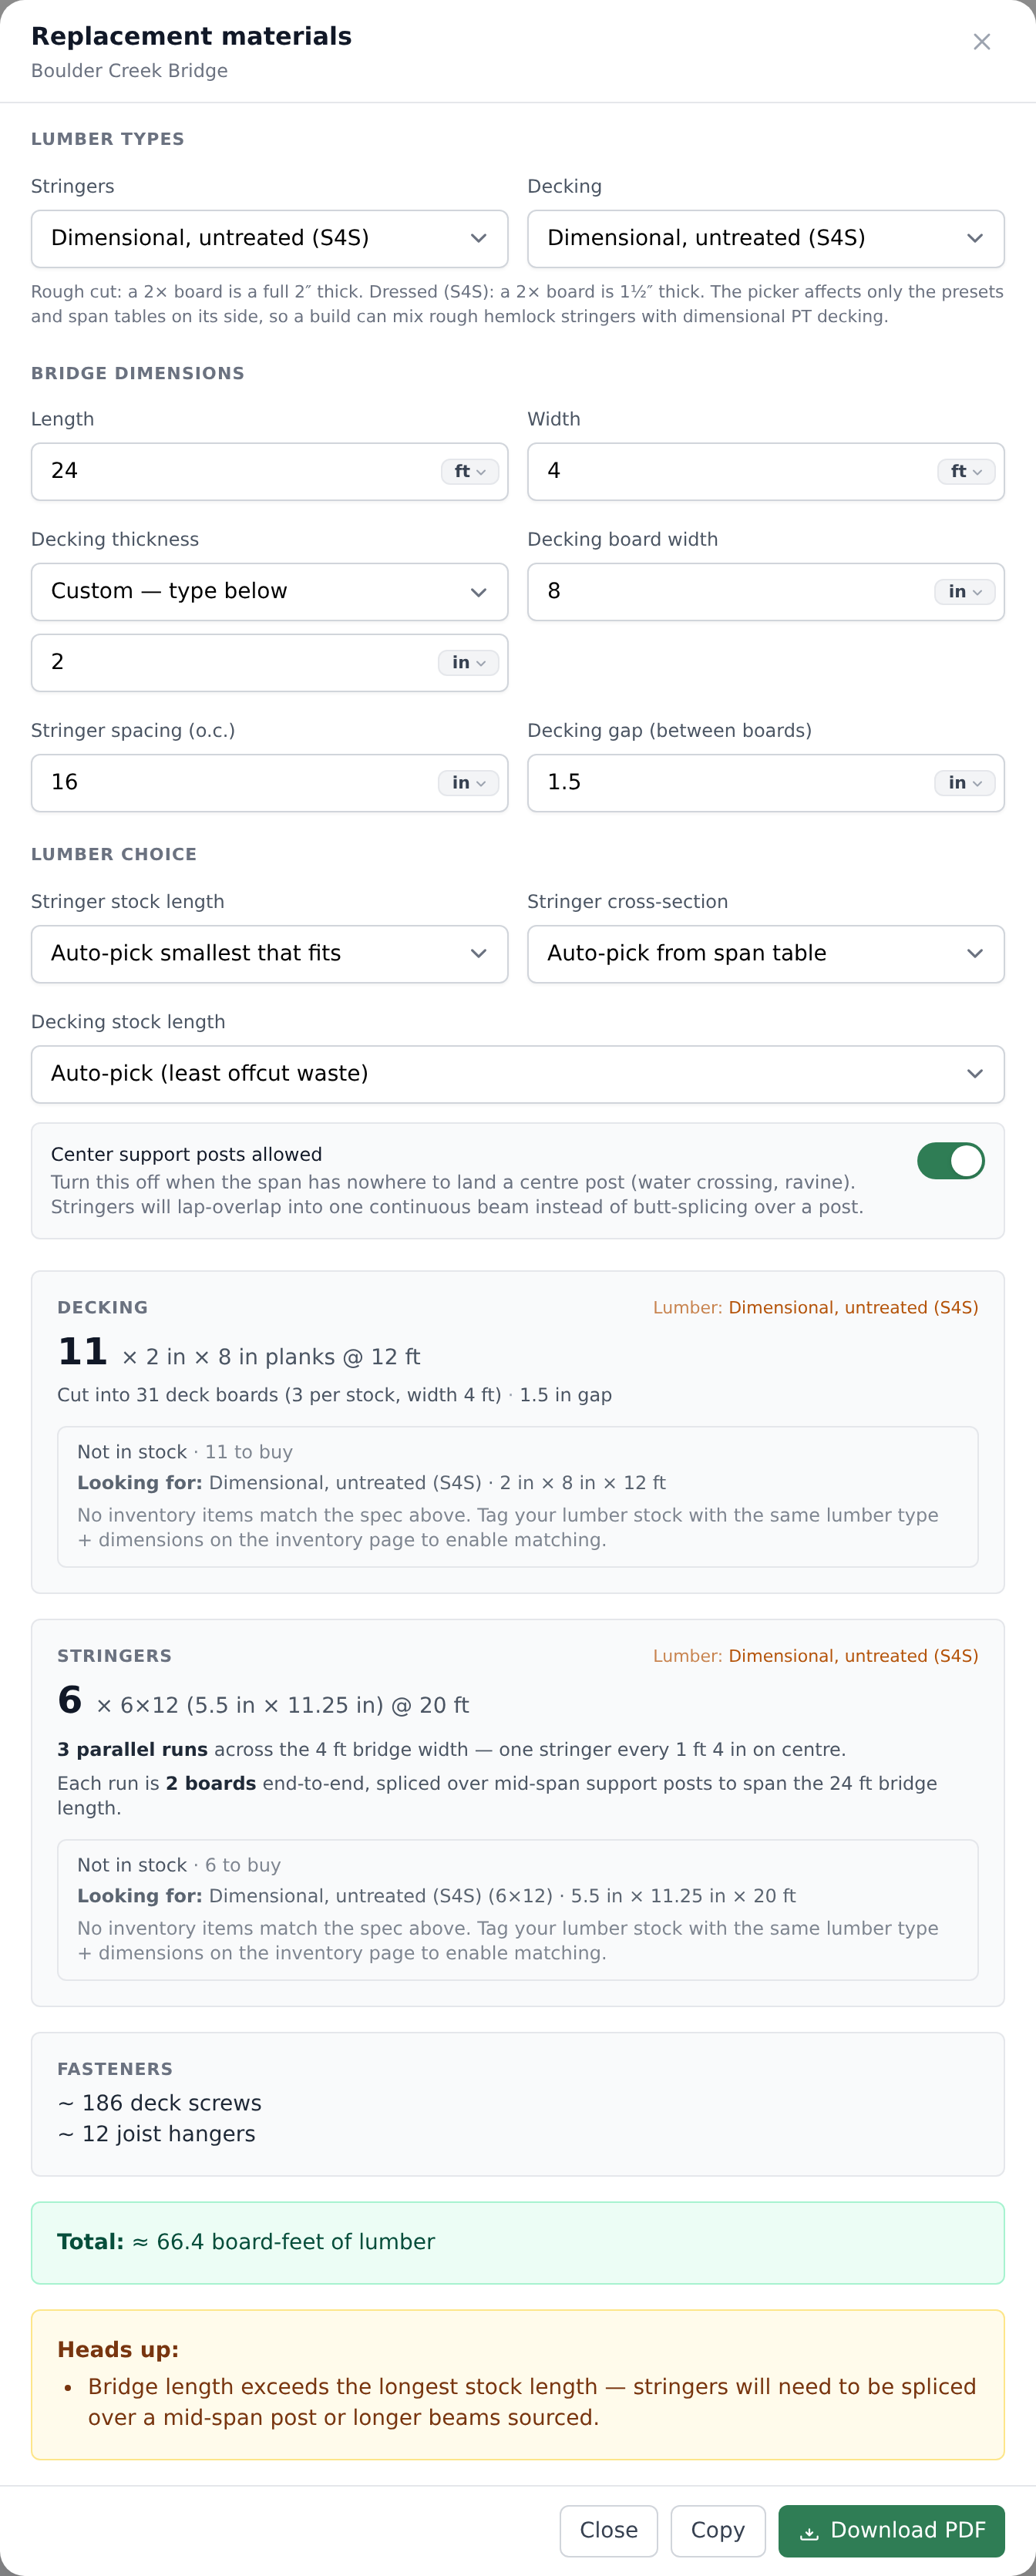
One choice is worth making deliberately: rough cut or dressed (S4S), set separately for stringers and for decking. A rough 2× board is a full 2 inches thick where a dressed one is 1½, and that difference feeds straight into the span table — so the same bridge sizes differently depending on which you pick. A build can mix the two, and often does.
Everything else on the sheet starts from a sensible default, and each one is a tap on its own row — the row opens an editor for that one thing rather than a form full of fields you did not come for. Override the details, at the foot of the list, is the same settings on one screen for a visit that is changing several; Reset there puts them all back to what the bridge record says.
Some of those changes stick to the bridge and the rest do not, and the editor tells you which before you pick. Your lumber types, the stringer size and the stringer stock length are facts about the bridge, so picking one saves it to the structure's record and it is there the next time anybody opens the calculator. Stringer spacing, the decking gap, board thickness and width, the decking stock length and the center-support switch apply to the estimate in front of you and are gone when you close it.
What it gives back
On the phone the calculator opens full screen with two tabs. Setup is the numbers going in; Materials is the list coming out, and the tab carries a count of the lines on it.
On the dashboard it opens as one wide window with the same two halves side by side. The settings are a column on the left, each a row with its control beside it, and the answer is on the right: the live plan, any warnings, what is already in stock, a card per part and the cutting list. They update as you type. Plans is a tab of its own beside Calculator, and the foot of the window carries the total volume, what is left to buy, Copy list and the PDF. On a small screen the two columns stack.
Both put the span editor under Structure: Split into another span, a box for each stretch's length and a posts switch per stretch, described under When one bridge crosses two kinds of ground below.
Setup opens on a plan of the bridge drawn from those numbers — every deck board and every stringer run, laid out to scale, with the drainage gap at the width you set it. It is there because a count is easy to read and hard to check: a spacing that puts three stringers under a deck where you expected four is obvious in the drawing and invisible in the number.
The drawing shows how each run is built, not just where it goes. A span longer than the boards you are buying is drawn as the boards it is really made of, and at the width they really are: one board thick along most of the run, two where a lapped pair runs side by side, three where a scab is bolted across a butt joint. It also shows how far the deck runs past the outer stringers, which is the part nobody can check from a list of quantities.
Tap the magnifier on it and the plan fills the screen, where it can be pinched to zoom and dragged to pan. It is worth reaching for on a long crossing: the mark on a run where its boards butt is the size of a pin head on a sheet you are scrolling past, and full screen is where you can see which run each one sits on. It is the same view the figures on the Plans tab open into.
- Decking — how many boards, at what stock length.
- Stringers — how many boards, at what cross-section, and at what length or lengths. On a span longer than the boards you are buying that is more than the number of stringers: a run is built up from several, and the card breaks the total down so you can check it. An order is not always one length — where the short ends of the runs come off a shorter board the card says so instead of naming a single size, and the cutting list below it names both.
- Fasteners — a rough count of deck screws and joist hangers.
- A total volume — board feet if you work in feet and inches, cubic meters if you work in meters — which is the number a supplier will actually price. How it's figured opens the pieces it was added up from.
Each line also says whether you already hold it. If your lumber is tagged in Inventory with a matching lumber type and dimensions, the sheet shows what is in stock and what is left to buy; if nothing matches it says so and tells you what it was looking for, so an untagged yard reads as "not matched" rather than as "not owned".
Stringers and Decking each carry two pills when the yard half-covers them — In stock 7 beside Buy 4 — because the boards you do not have to fetch are as much of the answer as the ones you do. They add up to what the job needs, so a card showing only one pill is fully supplied or fully to be bought.
When a material is ordered in more than one length — a spliced run buys long boards for the full pieces and one short board for the ends — you get a line per length, each labeled with the length it is about. They are separate questions: ten 12 ft boards on the rack do not cover a need for one 6 ft one.
Where something is in stock, Reserve holds it against the work you opened the calculator from, so the next person to look at that shelf can see those boards are spoken for. It holds what is actually on the shelf today — the button says how many, and if that is short of the job it says how many are still to be bought. Where the order has two lengths it holds both, and says so if one of them could not be held. It needs a connection: a reservation nobody can see is not worth making, so it says so rather than pretending offline.
Output is a materials list you can take to a supplier, as a PDF for a quote request, a work order, or a grant application's cost breakdown. On a phone the button reads Share or save PDF and opens the system share sheet, which is also where Save to Files lives; on a computer it downloads. On the dashboard there is a Copy list button as well, which puts the list on the clipboard for an email.
The drawings go with it. The PDF carries the plan view, the side elevation and the section on a page of their own after the list, so the document that reaches the yard is the same bridge somebody at the saw is looking at. You do not have to open the Plans tab first — they are attached whether you have looked at them or not. If for any reason they could not be drawn, the download says so rather than handing you a shorter document without comment.
The assumptions it makes
These are stated plainly because they decide whether the answer applies to your bridge:
- Deck boards run across the full width, butted end to end along the length. It picks the stock length that wastes the least per board — for a 4 ft deck that is 8 ft or 12 ft, both of which cut with nothing left over, rather than 10 ft which bins 2 ft every time. Between lengths that waste the same it takes one you already have in stock, and only then the shorter. It does not try to be clever about ripping boards or splicing offcuts. Trail bridges are short and single-length boards are the norm; if you build differently, the board count still holds but the lengths will not.
- Stringers are spaced 406 mm (16 inches) on center. How many that takes comes off the deck width, and the deck is left overhanging the outer stringer on each side by half a spacing — 8 inches on a 4 ft bridge. This follows residential deck guidance, which is what most trail crews work to. It is conservative: light foot bridges often carry wider spacing perfectly well.
- You can set that overhang yourself. Leave it alone and it is worked out as above; give it a number and the outer stringers sit that far in from each edge with the rest spaced between them, which usually changes how many you need. Zero is a real answer — a stringer on each deck edge — and the calculator treats it as one rather than as "unset".
- Stringer cross-section comes from a span table, sized for the length you entered.
- Fasteners are order-of-magnitude — two deck screws per board per stringer crossing, and two joist hangers per stringer. Exact hardware depends on a spec TrailsIQ does not track, so treat these as "how many boxes", not a bill of quantities.
Where it stops
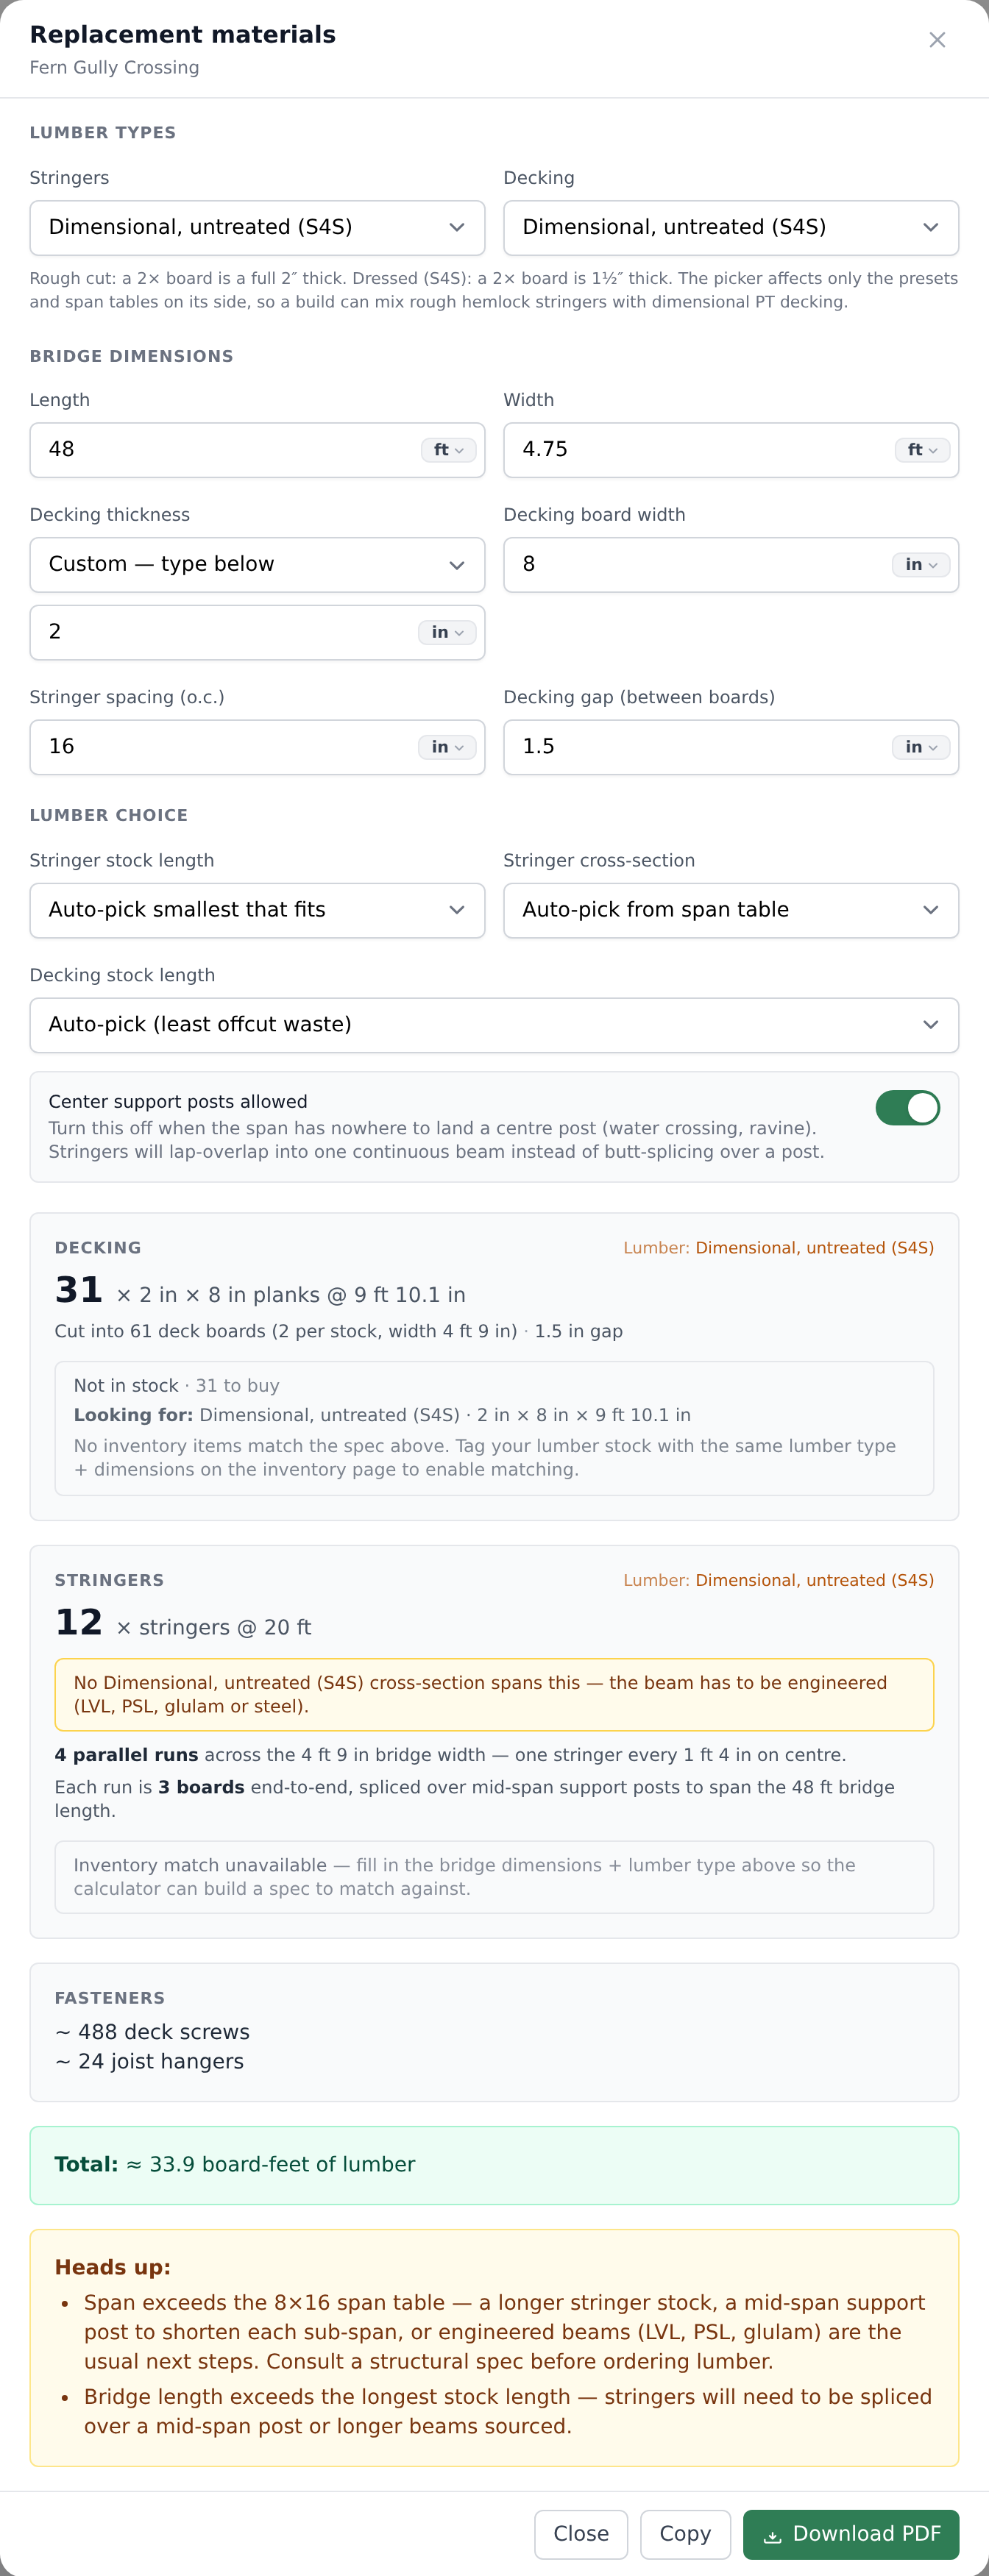
Once a span is longer than the biggest beam in the span table, the calculator stops sizing stringers and says so.
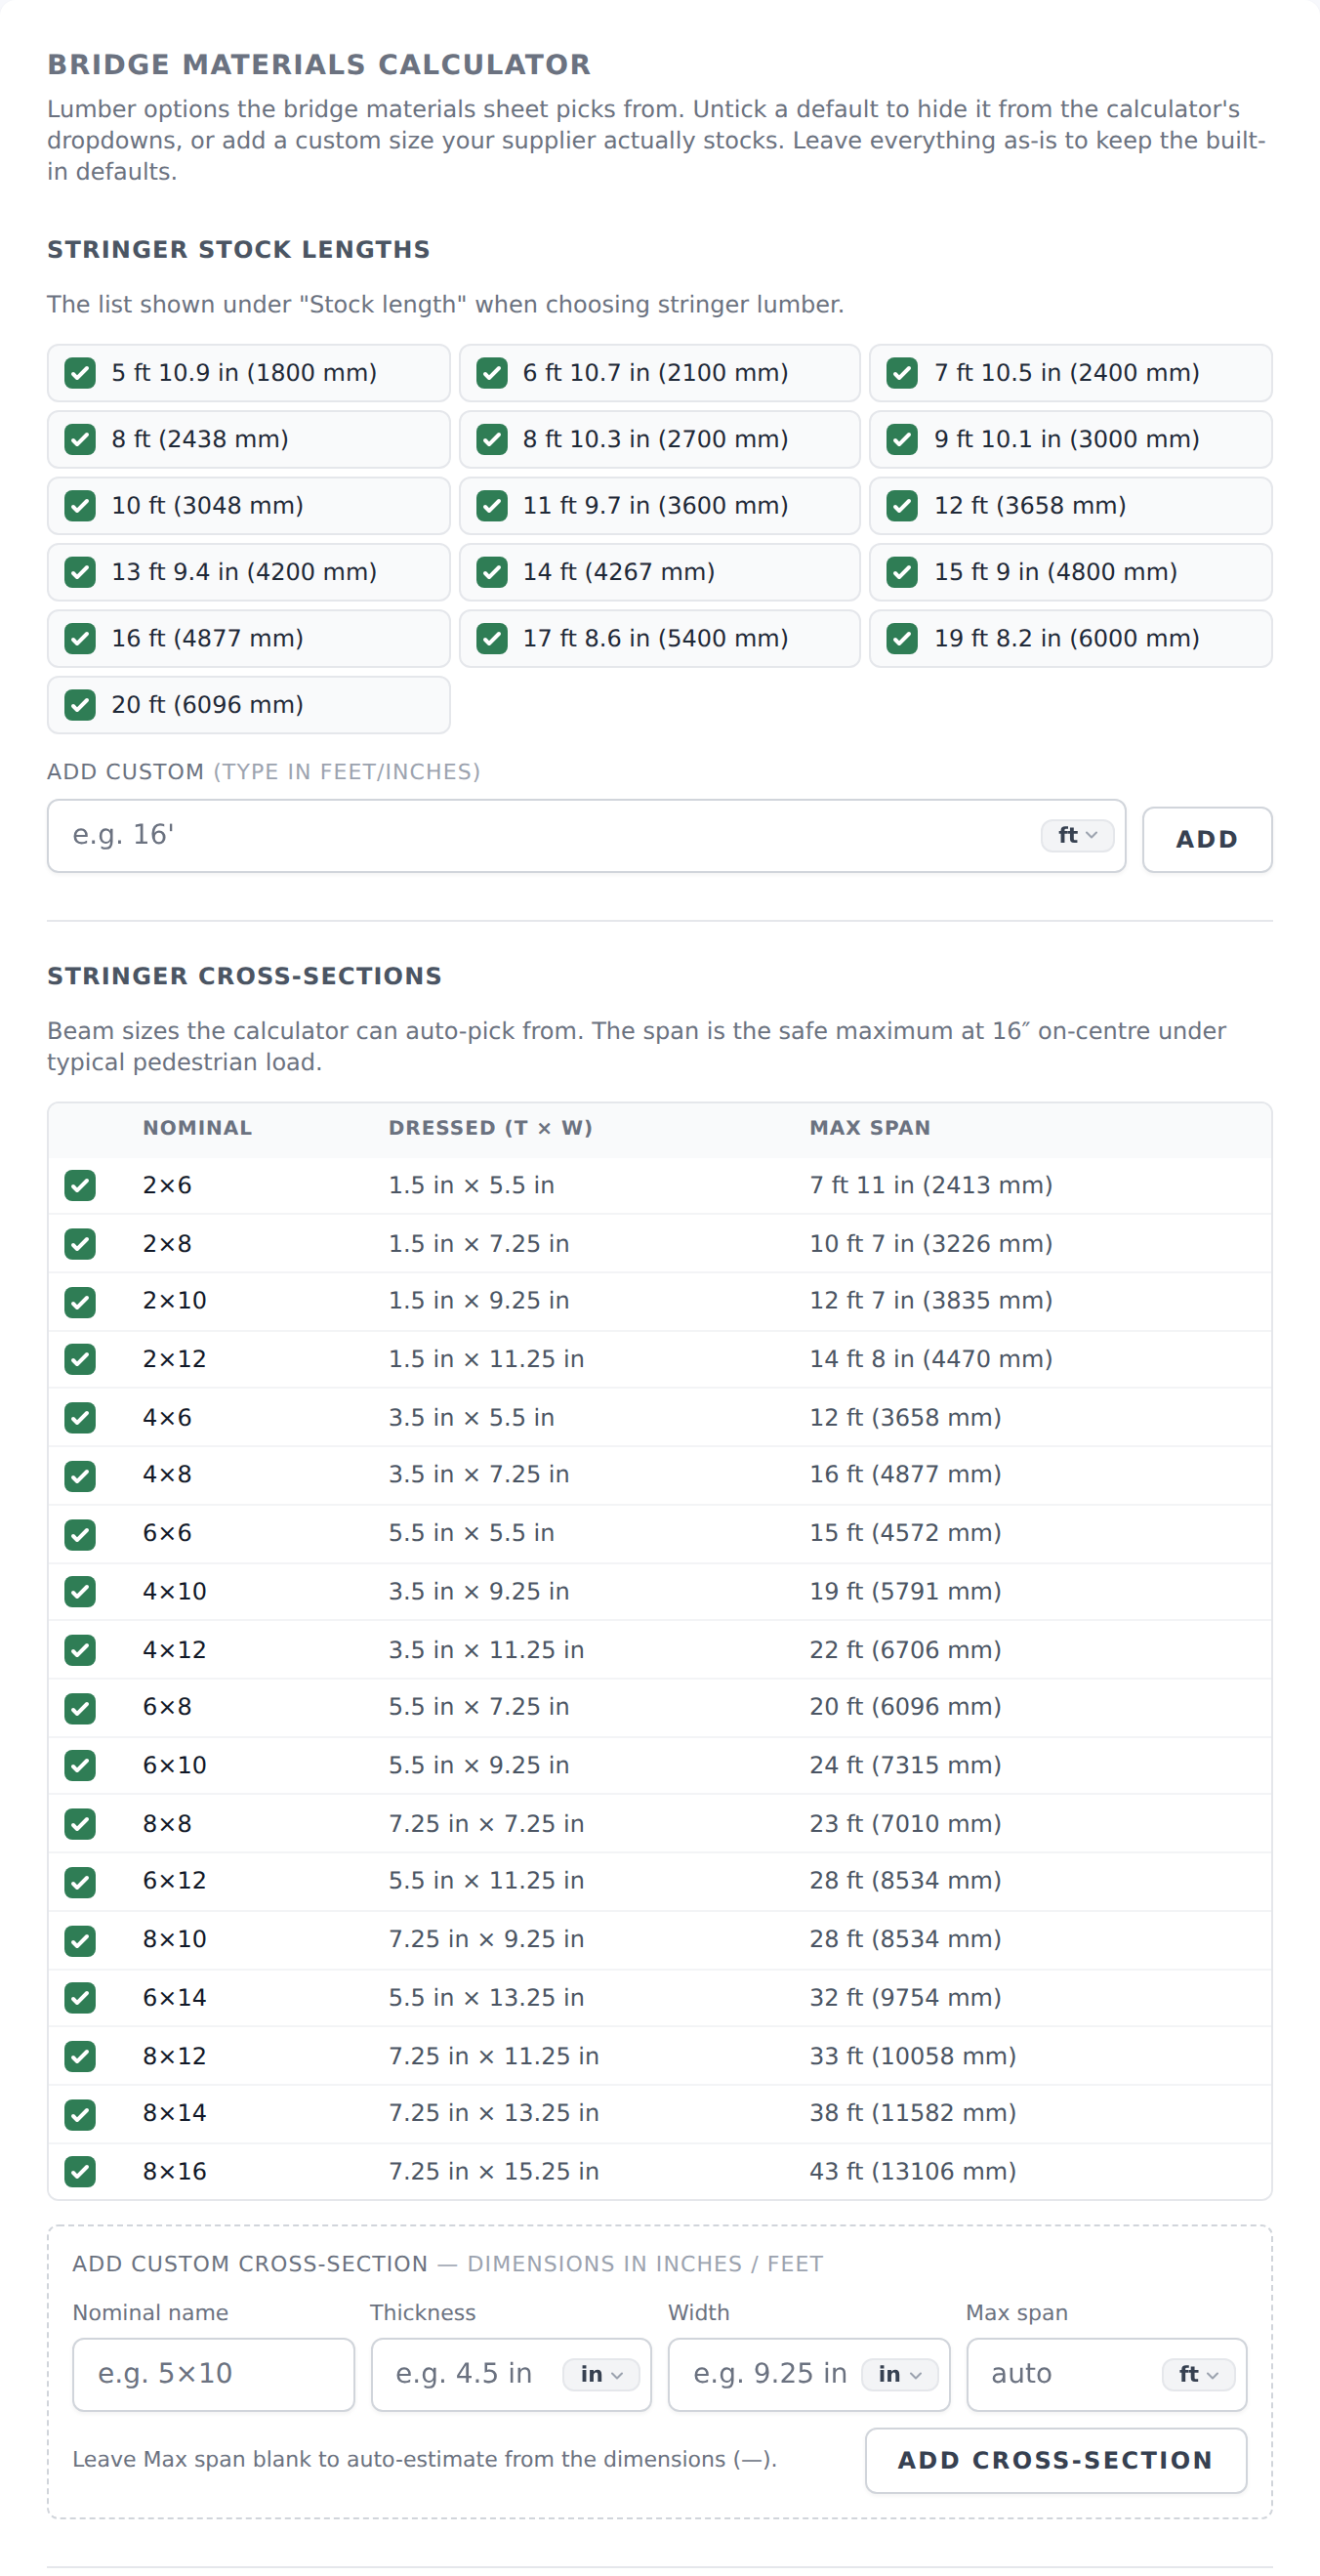
With the standard dressed lumber list that happens at about 43 feet / 13.1 meters — the point where an 8×16 runs out. Rough-cut stock is stronger for the same nominal size, so its table reaches further. The warning names the size it ran out at, so you do not have to remember either figure.
That is the honest limit rather than a missing feature. Past it you are into engineered beams — LVL, PSL, glulam, steel — and picking one from four dimensions would be guessing at something with a load rating on it. It will still give you the deck, the layout and the fastener numbers; the beam spec has to come from an engineer.
Well before that hard stop you will meet a softer one. When the span is longer than the longest stock length you have set, the calculator keeps sizing the beam but flags that each run has to be joined. That is a note about how the bridge gets built, not a refusal — but every one of these joints is a structural detail, so it belongs in the same conversation as the beam itself.
How a run gets joined
When the boards are shorter than the span, something has to carry the run across the gap between them. There are three ways, and the calculator picks by measuring, not by preference.
With the Center support posts switch on, each run is butted end to end over a post and every piece lands on something solid. That is the simplest answer whenever the ground allows a footing.
Switch the posts off — over water, over a ravine — and the run has to carry its own joints. Now the board length decides:
- Long enough boards lap. Lay two boards past each other far enough and the overlap is the joint: bolt through it and you are finished. Nothing is cut and nothing is added. A 20 ft span on 16 ft boards lands here exactly — each board reaches 6 ft past the middle, and the run is two boards.
- Shorter boards butt, and a scab carries the joint. The same 20 ft span on 12 ft boards can only lap by 2 ft, which is not enough, so the boards are cut to 10 ft and meet end on with a scab bolted across the joint. The scab is the only thing crossing that line, which is why it gets a length of its own rather than a piece count.
When one bridge crosses two kinds of ground
A long crossing is often not one problem. The middle is over water, so there is nowhere to put a footing; the approaches are over dry bank, where a post is easy. The Center support posts switch is one answer for the whole structure, and a bridge like that has two.
Split it instead. Split into another span divides the bridge into stretches, and each stretch carries its own answer about posts — so the water stretch has to carry its own joints while the bank stretches are free to butt over a post.
Three things follow from that, and the second is the reason to bother:
- The spans divide the length; they do not replace it. The bridge is as long as the structure record says, so the last span is whatever is left over and is shown rather than typed. Change the bridge's length and the spans re-divide it.
- Where two spans meet, something carries the line. That is what makes them two spans rather than one: an abutment, a pier, a sill. The drawing marks the change of ground with a dashed line and puts a bearing on it, and every run breaks there — so the piece count goes up by one per run at each boundary, which the cut list already prices. The Center support posts answer on a span is about posts inside that stretch, not about its ends.
- The stringer size is set by the longest span, not by the bridge. This is the whole point of saying where the ground is. A 38 ft crossing sized as one clear span wants a very heavy beam, or falls off the span table entirely; the same crossing as a 24 ft water span and a 14 ft bank span is sized for the 24 ft. If you cannot say where the supports are, do not split it — an unsupported span you have described as supported is a bridge sized for a load path it does not have.
- Every span gets the same size. Mixed depths put the tops of the stringers at different heights, so the deck would step at each change unless every bearing were shimmed to match.
- The stock length is the other way round: on Auto each stretch gets its own. A 12 / 16 / 10 ft crossing buys three 12 ft boards, three 16 ft and three 10 ft, and cuts nothing to waste. Pin a stringer stock length and every stretch uses it — the same crossing on a pinned 16 ft buys nine 16 ft boards and cuts six of them down, which is 30 ft of offcut. Pin one when that is genuinely all your yard carries; otherwise leave the row on Auto, where it reads one per span.
Short end pieces are shared between the spans. Three 13 ft stretches on 12 ft boards leave a 1 ft end per run — nine of them, and a 6 ft board holds six, so the bridge buys two short boards rather than the three it would if each stretch were planned on its own. Ends of different lengths still get their own board: working out which odd lengths could share one is a packing problem, and the calculator does not pretend to have solved it.
Set the joint reach to what your own detail calls for. It is one number — how far a lap or a scab has to extend past the joint on each side — and it decides both which arrangement you get and how long the scab is. The default suits ordinary trail-bridge timber; a longer reach is a heavier joint.
More generally: this is a materials estimator, not a structural design. It does not know your species or grade of timber, your live-load requirement, your snow load, your abutment condition, or whether the bridge carries a machine. Anything load-bearing that people cross needs somebody qualified signing it off. Use this to plan the shopping and the budget, and to have a sensible conversation with whoever does the design.
The plans
Plans is the third tab, beside Setup and Materials. It is the same bridge drawn: what it looks like from above, from the side, and cut through the deck, with the dimensions on the drawings rather than in a list beside them.
Nothing on it is a separate answer. Every line comes from the same setup the materials list comes from, so changing the deck width or splitting the crossing changes the drawings in the same press.
Opening one full screen
Tap the magnifier on any figure — or on the plan over on Setup — and it fills the screen, where it can be pinched to zoom and dragged to pan — the buttons step the same zoom for when one hand is full. A wide drawing is turned a quarter so it uses the whole of a phone held upright — the button beside the zoom turns it back if you would rather have it the other way.
Share or save hands any of the three figures to your phone as a picture: the usual share sheet, so it can go into a message, an email, or your camera roll. It is a real image of that drawing at the size it was drawn, not a screenshot of your phone.
What each figure tells you
- The plan view is the deck from above, with the stringer runs under it and a mark on each run wherever its boards butt. Every place the crossing is carried — the two abutments and each span boundary — is drawn as the sill under the deck. The key under the drawing names every mark on it.
- The side elevation carries two rows of measurements and they answer different questions. The lower row is the spans — where the bridge is carried. The upper row is the boards, per run, which is where the timber stops and starts. On a crossing split into a 2 m and a 4 m stretch cut from 3 m boards those are 2.00 and 4.00 against 2.00, 3.00 and 1.00, and the second list is the one you cut from.
- The section is cut somewhere there is deck to cut: inside the first bay rather than at the middle of the bridge, because on a crossing split into two the middle is a bearing, and a section through a bearing shows you a support instead of the deck.
A boundary is carried AND broken
Where two spans meet, both things are true at once and the drawings show both: something carries the line there, and every stringer run stops and starts. So a span boundary gets the bearing mark and a joint mark on each run.
Both drawings mark it the same way, and they are worth reading together: a bar across the deck wherever the bridge stands on something — the two abutments, every span boundary, every mid-span post — with a small mark on each run wherever that run breaks. A split carried by a bearing and a split carried by a post look alike because they are alike; what differs is named in the sentence under the picture, not left for you to infer from two different-looking marks.
A joint away from a boundary is different again. It stands on a mid-span post only when that stretch allows one — a stretch crossing water is butted and scabbed precisely because there is nowhere to land a footing, so no post is drawn under it and the note does not claim one. What is drawn there instead is the scab, on the plan and on the elevation, reaching past the joint on both sides: it is the only member crossing that line, so a drawing with the break and not the plate would be a picture of a beam with a gap in it. On the plan it is drawn alongside the run rather than over it, because that is where it is bolted — one plate down one side for a single-face scab, one either side for a double — and drawing it on top would hide the run and the overlap in one stroke.
The Setup drawing counts supports rather than bearings for the same reason. The two abutments, every span boundary and every mid-span post are all places the structure lands, and the sentence under the picture names which is which — so a crossing of a 2 m and a 4 m stretch on 3 m boards reads carried at both abutments, the span boundary and 1 mid-span post, over 3 boards per run — 1 joint butted over a mid-span post, and 1 break landing on a bearing where the ground changes. A break at a boundary needs no detail from you; the bearing under it is the detail.
Deck height above the bed
Deck height above the bed — on Setup, or under Structure on the dashboard — is measured from the walking surface straight down to the ground or the water. Fill it in and the side elevation draws the bed and gives the bearings a real length; leave it blank and the elevation marks where the bridge is carried and stops there, because drawing a four-foot post under a bridge that in fact sits on bedrock would be a picture of a different bridge.
It buys nothing. No board, no fastener, no stringer size reads it, and the materials list does not move when you change it. It is a fact about the crossing that only the drawings use.
A height that does not clear the deck and the beam under it is refused rather than drawn, since that describes a bridge buried in its own bed.
Both this and each span's length open the same panel every other measurement on Setup uses, so either can be entered in whatever unit you have a tape for — feet and inches, or meters — whichever your team normally reads.
The scale is a bar, not a ratio
The drawings are on a screen and go to whatever paper you print them on, so a printed 1:50 would be a promise nobody can keep. The bar under the figures is a real length you can hold a tape against at whatever size it ends up.
They are still an estimate. The drawings are generated from your numbers, not designed by anyone, and the same line that applies to the materials list applies here: anything load-bearing that people cross needs somebody qualified signing it off.
Cutting and offcuts
The materials list ends with what you cut from what, one line per kind of board you carry to the saw.
What is left over is the big figure on each line, and it is given as pieces — 3 × 1.00 m, not 3.00 m. Three meter-long ends and one three-meter one are the same quantity and are not the same pile: the first is timber you can use on the next job and the second is a board. The total sits under it in small type as Total: 3.00 m, and a line that leaves nothing says none.
Beside that, also in small type, is what you bought and what comes out of each board — a line reading used whole is a board that goes in as it comes, and one reading cut to 10 ft is one you will be trimming.
The piece lengths are not all the same on every line, and that is the point. Where a line's boards are cut alike they each leave the same end. Where they are not, the last board is only part used and leaves a longer one: sixteen planks cut two deck boards apiece cover thirty-one boards, and the sixteenth gives up one and keeps the other. That half-plank shows as its own piece rather than being averaged into the rest.
The figure at the top of the section is every line added together, so it and the lines cannot tell you two different things — and each line's pieces add up to its own total for the same reason.
The same rows are on the PDF, so whoever is at the yard and whoever is at the saw are reading the same list.
Setting your stock lengths
Settings → Bridge materials calculator holds the stock lengths and stringer cross-sections the calculator is allowed to choose from.
Set these to what your supplier actually stocks. The default list is a reasonable general set, but a calculator that recommends a length nobody near you sells produces a materials list you cannot buy — and the substitution then happens in the yard, unrecorded.
Common gotchas
-
Rubbish dimensions in, rubbish list out. The calculator is only as good as the four numbers on the structure record. Measure the bridge, do not eyeball it from a photo.
-
It is not an engineered design. For anything spanning far, carrying a machine, or crossing water people could fall into, get it designed.
-
Long spans intentionally return no stringer size. That warning is the answer, not a failure.
-
A splice warning is not the same as a refusal. "Spliced over mid-span support posts" means the calculator sized the beam and is telling you it will not arrive in one piece. Check that a center post can actually land there — over water or a ravine, often it cannot, and the Center support posts switch tells the calculator so.
-
Count boards, not stringers. Three stringers on a span that needs two boards each is six boards, and a butted run needs a scab over every joint on top of that. The quantity is what you buy; the drawing shows the runs. They are different numbers on purpose and the card says how it got from one to the other.
-
A scab is cut, not bought whole. Its length is set by how far it has to reach past the joint, so the list gives you a cut length and the number of boards those cuts come out of — which is usually fewer boards than scabs.
-
A span a few millimeters past a whole number of boards is told to shorten. The last piece of a run is whatever is left over, and when that leftover is shorter than the beam is deep it is not a piece of beam — it is a block, and buying a board to cut three of them off is not a list anybody would follow. The calculator says how far past you are and what shortening the bridge by that much would save. It does not change the order on your behalf: the length on the record is the bridge you said you were building, and the board disappears on its own once you change it.
-
Fastener counts are approximate. Buy round numbers and expect leftovers.
-
The last piece of a run is not a whole board. A span is rarely a whole number of boards, so the final piece is whatever is left — and the list buys it as the shortest board it fits in, with every run's short piece cut from the same board where they fit. A 38 ft bridge on 12 ft boards is three runs of four pieces — three 12 ft boards and a 2 ft tail each — and the three tails come off one 6 ft board, so it buys ten boards rather than twelve. Pieces and boards are different numbers on a spliced run, and the headline counts boards, because that is the one you take to a supplier.
-
An estimate for a bridge exactly as long as a board may have changed. A span that matched one of your stock lengths to the foot — an 8 ft bridge on 8 ft boards, a 14 ft deck on 14 ft boards — used to step up to the next length, and on a pinned length it said the run needed splicing over mid-span posts. It now buys the length the bridge is. If you saved or printed a materials list for one of those, re-open the calculator and take a fresh one: it will be a rung shorter and the post note will be gone.
-
Set your stock lengths first, or the list will be right in principle and unbuyable in practice.
-
A length you already hold breaks a tie, and only a tie. The calculator reads your lumber inventory for the section it is about to buy, and where two stock lengths cut the board equally well it plans around the one on your shelf. It will not spend timber to use the yard up: a length that wastes more, or that needs a joint in a board somebody walks on, still loses. One thing it cannot see is the last plank of the order — 40 boards is exactly twenty 8 ft planks but thirteen and a third 12 ft ones, so the 12 ft order rounds up and the last plank carries a couple of spares.
-
A longer board can stand in, and the card says when one is. The stock check accepts any board long enough, so eleven 12 ft planks can answer a line written in 8 ft. They are not eleven of what the line asks for — cut for a 4 ft deck each gives three boards rather than two — so the card names the length it found and how far it goes, rather than folding it into the count.
-
Decking thickness matters more than people expect. It drives both the stringer spacing you can get away with and the deck weight the stringers carry.
-
A size marked auto is still a real size. Those rows show what the calculator picked from the span table and the stock list — the tag says where the number came from, not that it is waiting for one. Pin your own on Override the details when you are building from what is already in the yard.