Trails
How to create a trail
Three ways to add a trail to TrailsIQ — import a GPX / KML / GeoJSON file, plan one from the dashboard, or record it in the field — plus a full reference to every setting on the trail edit page.
There are three ways to add a trail to TrailsIQ, and every one of them lands on the same detail page where you can tune the trail's settings:
- Import a GPX, KML, or GeoJSON file you already have.
- Plan a line on the map from the dashboard planner.
- Record the line in the field by walking or riding it with the mobile app.
This article walks through all three flows, then covers every setting on a trail and how to change it later.
Method 1 — Import from a file
Import is the fastest path when you already have GPS tracks from another tool (Strava, Trailforks export, a survey app, or a hand-drawn route in Google Earth). It accepts up to 25 files at once and each can be up to 20 MB.
Where to start
Open the Trails tab from the sidebar. In the top right you'll see the Import trails button (managers only — if you don't see it, ask an owner to bump your role).
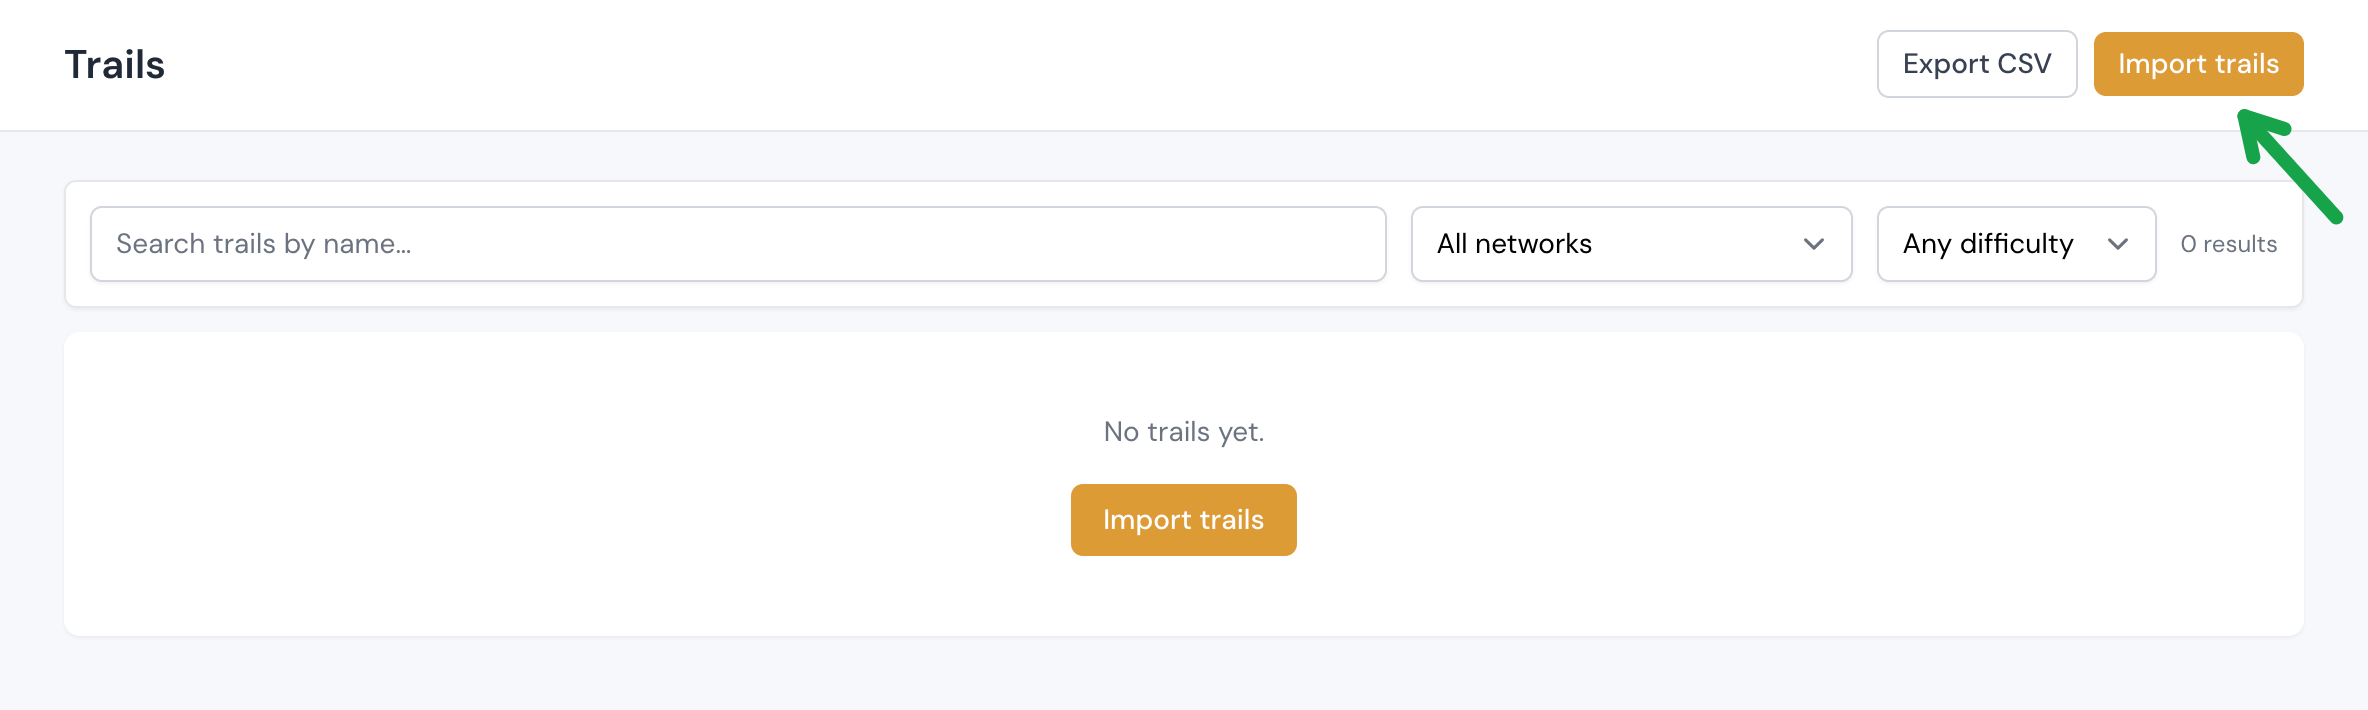
Drop or browse for files
The import page has a drop zone that accepts .gpx, .kml, and .geojson / .json files. Drag them onto the zone or use Browse from your computer to pick them.
- Each file's
<name>element (or track name for GeoJSON) becomes the trail's name. You can rename any of them later on the trail's edit page. - Files with multiple tracks split into one trail per track, so a multi-track GPX from a bike computer imports as several trails in one shot.
Set the per-file defaults
Before you hit import, you can pick a few defaults that apply to every file in the batch. Any of them can be changed per-trail later — this is just so you don't have to open every trail and set the same values by hand.
- Difficulty — Easy, Moderate, Hard, Expert, plus Access (a service road or beginner connector) and Pro (double-black).
- Status — Public (visible on the map to everyone) or Hidden (staff only). Draft imports usually start Hidden.
- Access — Inherit from network, Public, Private, or Pass required.
- Lifecycle — Open, Planned, Under construction, Closed, or Decommissioned.
- Primary use — mixed, hiking, mtb, gravel, running, equestrian, nordic, alpine, snowshoe, fatbike, ATV, snowmobile, or walking. This matters — it changes which difficulty icon set is drawn on the map (see the settings reference below).
- Add to networks — chip-toggle any of your existing networks to auto-attach each imported trail to them.
- Description — a shared description applied to every file in the batch. Blank means "leave the description empty".
What happens after you upload
- The parser reads each track, computes distance / elevation gain / loss / grade, and (if terrain resampling is on) resamples elevations against your organization's DEM provider so the up and down profiles agree.
- Everything runs inside a database transaction. If one file's geometry is unusable (empty track, corrupted GPX) the batch keeps going; the failure is surfaced on the results screen alongside the successful imports.
- A single-file import redirects you straight to the new trail's detail page. A batch import redirects to the Trails index with a "X trails imported" toast.
Method 2 — Plan a trail on the dashboard
If you don't have a track yet — you're designing a new alignment, planning a reroute, or scouting from an aerial — use the dashboard planner. There are two flows:
Suggest a sustainable line (A* search)
Open Trails → Plan trail → Suggest sustainable line (or hit the badge marked Experimental on the planner overview). The suggester runs an A* search over a coarse DEM grid with the IMBA half-rule penalty baked in — it prefers contour-following benches over fall-line shortcuts, avoids stream crossings, and routes around wetlands, ponds, and small lakes where NWI / NHD data is available. Wetland avoidance scales with recent rainfall — a soaked marsh weighs more than a dry-summer marsh, computed from the same weather observations that drive the wetness dashboard.
Beyond the start + end pins, you can drop up to six waypoints the line must pass through (tap + Waypoint then click the map — the pin gets a number, click × on the chip to remove). Waypoints let you force the alignment through a shared bridge, an existing trail junction, or a must-hit vista, chaining one A* leg per pair.
Enable Avoid trail crossings to penalise routes that would cross other trails in your org — useful when the goal is a standalone loop rather than a network junction. The result panel adds an Existing-trail crossings box counting any remaining crossings (T-numbered dots on the map) so you can see the trade-off the finder made.
- Tap the map to set a start point (green marker).
- Tap again to set an end point (red marker).
- Press Find sustainable line.
The suggester caps at roughly 1.5 km between points to keep the search inside a synchronous web request. For a longer trail, chain multiple search legs using the Next leg from here → button after each save — the app splices them into a single draft.
When you're happy with the result, hit Save as planner draft. This saves it as a planner draft — not a trail yet.
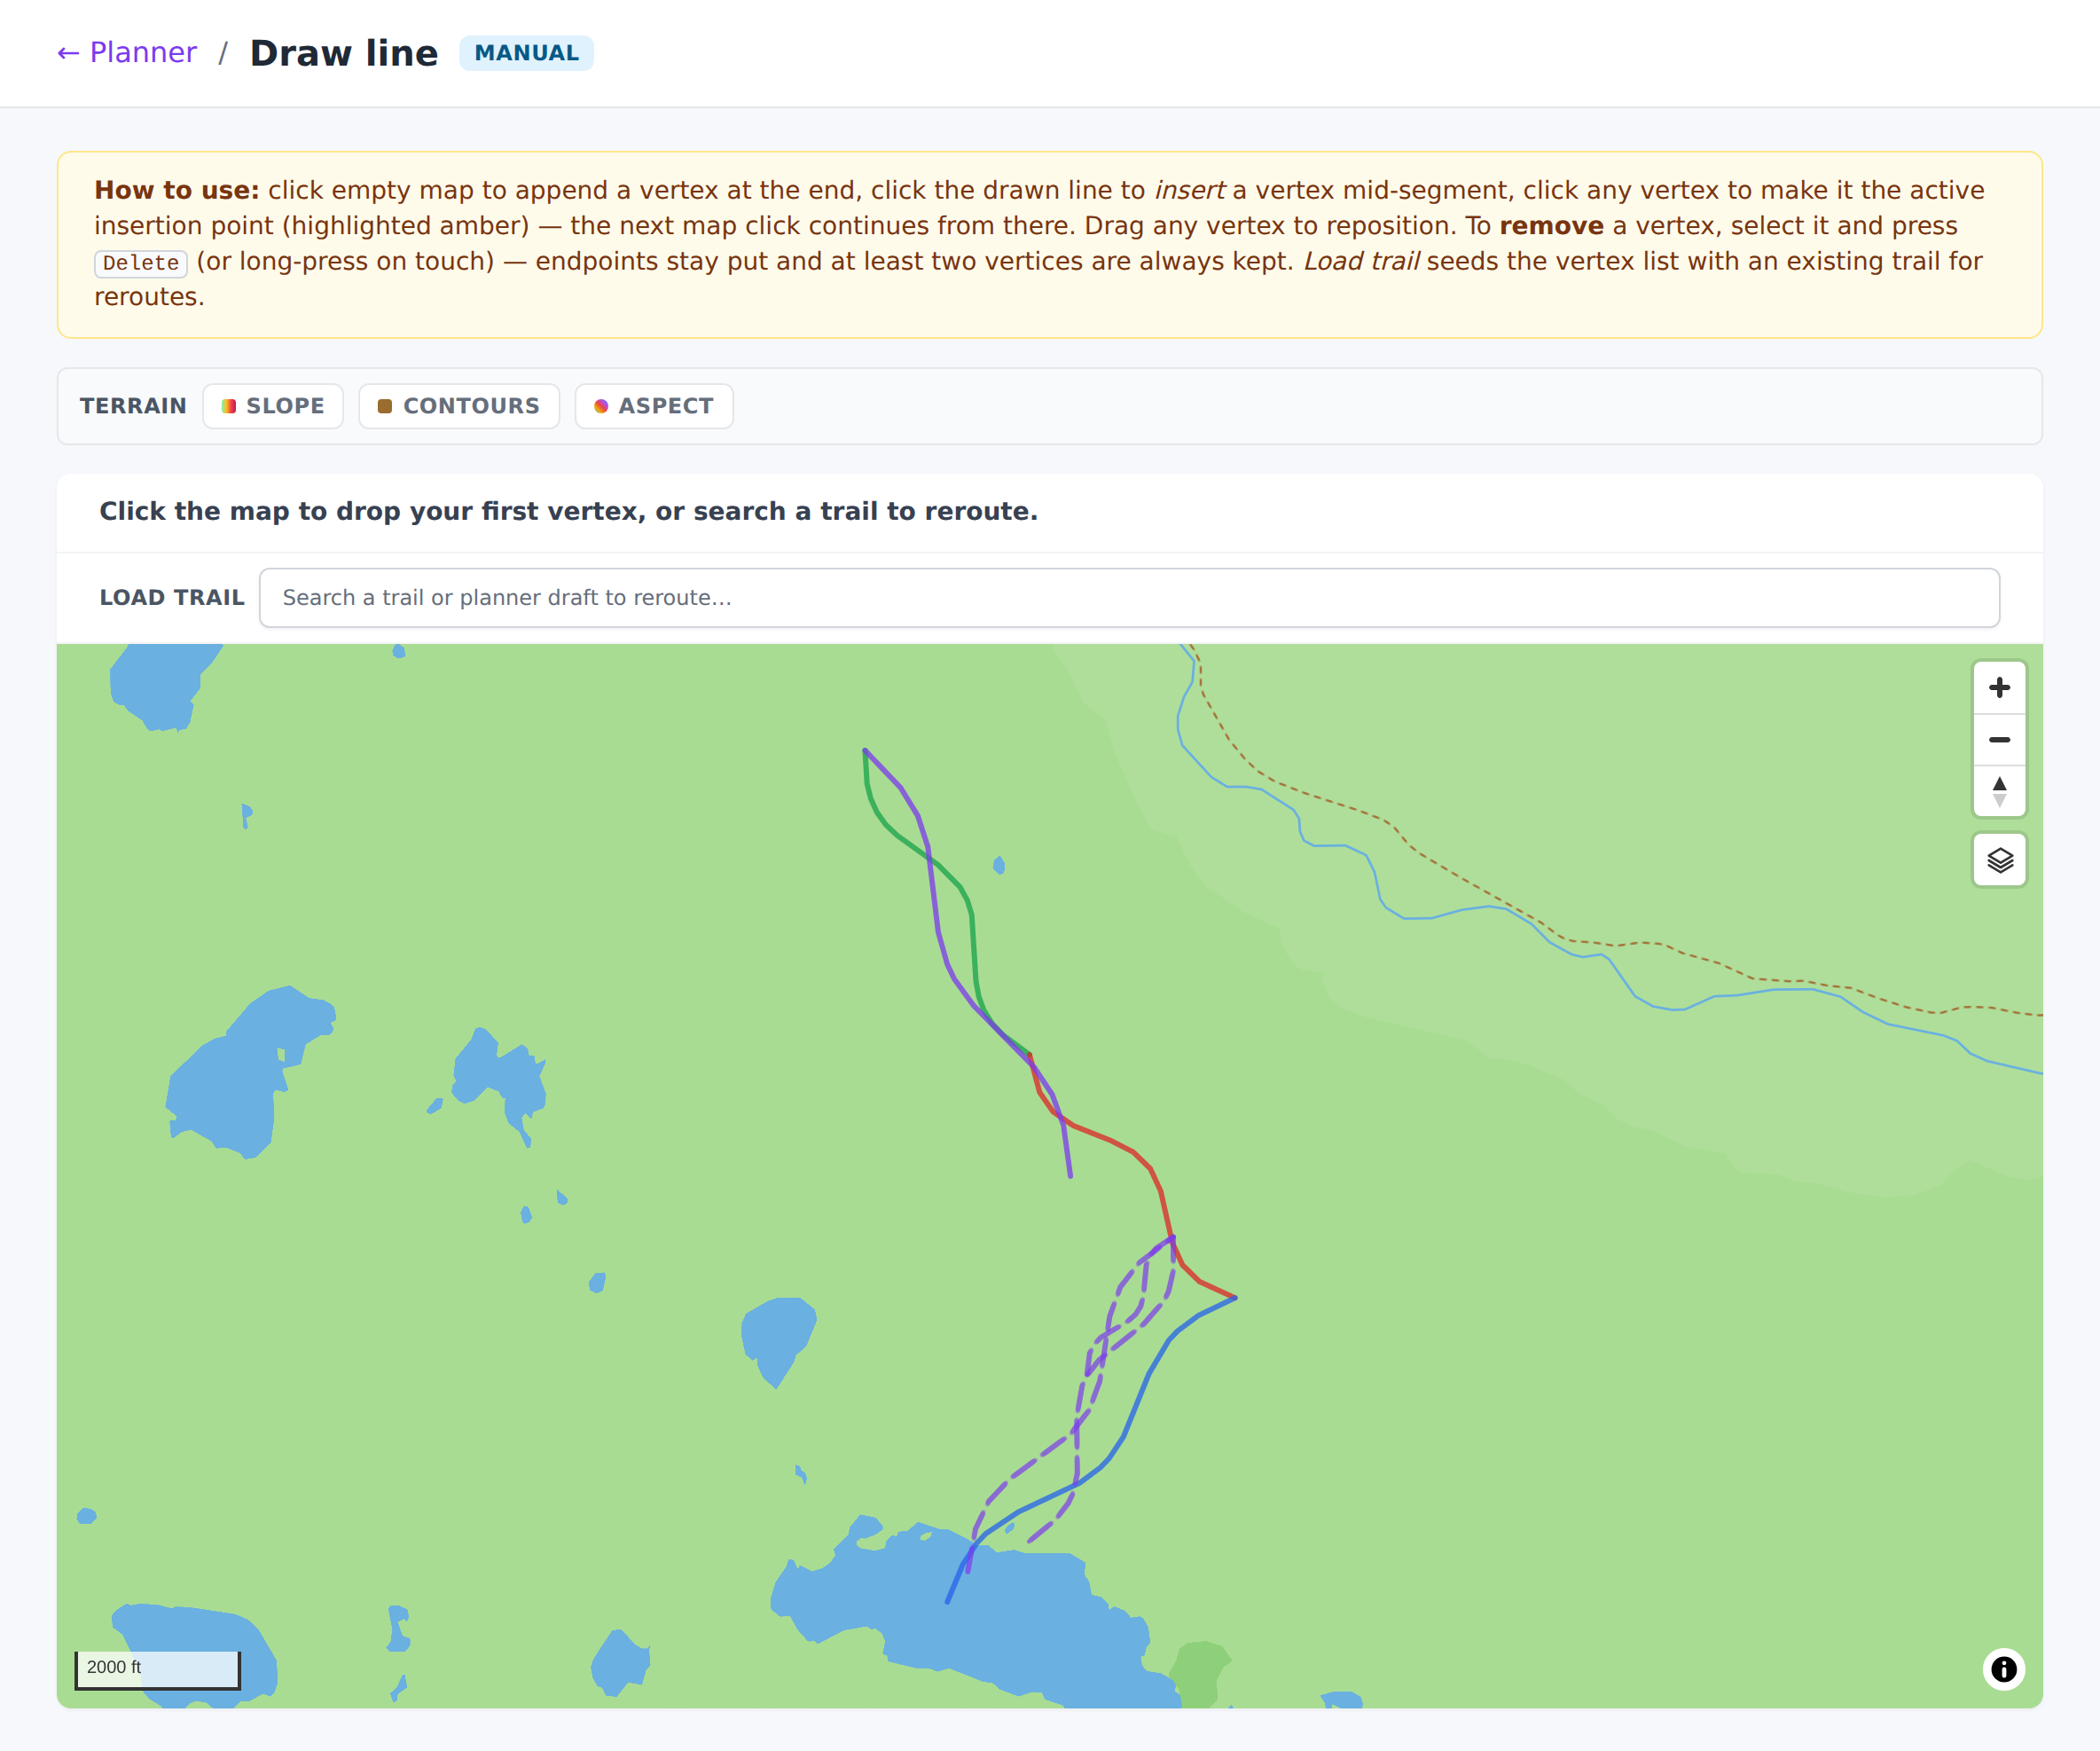
Draw a line by hand
If the terrain data isn't good enough for the suggester (dense forest, custom-cut features, an existing alignment you're re-tracing), use Draw line instead.
- Click on the map to drop vertices; each click adds a straight segment to the previous point.
- Use Load trail to seed the draw canvas with an existing trail or draft's polyline — handy for planning a reroute that stays close to the original.
- No DEM smoothing or sustainability check happens on this path — what you draw is what gets saved.
- Hit Save as planner draft when the line looks right. Same result as the suggester: a planner draft that you promote to a trail below.
Promote a planner draft to a real trail
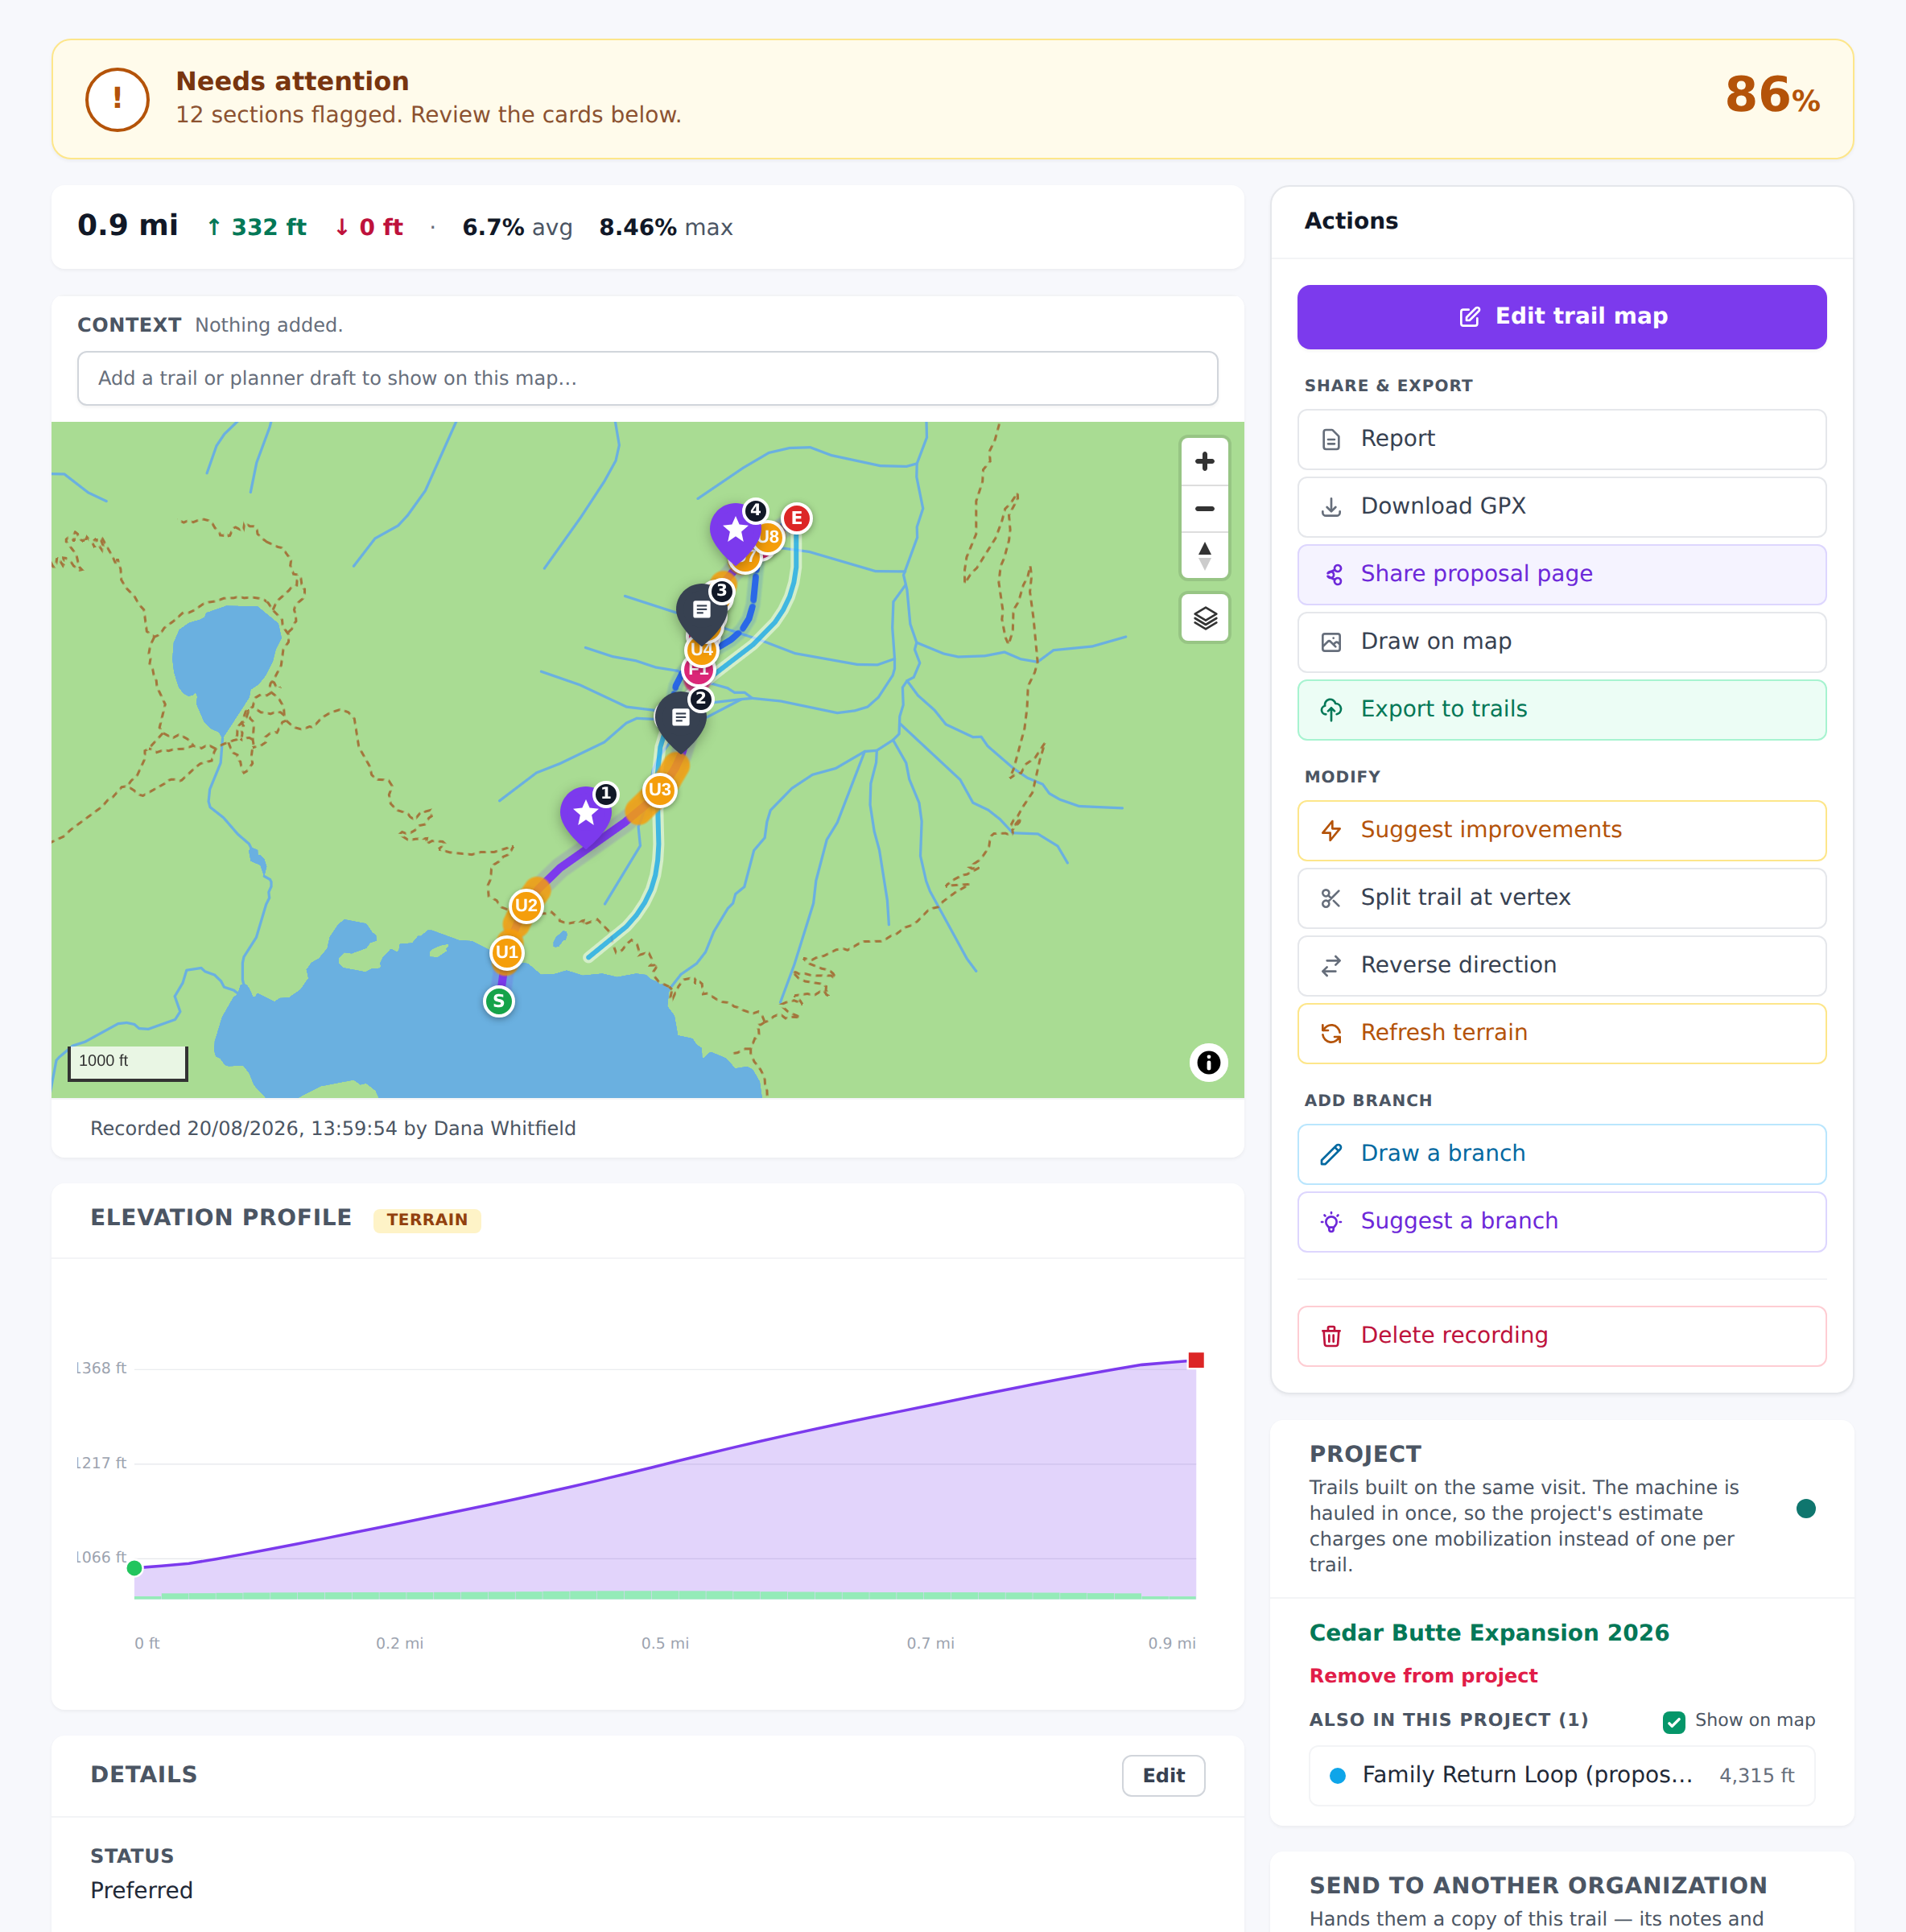
Open the planner recording from the Planner tab. In the actions row at the bottom of the detail card you'll see Export to trails (green button with a right chevron). Clicking it:
- Creates a real trail from the recording's line, elevations, and stats.
- Materialises any waypoints you attached (feature notes → structures or POIs).
- Redirects you to the freshly-created trail's detail page.
A green banner appears on the planner recording afterwards saying Already exported. Published to the trails tab on {date}. with an Open trail → link, so you can always jump back to the trail from the draft.
Method 3 — Record a trail in the field
The mobile field app is the best tool when the trail is on the ground and you're on it — the GPS trace is more accurate than any desktop guess and you can add photos and waypoints in the same walk.
Open the recorder
From the field-app home screen, tap Plan / Record Trail. If you don't see it, an owner needs to enable the planner for your organization.
The planner overlay has three sticky buttons at the bottom:
- Record — walk / ride the line, GPS captures every point.
- Suggest — the same A* sustainable-line search as the desktop, but with the map already centered on your GPS fix.
- Draw — tap-to-add-vertex drawing, useful when you know the alignment but can't walk it.
Warmup phase
The recorder always starts in a warmup screen. It shows a live GPS accuracy dial and copy that reads "Walk to the start of your line. Tracking begins when you press the button."
The Start tracking button stays disabled until your GPS accuracy is inside 20 meters. That is the same reading a fix has to beat to become a point on the line, so the button unlocks exactly when the recorder could start capturing — and it prevents a garbage first fix from anchoring the trail's start in the wrong place, which matters because the first point is the spot you are standing on when you press it. Give the phone 30–60 seconds under the open sky if the button won't unlock.
Recording phase
Once you tap Start tracking, the HUD switches to a live map view with three stat tiles: Distance, Points, and Accuracy. Two buttons are available:
- Pause — stops sampling without ending the recording. Great when you stop for lunch or scout a side branch on foot.
- Stop — ends the recording and moves to the review screen.
While recording you can also tap Drop note to add a waypoint at your current position. Notes can be a feature (bridge, kiosk, hazard) or a plain descriptive marker; both save the current lat/lng and can carry photos.
Review + save
Stopping opens the review screen. Give the recording a name (the placeholder is "e.g. North Loop · Option A") and hit Save recording. Or hit Discard to throw it away.
- A save with no signal joins the sync queue and goes up on its own when the phone finds a connection again.
- Saving twice — a tap you were not sure landed, a retry after a slow moment — files one recording, not two.
- A recording is a planned line, exactly like one drawn on the dashboard planner, so the same Export to trails button on its detail view publishes it. That works from either the field app or the desktop.
Trail settings — every field explained
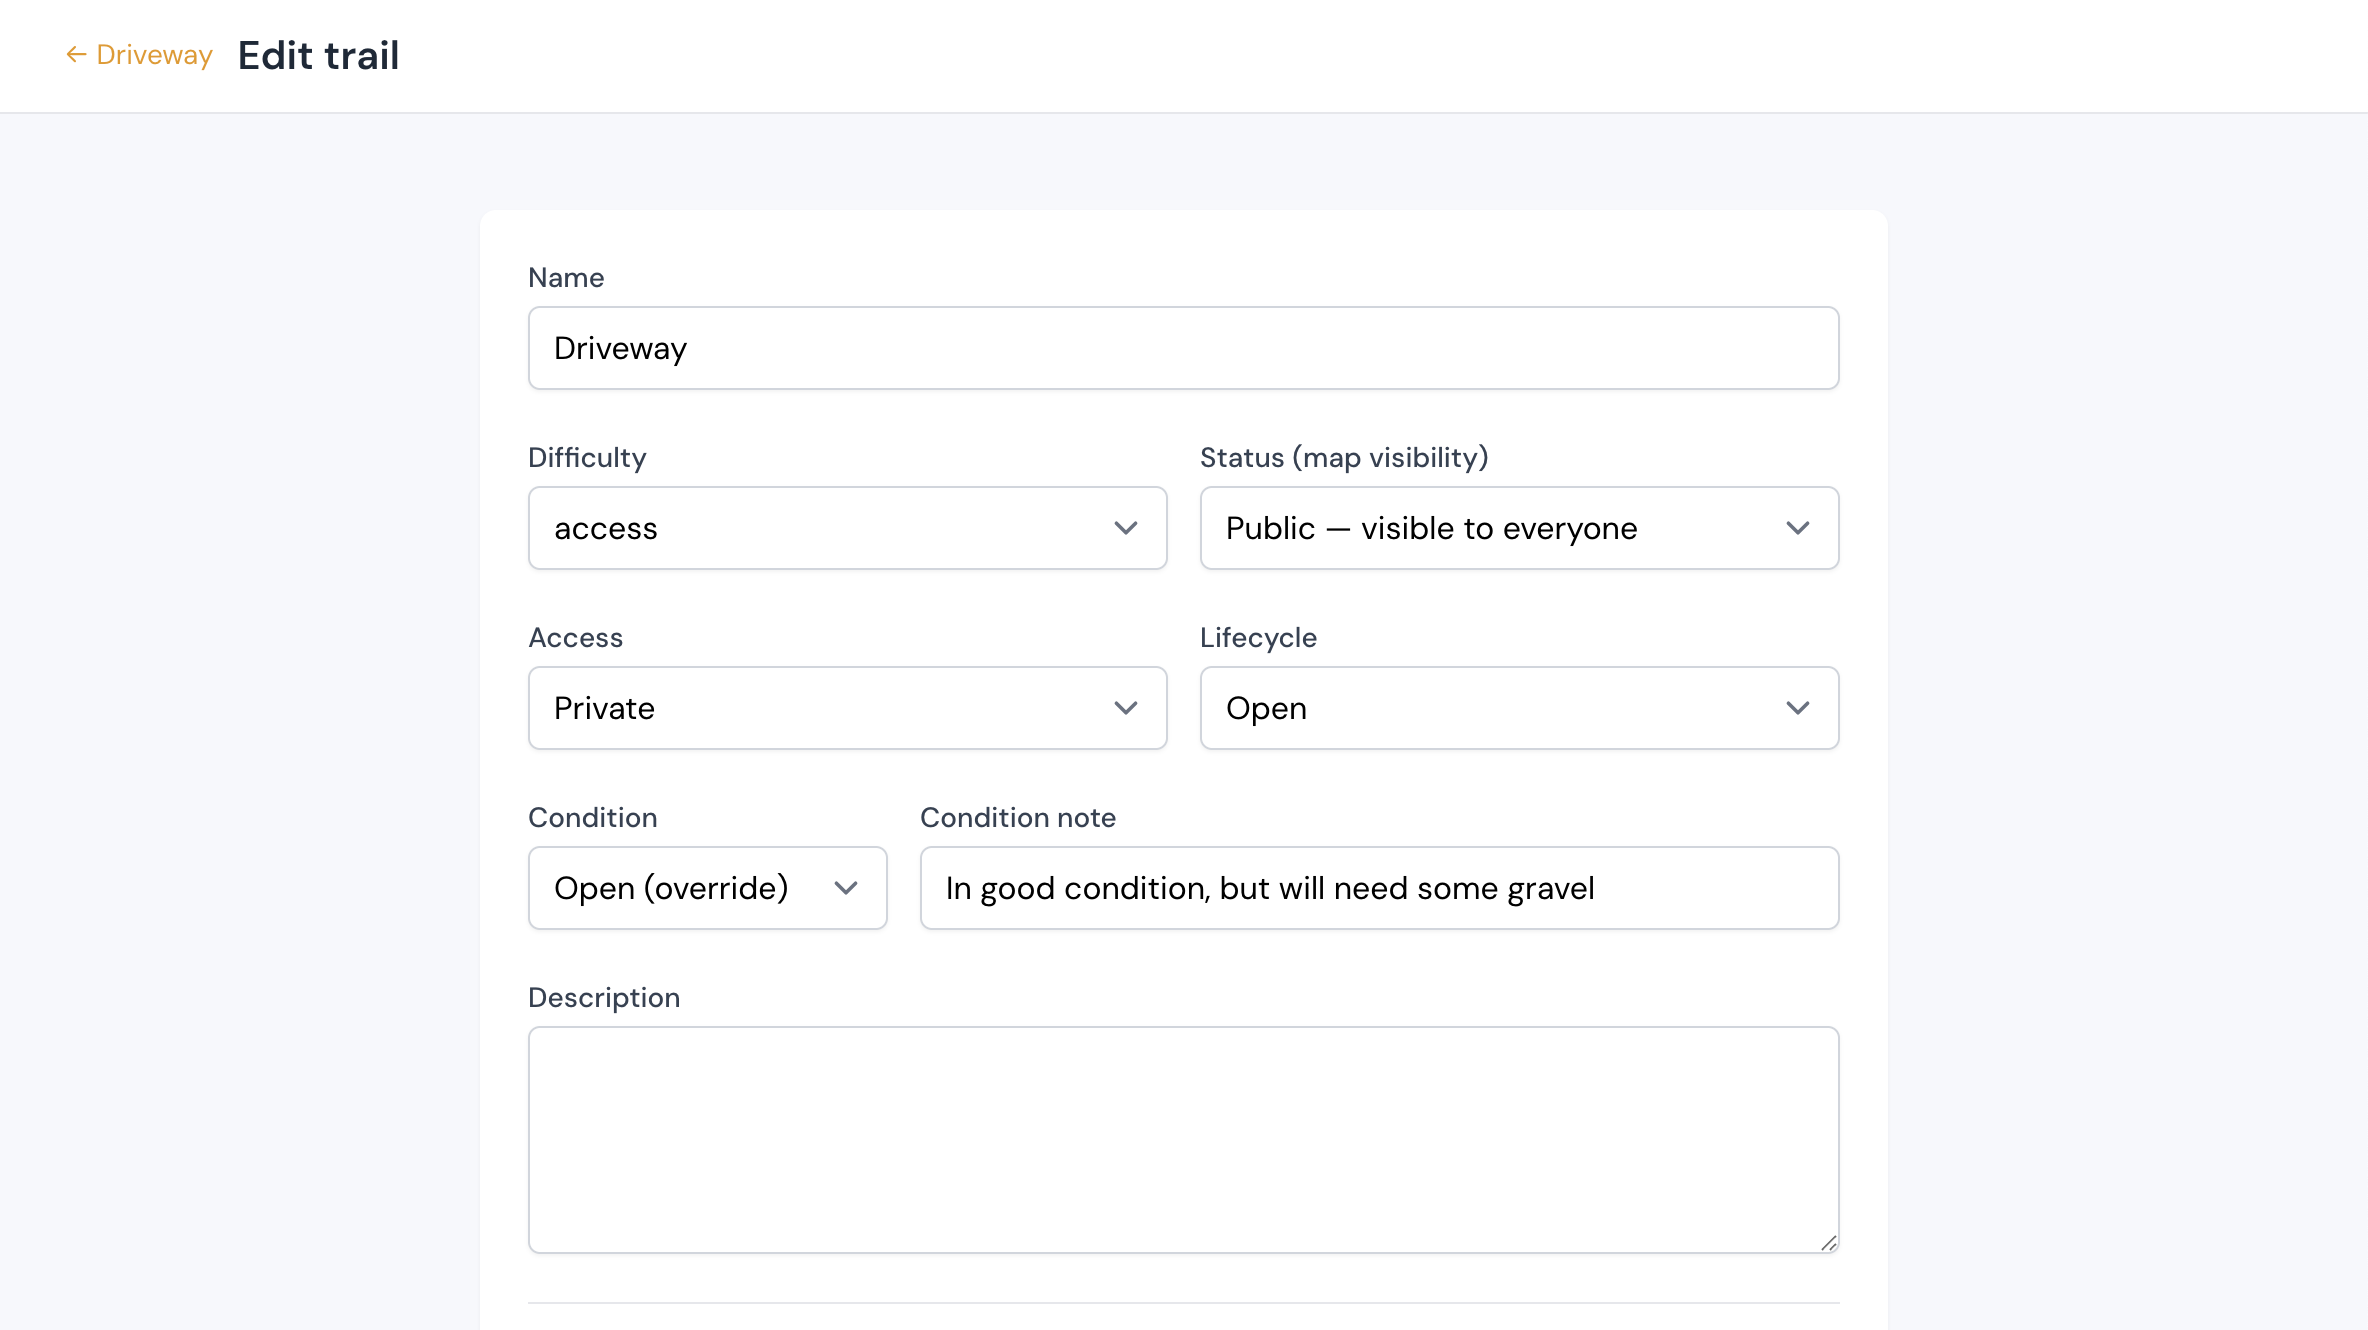
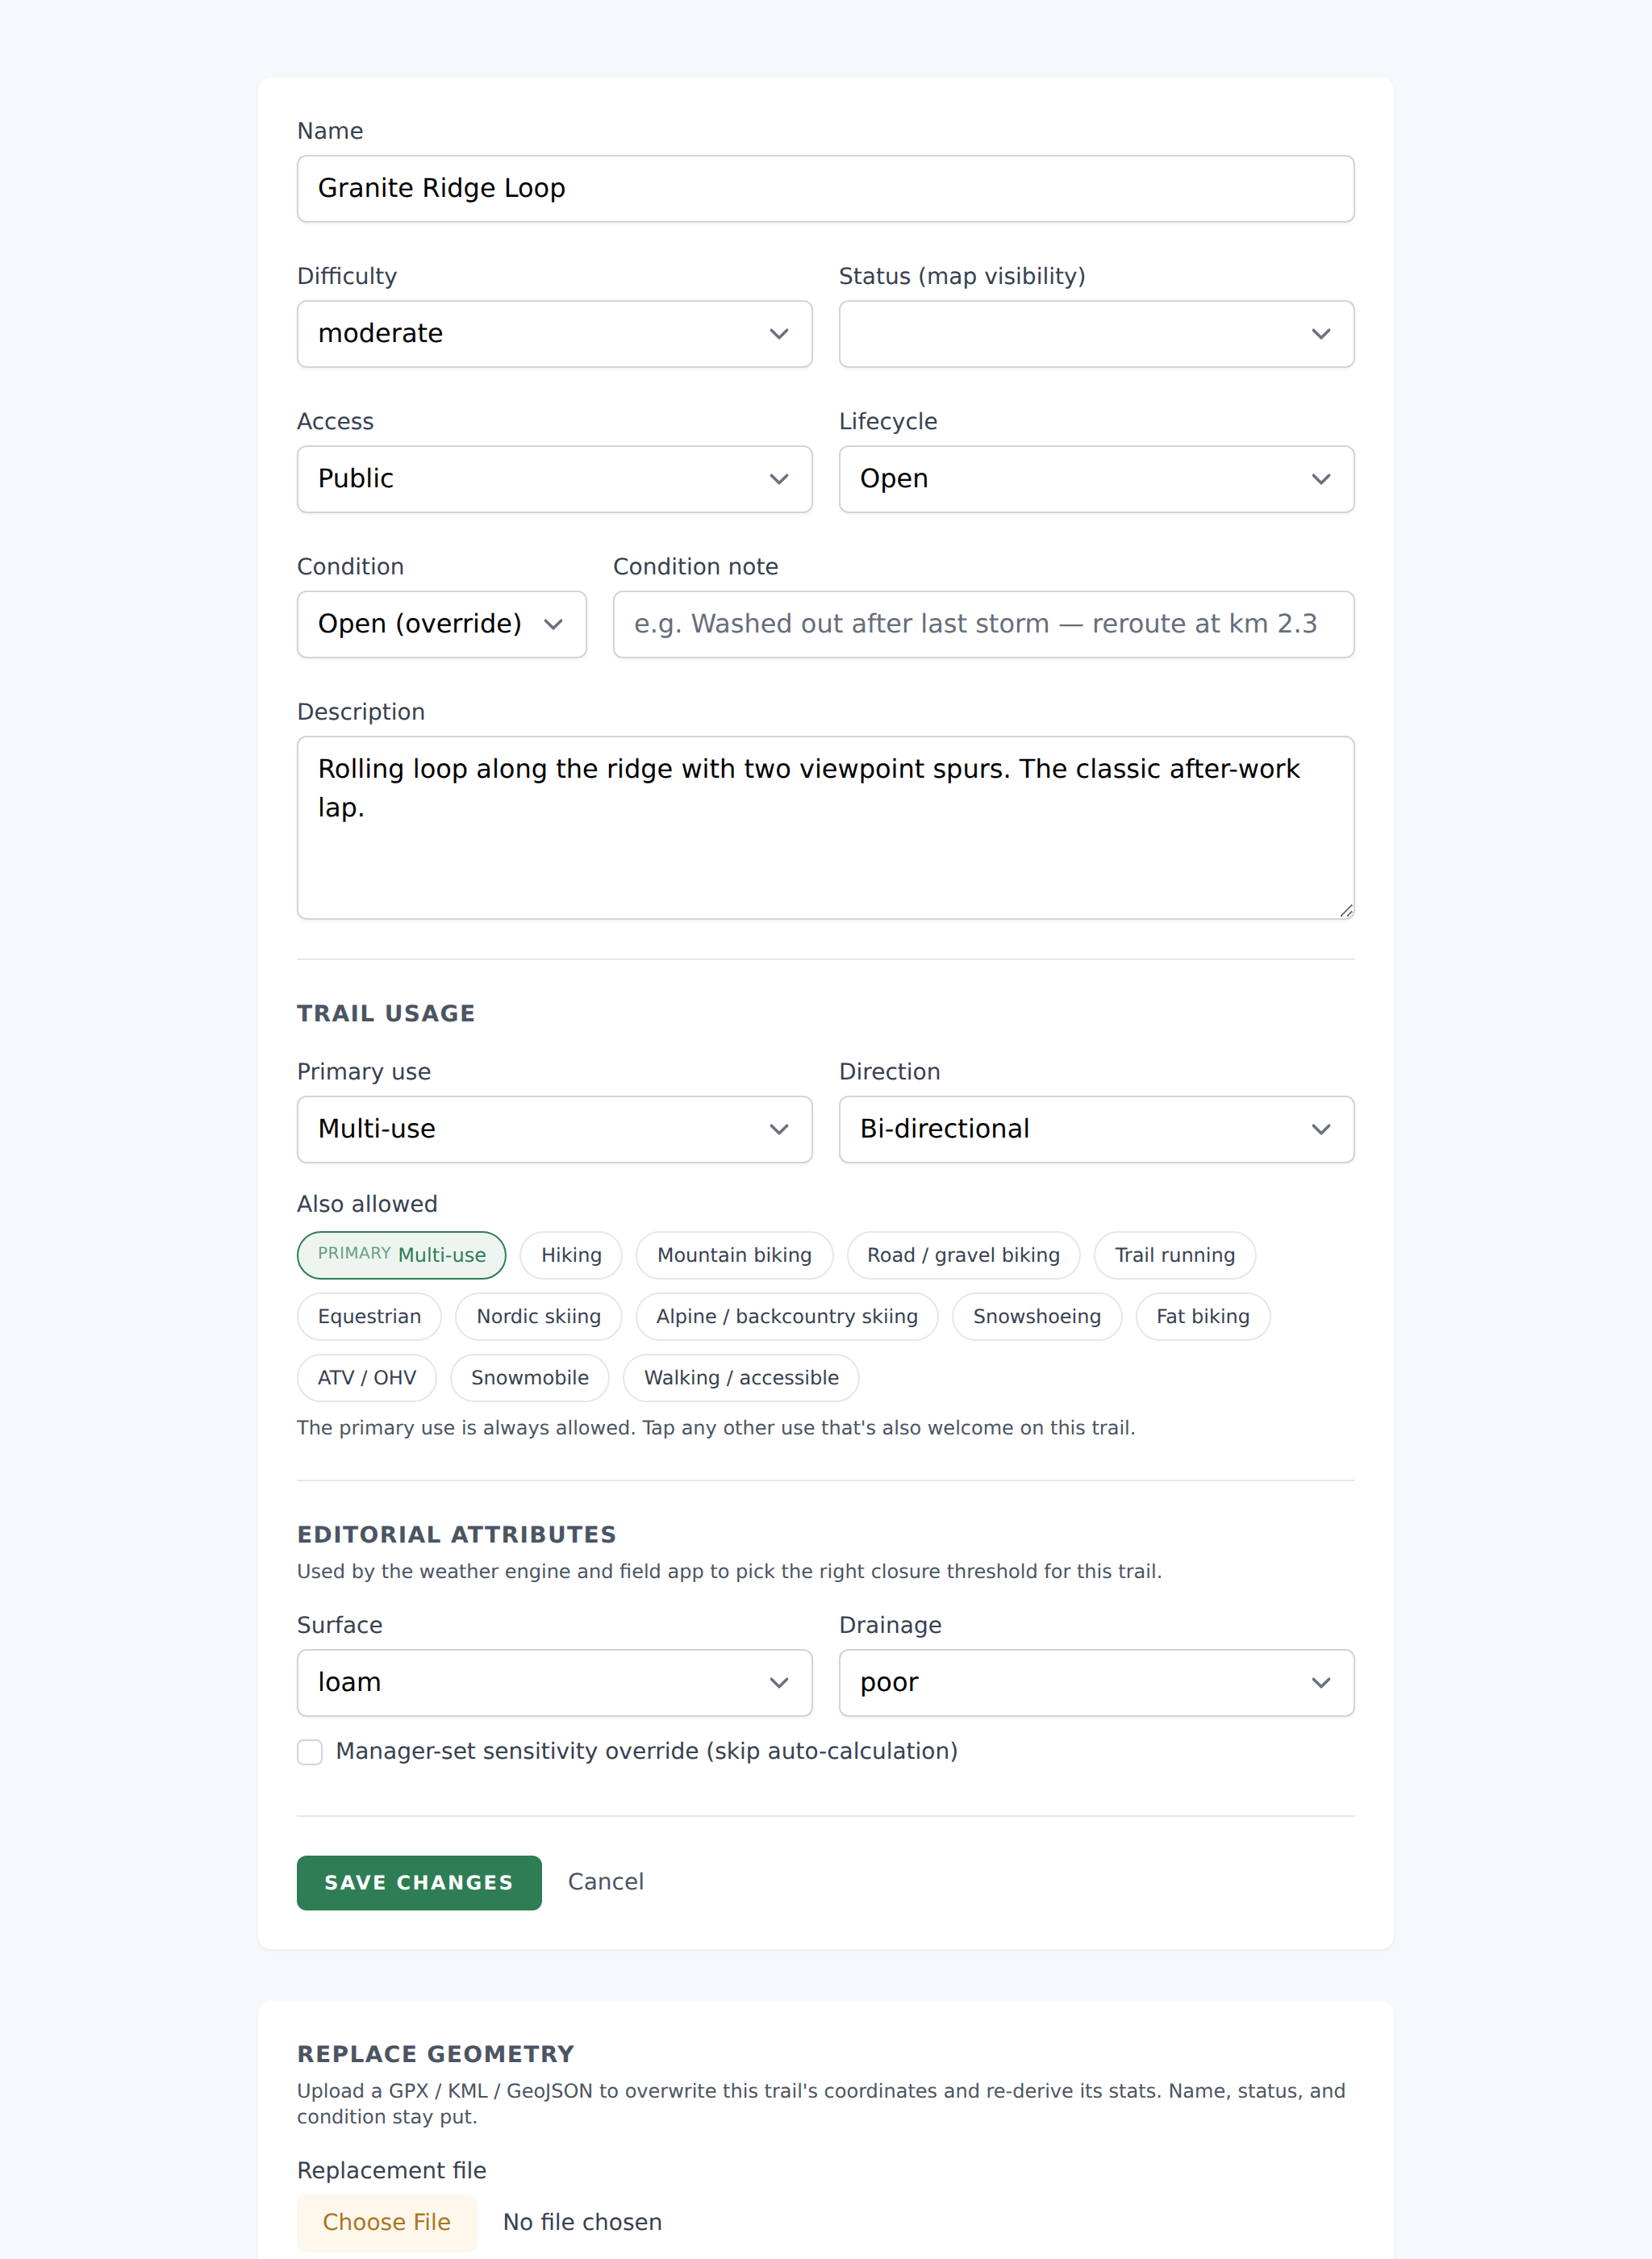
Once a trail exists, open Trails → the trail → Edit to reach the full settings page. Every field below is user-editable at any time, and every change writes immediately when you hit Save.
Identity + visibility
- Name — required, plain text. This is what shows on the trail card, the map label, and every downstream export.
- Description — optional. Rendered on the public trail page if the trail is published.
- Status (map visibility) — Public means the trail is drawn on every map your organization renders (public site, field app, dashboard). Hidden limits it to staff only, useful for drafts or trails you're building.
- Access — describes who's allowed to use the trail. Options: Inherit from network, Public, Private, Pass required. This is display metadata (used in trail cards + report tooltips) — it doesn't gate anything technically.
- Lifecycle — where the trail is in its build cycle: Open, Planned, Under construction, Closed, Decommissioned. Independent from Status and Access — a Private / Under construction / Hidden trail is a valid combination.
Condition
- Condition — override the current condition of the trail. Inherit from area / network means the trail follows whatever the parent network or area was set to; picking Open (override), Caution, or Closed locks the trail's condition regardless of the parent.
- Condition note — a short free-text note (placeholder: "e.g. Washed out after last storm — reroute at km 2.3"). Shown next to the condition chip on trail cards and reports.
Difficulty
- Difficulty — Easy, Moderate, Hard, Expert, Access, or Pro. The icon set used to draw the difficulty next to the trail name depends on the trail's Primary use — MTB / gravel / fatbike get the IMBA shapes (circle, square, diamond), Alpine uses ski-resort signs, Nordic uses cross-country signs, everything else gets a plain colored circle. Changing the primary use silently changes the icon shape.
- Colors come from your organization's difficulty palette — you can customize them per icon set in Settings.
Use + allowed activities
- Primary use — the main activity the trail is designed for. Options: mixed, hiking, mtb, gravel, running, equestrian, nordic, alpine, snowshoe, fatbike, ATV, snowmobile, walking. The primary use flows through to the difficulty icon set (above), the trail's default weather closure threshold, and the analytics that judge sustainability.
- Direction — Bi-directional, Downhill only, or Uphill only. Directional trails render arrows on the map and gate the recorder's uphill / downhill grade analytics.
- Also allowed — chip row of secondary uses the trail is open to (e.g. a mtb-primary trail that also allows hiking). The primary use is always implicitly included.
- E-bikes — this section only appears when a bike-type is in Primary use or Also allowed. Two checkboxes: Pedal-assist e-bikes (Class 1 / 3) and Throttle e-bikes (Class 2). Set each independently.
Trail type
What kind of trail this is and what a visitor will meet on it. Your website's Trails page reads both, and both are optional:
- Primary type: the kind of trail it mostly is. The choices are singletrack, doubletrack, flow trail, technical trail, jump line, pump track, multi-use path, paved path, adaptive trail, connector, Nordic ski trail and snowshoe trail. Leave it on Not set and the trail is left out of the website's Types of trail block.
- Also: once a primary type is picked, tap any other type that also fits. A singletrack can be technical too. The trail is listed under every type it has, and its own page shows all of them with the primary first.
- Features: tap each one a visitor will meet on the trail: rock gardens, roots, rock rolls, berms and jumps, drops, skinny bridges, steep climbs, steep downhill, switchbacks, creek crossings, bridges, exposure, scenic viewpoints, shade, groomed snow. They show on the trail's own page and fill in the website's Features by network table. Horse access is not on the list because it already comes from the trail's uses: a trail open to horses counts as having it.
To set them on many trails at once, tick the trails on the Trails list and press Bulk update. There each type and feature cycles through add, remove and leave alone as you tap it, so what each trail already has stays unless you say otherwise. The trail's page shows its types with its key numbers, and its features in a Trail features box, each with a line on what it means.
Editorial attributes
The Surface and Drainage dropdowns feed the weather engine's closure logic and the field app's condition prediction. Keep them accurate or the automatic weather closures won't fit the trail.
- Surface — clay, loam, gravel, hardpack, rock, asphalt, or mixed.
- Drainage — poor, moderate, or good.
There's also a Manager-set sensitivity override checkbox. Turning it on tells the weather engine to skip its auto-calculated sensitivity for this trail and use your manual condition instead — useful for trails with quirky drainage the terrain data can't see.
Geometry
The edit page has a Replace geometry form near the bottom — same GPX / KML / GeoJSON accept list as the initial import. Use it to swap the trail's polyline without losing any of the metadata you've already set. Also handy for re-uploading a fresh survey of a trail that got rebuilt.
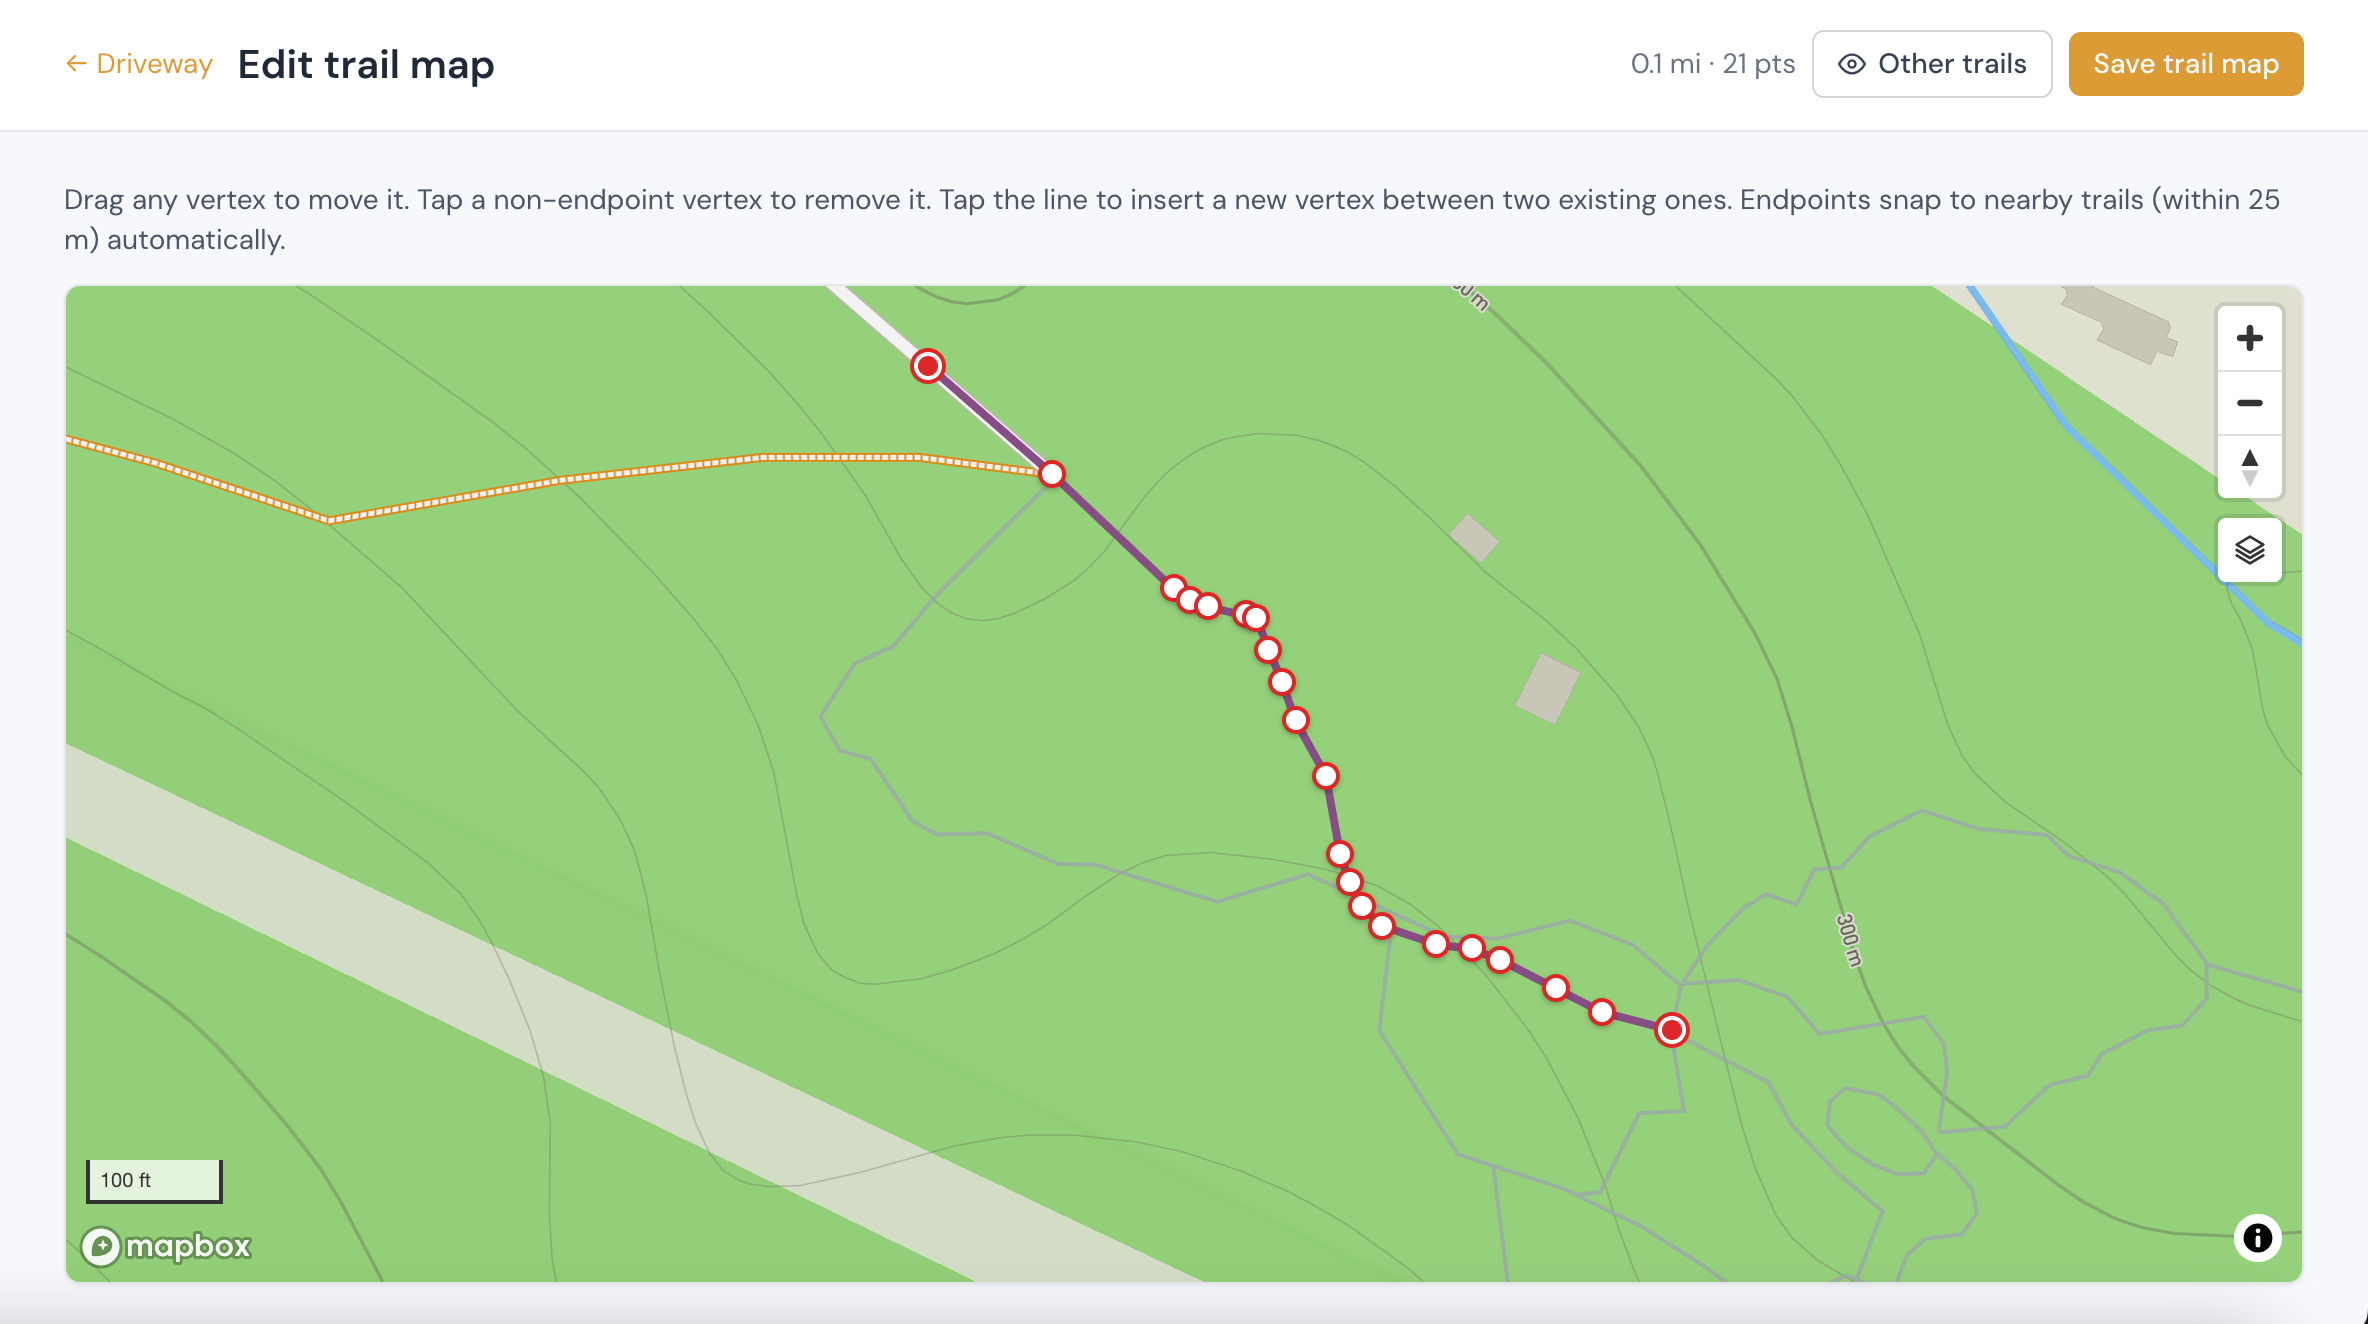
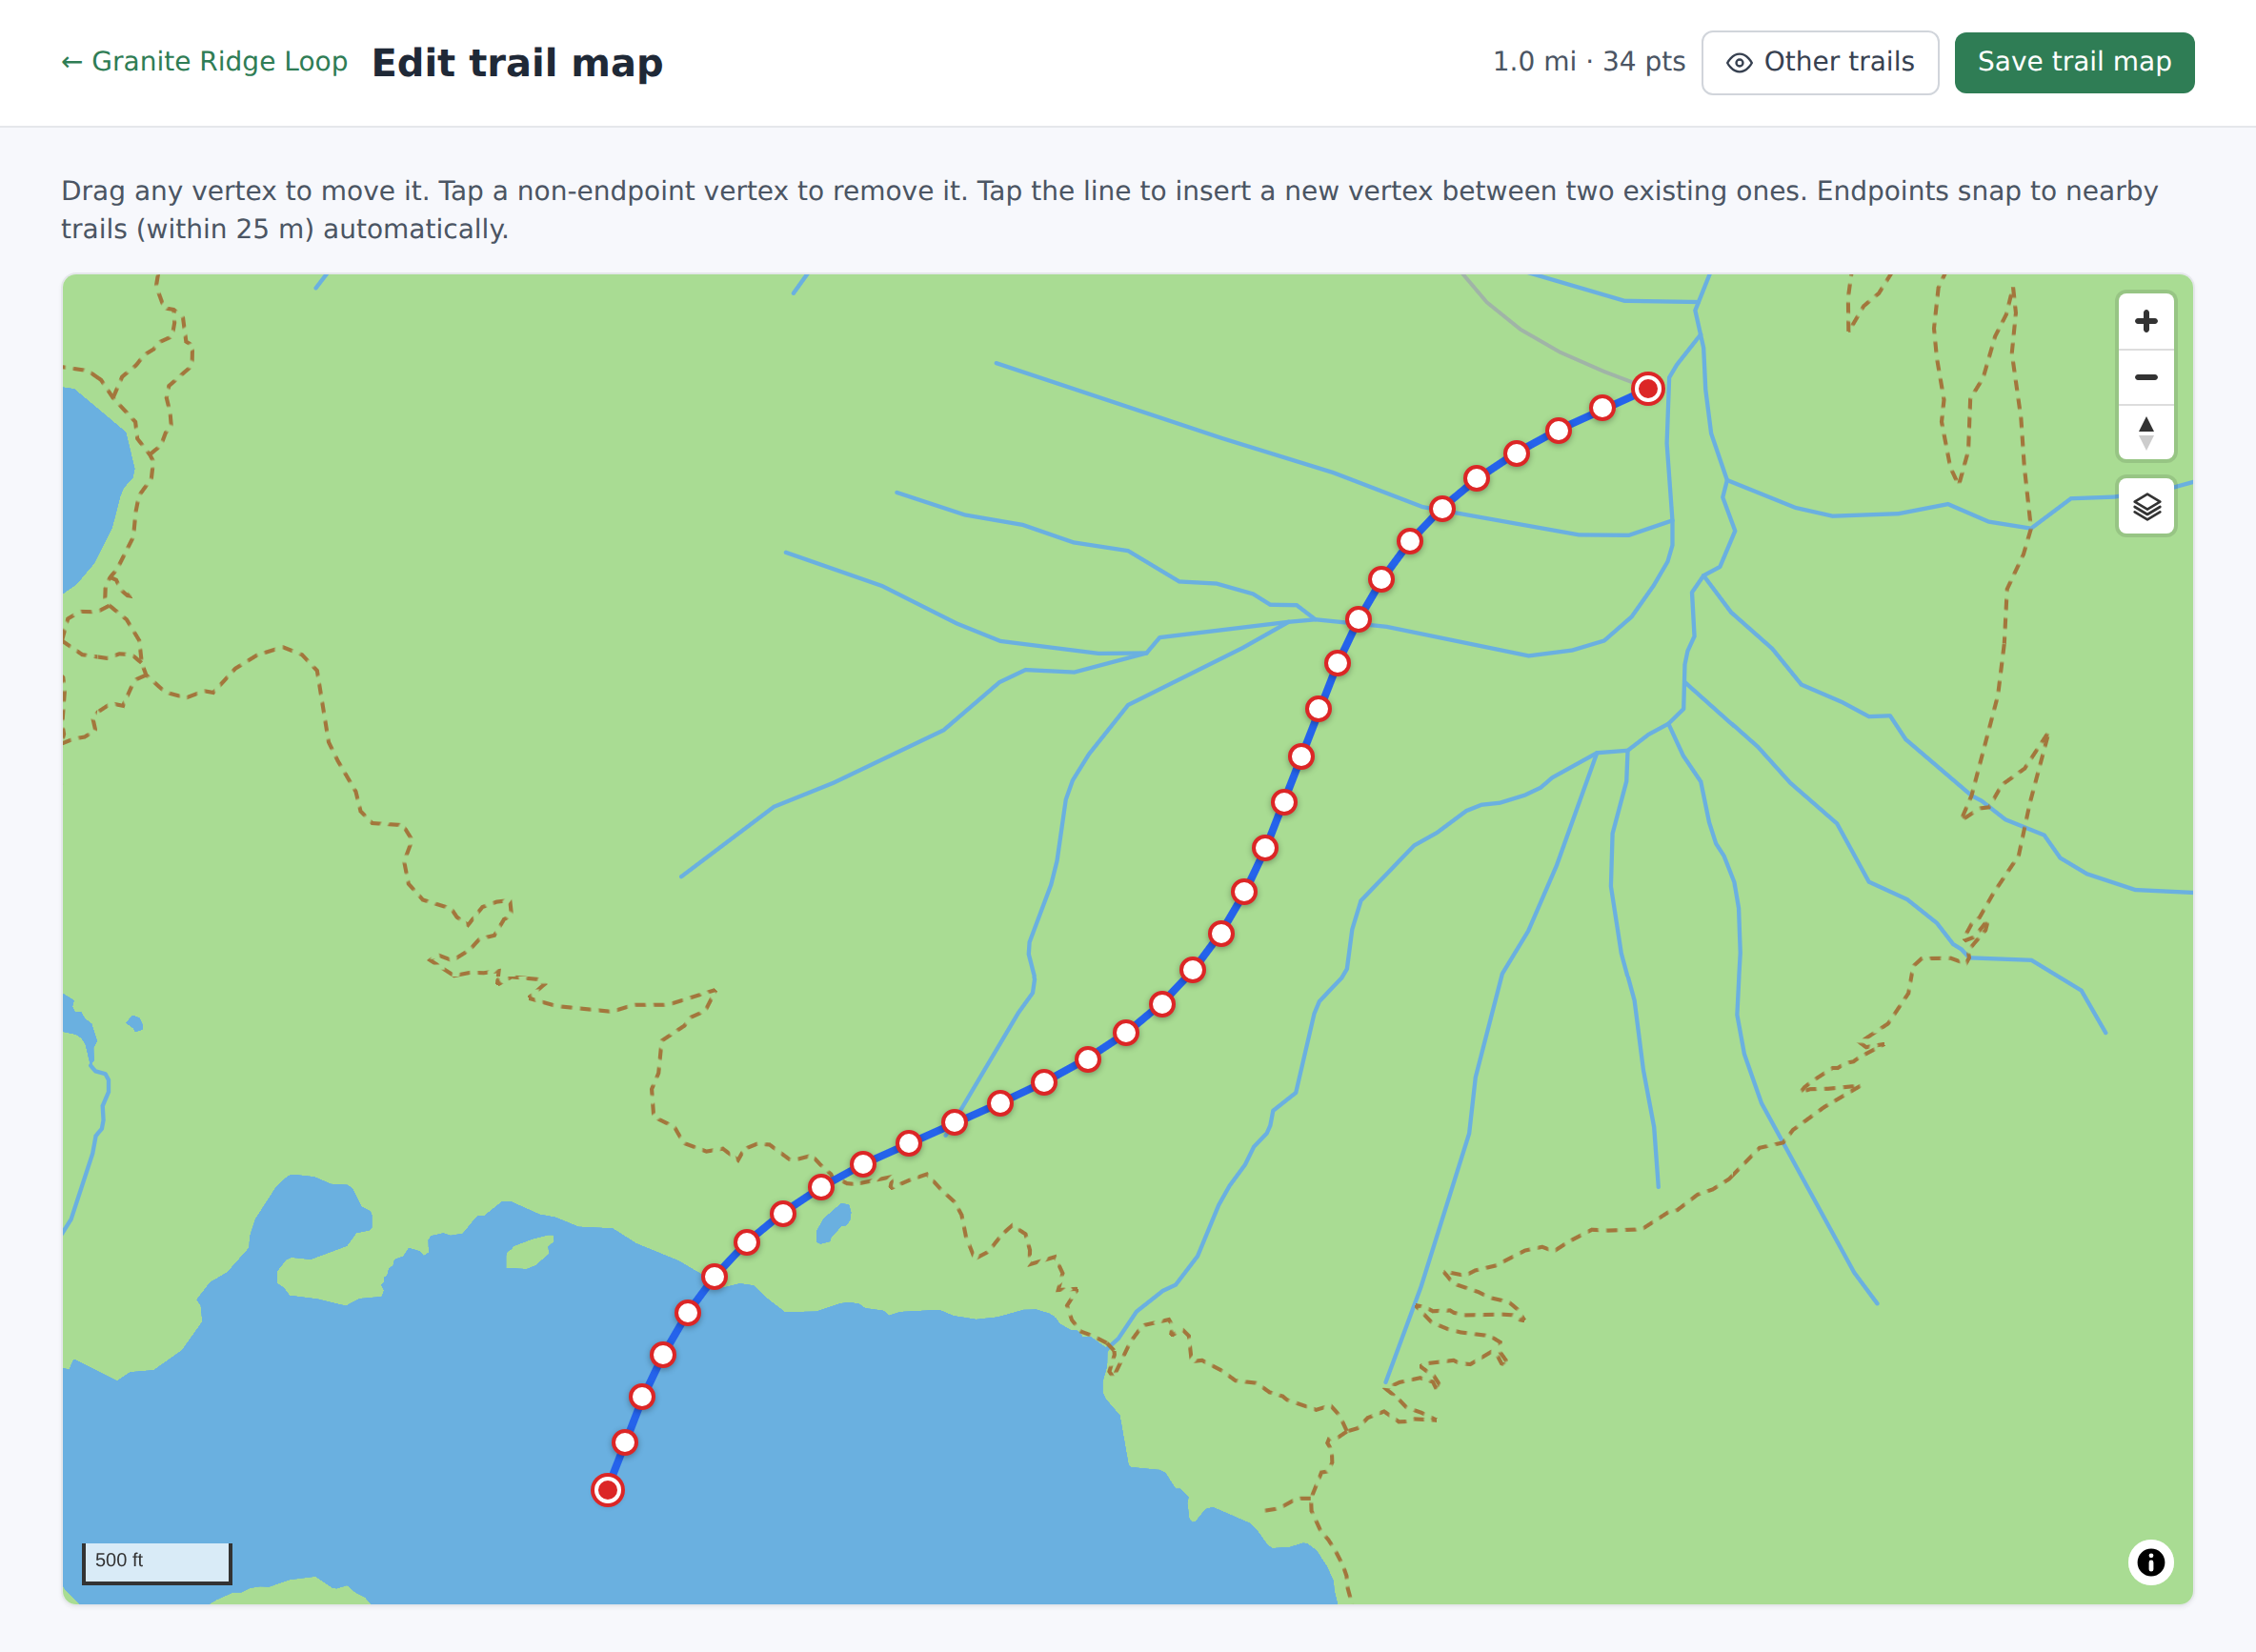
For fine-grained edits — nudging a vertex, adding a switchback, cleaning up a GPS wobble — use the Edit Trail Map button on the trail's detail page. It opens a full-canvas editor where every vertex is a draggable handle, clicking on a segment inserts a new vertex, and holding shift + click deletes one.
Networks
Networks are the containers that group trails geographically (e.g. "North side", "Beginner loop system", "Cross-country zone"). Trails can belong to multiple networks at once — the edit page has a multi-checkbox that full-replaces the trail's network memberships each time you save.
If a trail's Access is set to Inherit from network and it belongs to multiple networks, the most restrictive network wins.
Danger zone
- Recalculate stats (on the trail's detail page) — rebuilds every stat derived from the current polyline: distance, elevation, grade, aspect and the time estimate. Useful after a Replace geometry when you want the numbers to catch up. A stat the new polyline can no longer support is cleared, not left at its old value — replace a line that had elevations with one that has none and the elevation and aspect figures go blank rather than describing the geometry you removed. Recorded duration and average speed are the exception: coordinates carry no timestamps, so a recalculation leaves those exactly as the original file set them.
- Scan trail health (also on the detail page) — runs the sustainability / fall-line / side-slope analyzer on demand. The result is shown inline but not persisted, so it's cheap to re-run.
- Delete trail — permanent. Confirms first. Any structures or POIs attached to the trail via feature notes stay in place — deleting the trail doesn't clean them up automatically.
Common gotchas
- The difficulty icon shape follows Primary use, not Difficulty. If you change a trail from MTB to Hiking, the icon set silently switches from IMBA shapes to plain circles. Change back if you want the diamond back.
- Status, Access, and Lifecycle are independent. You can have any combination — the older single-status field couldn't represent something like Private + Under construction + Hidden. If a trail seems to be behaving oddly on the public map, check all three.
- Bikes / e-bikes derive from Primary use + Also allowed. There's no separate "bikes allowed" toggle — pick a bike-type in either use field and the e-bike checkboxes show up automatically.
- Trail names on import come from the GPX
<name>element, not the file name. If you get a trail called "Untitled" after import, the original track had no name tag — just rename it on the edit page. - There's no "Create trail from scratch" button on the Trails tab. Every trail originates from either an import, a planner-recording export, or a Trails-IQ Registry claim. That's by design — a trail without a real polyline isn't useful yet.
What's next
- If you haven't set up your organization's difficulty color palette yet, do that in Settings → Difficulty colors so imported trails render in your brand's colors.
- Once you have a handful of trails, group them into Networks so operators can filter the map by area.
- For maintenance workflows on top of a published trail (issues, tasks, inspections), see the Trail maintenance article.