Team
Inventory — stock, assets, checkouts, and reservations
Manage the org's shared catalog of tools, lumber, and gear — consumable stock with per-location counts, assets with checkout / check-in, low-stock alerts, reservations against in-progress maintenance items, and a full field-app surface for the shelf and the trail.
Inventory is your org's shared catalog of physical things — tools, lumber, hardware, signs, safety gear, machinery — with per-location quantities for consumables and check-out / check-in for equipment. Every crew member can answer "how much 2×4 do we have at the East Trailhead?" or "who has the chainsaw right now?" from either the dashboard or the field app.
What inventory is in TrailsIQ
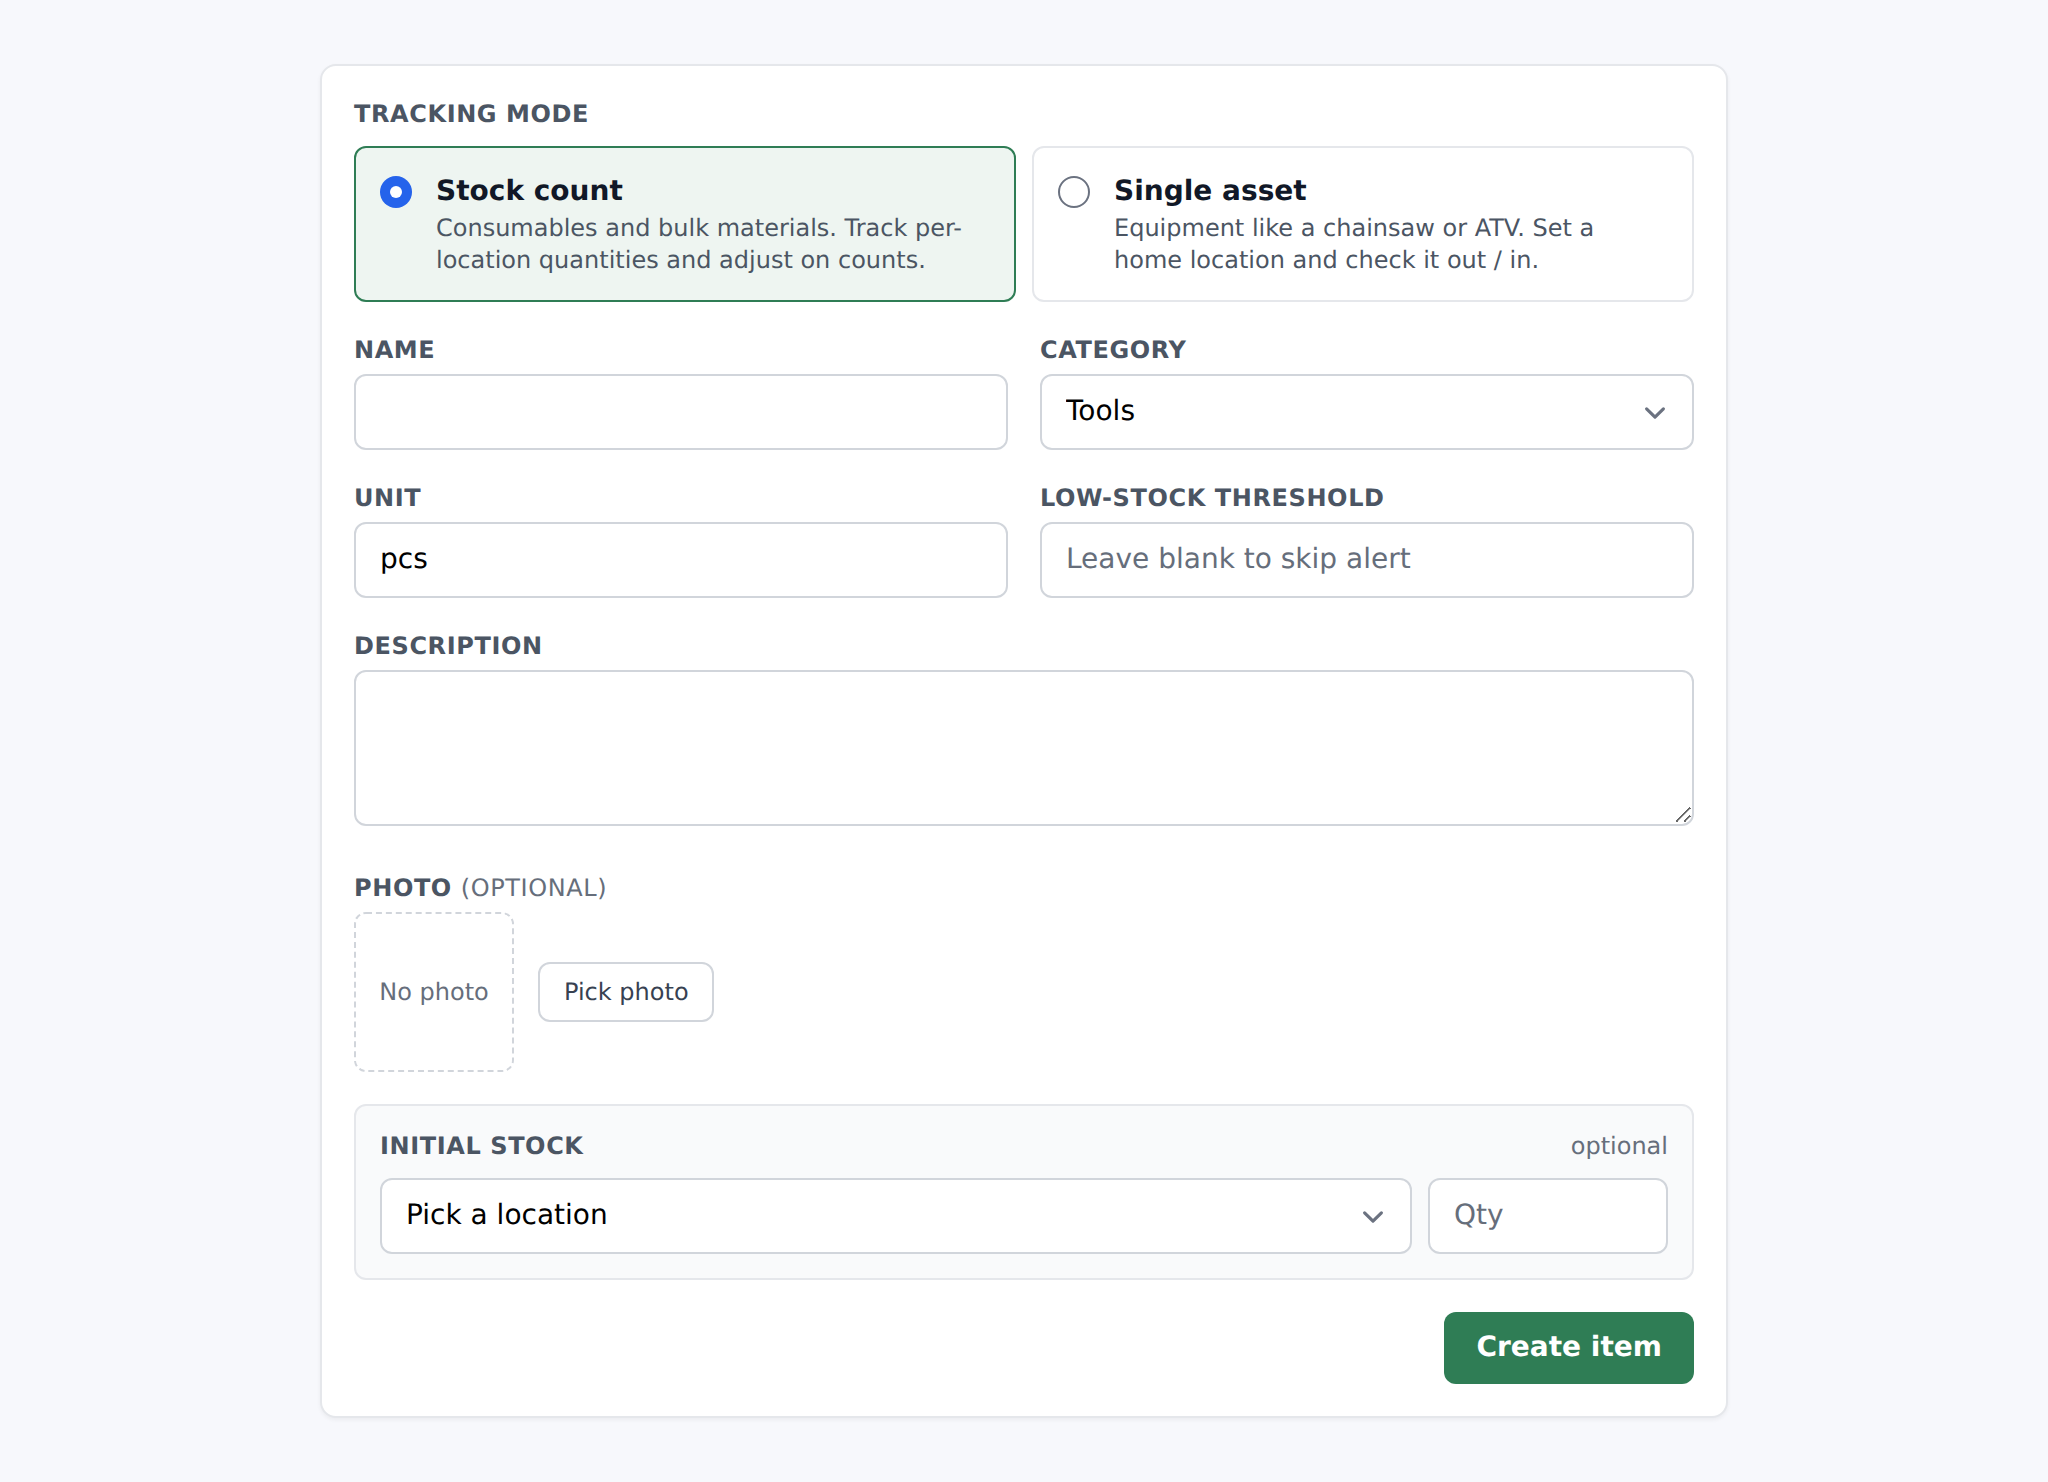
Every inventory row is one kind of thing — "2×10 pressure-treated lumber", "Stihl MS 261 chainsaw", "trail-closed signs" — with quantity tracked separately per storage location. When you create an item you pick one of two tracking modes and the item stays in that mode for its whole life:
- Stock count — "Consumables and bulk materials. Track per-location quantities and adjust on counts." Best for anything you count in units, feet, gallons, or bags — lumber, screws, gravel, paint, trail-marking flagging.
- Single asset — "Equipment like a chainsaw or ATV. Set a home location and check it out / in." Best for things one person takes out at a time. The name is slightly misleading: you can set
How many do you own?above 1, so a fleet of five identical shovels can share one asset row.
Two very different workflows behind the same catalog. Consumables get counted, moved, and consumed. Assets get taken out, taken back, and their trip history recorded.
Setting up storage locations
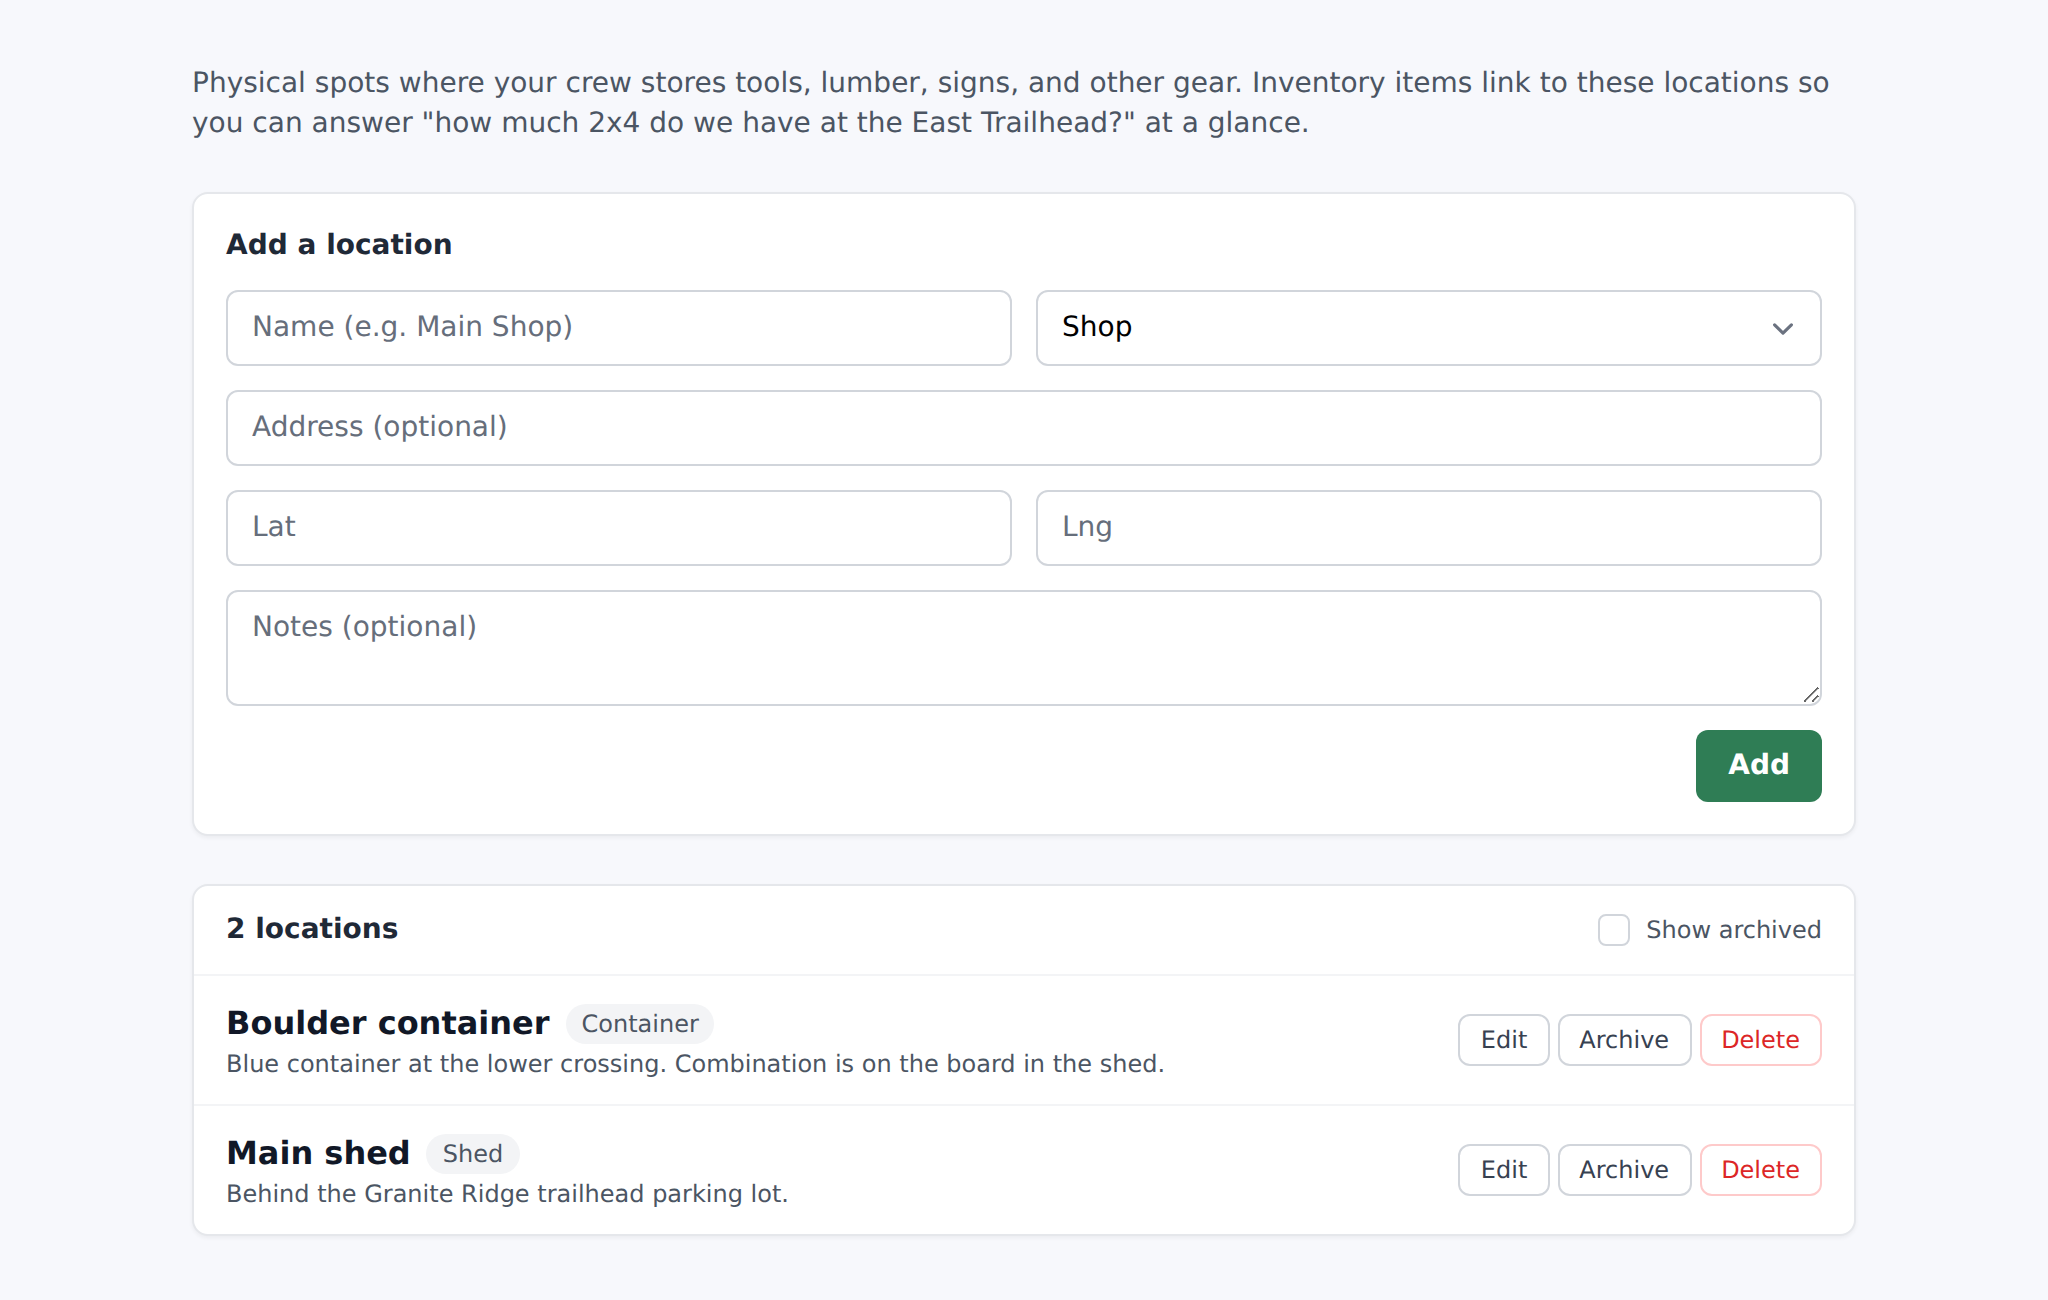
Locations are where inventory lives — the shop, a shed at the trailhead, a job trailer, a gravel cache. Manage them under Settings → Storage locations.
Copy on the page: "Shops, trailers, caches, trailheads — where inventory lives." Under the create form: "Physical spots where your crew stores tools, lumber, signs, and other gear. Inventory items link to these locations so you can answer 'how much 2×4 do we have at the East Trailhead?' at a glance."
Fields:
- Name — required, unique per org, placeholder "Name (e.g. Main Shop)".
- Type — fixed enum: Shop / Warehouse / Shed / Container / Yard / Cache / Trailer / Trailhead / Office / Other.
- Address — optional.
- Lat / Lng — optional; used if you want the location to show on the map.
- Notes — optional.
- Is archived — hides from the default picker without deleting.
Deleting a location with stock still on it fails. Confirmation dialog and server both refuse: "This location still has inventory. Move or remove the stock rows first." Empty the location's stock (or move it elsewhere) before you delete.
Set up your handful of real locations before creating items — the create form's Initial stock field on stock items needs at least one location to be useful.
Categories (and custom categories)
Category is a plain string. Every org ships with these defaults:
Tools · Lumber · Hardware & Fasteners · Trail Materials · Signage · Consumables · Safety & PPE · Equipment & Machinery · Other
The defaults are always available. To add your own — "Wire rope", "Fasteners (galvanised)", "Prescribed-fire kit" — click Manage categories on the inventory Index page. Side panel titled "Inventory categories" with the copy "The defaults are always available. Add your own to fit your workflow — they'll show up in the picker both here and in the field app."
Categories drive the picker on the create form and the filter chip on the Index page. That's it — no per-category custom fields, no per-category permissions, no category-specific reports. The Lumber category is the one exception: picking it reveals a Lumber-dimensions fieldset (see the Every field on the form section) so the bridge-materials calculator can match your stock against a bridge design.
Creating an inventory item
Manager-only. Field workers and volunteers see the inventory list read-only unless the Manage inventory permission is granted to them (which it is by default for field workers, off for volunteers).
Click + Add item on the Index page. Same form covers create + edit. Landing on save goes to the item's Show page.
Every field on the form
- How is it tracked? — two tiles: Stock count ("Many of the same thing") and Single asset ("One machine, tracked on its own"). Pick before anything else — the rest of the form changes shape.
Save changes and Cancel sit pinned at the foot of the form rather than at the end of it, so a one-word change to a name does not mean scrolling past every field that was already right. Delete this item is at the bottom of the form, managers only, and asks first by name; its counts and its history go with it, and it needs a connection — everything else on the form saves offline.
- Name — required, up to 120 characters, unique per org.
- Category — pick from the org's effective list (defaults + your custom additions).
- Unit — stock mode only, up to 20 characters. Placeholder "pcs, ft, gal…". Defaults to pcs. This is what shows next to the quantity everywhere ("6.5 gal", "24 pcs").
- Home location — asset mode only: where the thing goes back to when it is not out. A stock item does not have one, because its whereabouts are its per-location counts, and those are set on the Stock tab. First option: "No home location set".
- How many do you own? — asset mode only, integer 1–9999. Helper: "Use 1 for a single tool; bump it up for several of the same (e.g. five identical shovels)."
- Low-stock threshold — stock mode only, optional. Placeholder "Leave blank to skip alert". When on-hand crosses from above to below this number, managers get a push notification (see Low-stock alerts).
- Machine details — make and model, serial, fuel, Hour meter, Service due at and Check before it goes out. Asset mode and the Equipment & Machinery category: that is the block's home, and everything else folds it away. It also stays open for any item that already has one of those values written down, whatever its category — a field that hid a number you could no longer see or correct would be worse than one you scroll past, so filing a machine under your own word for it never loses its hour meter.
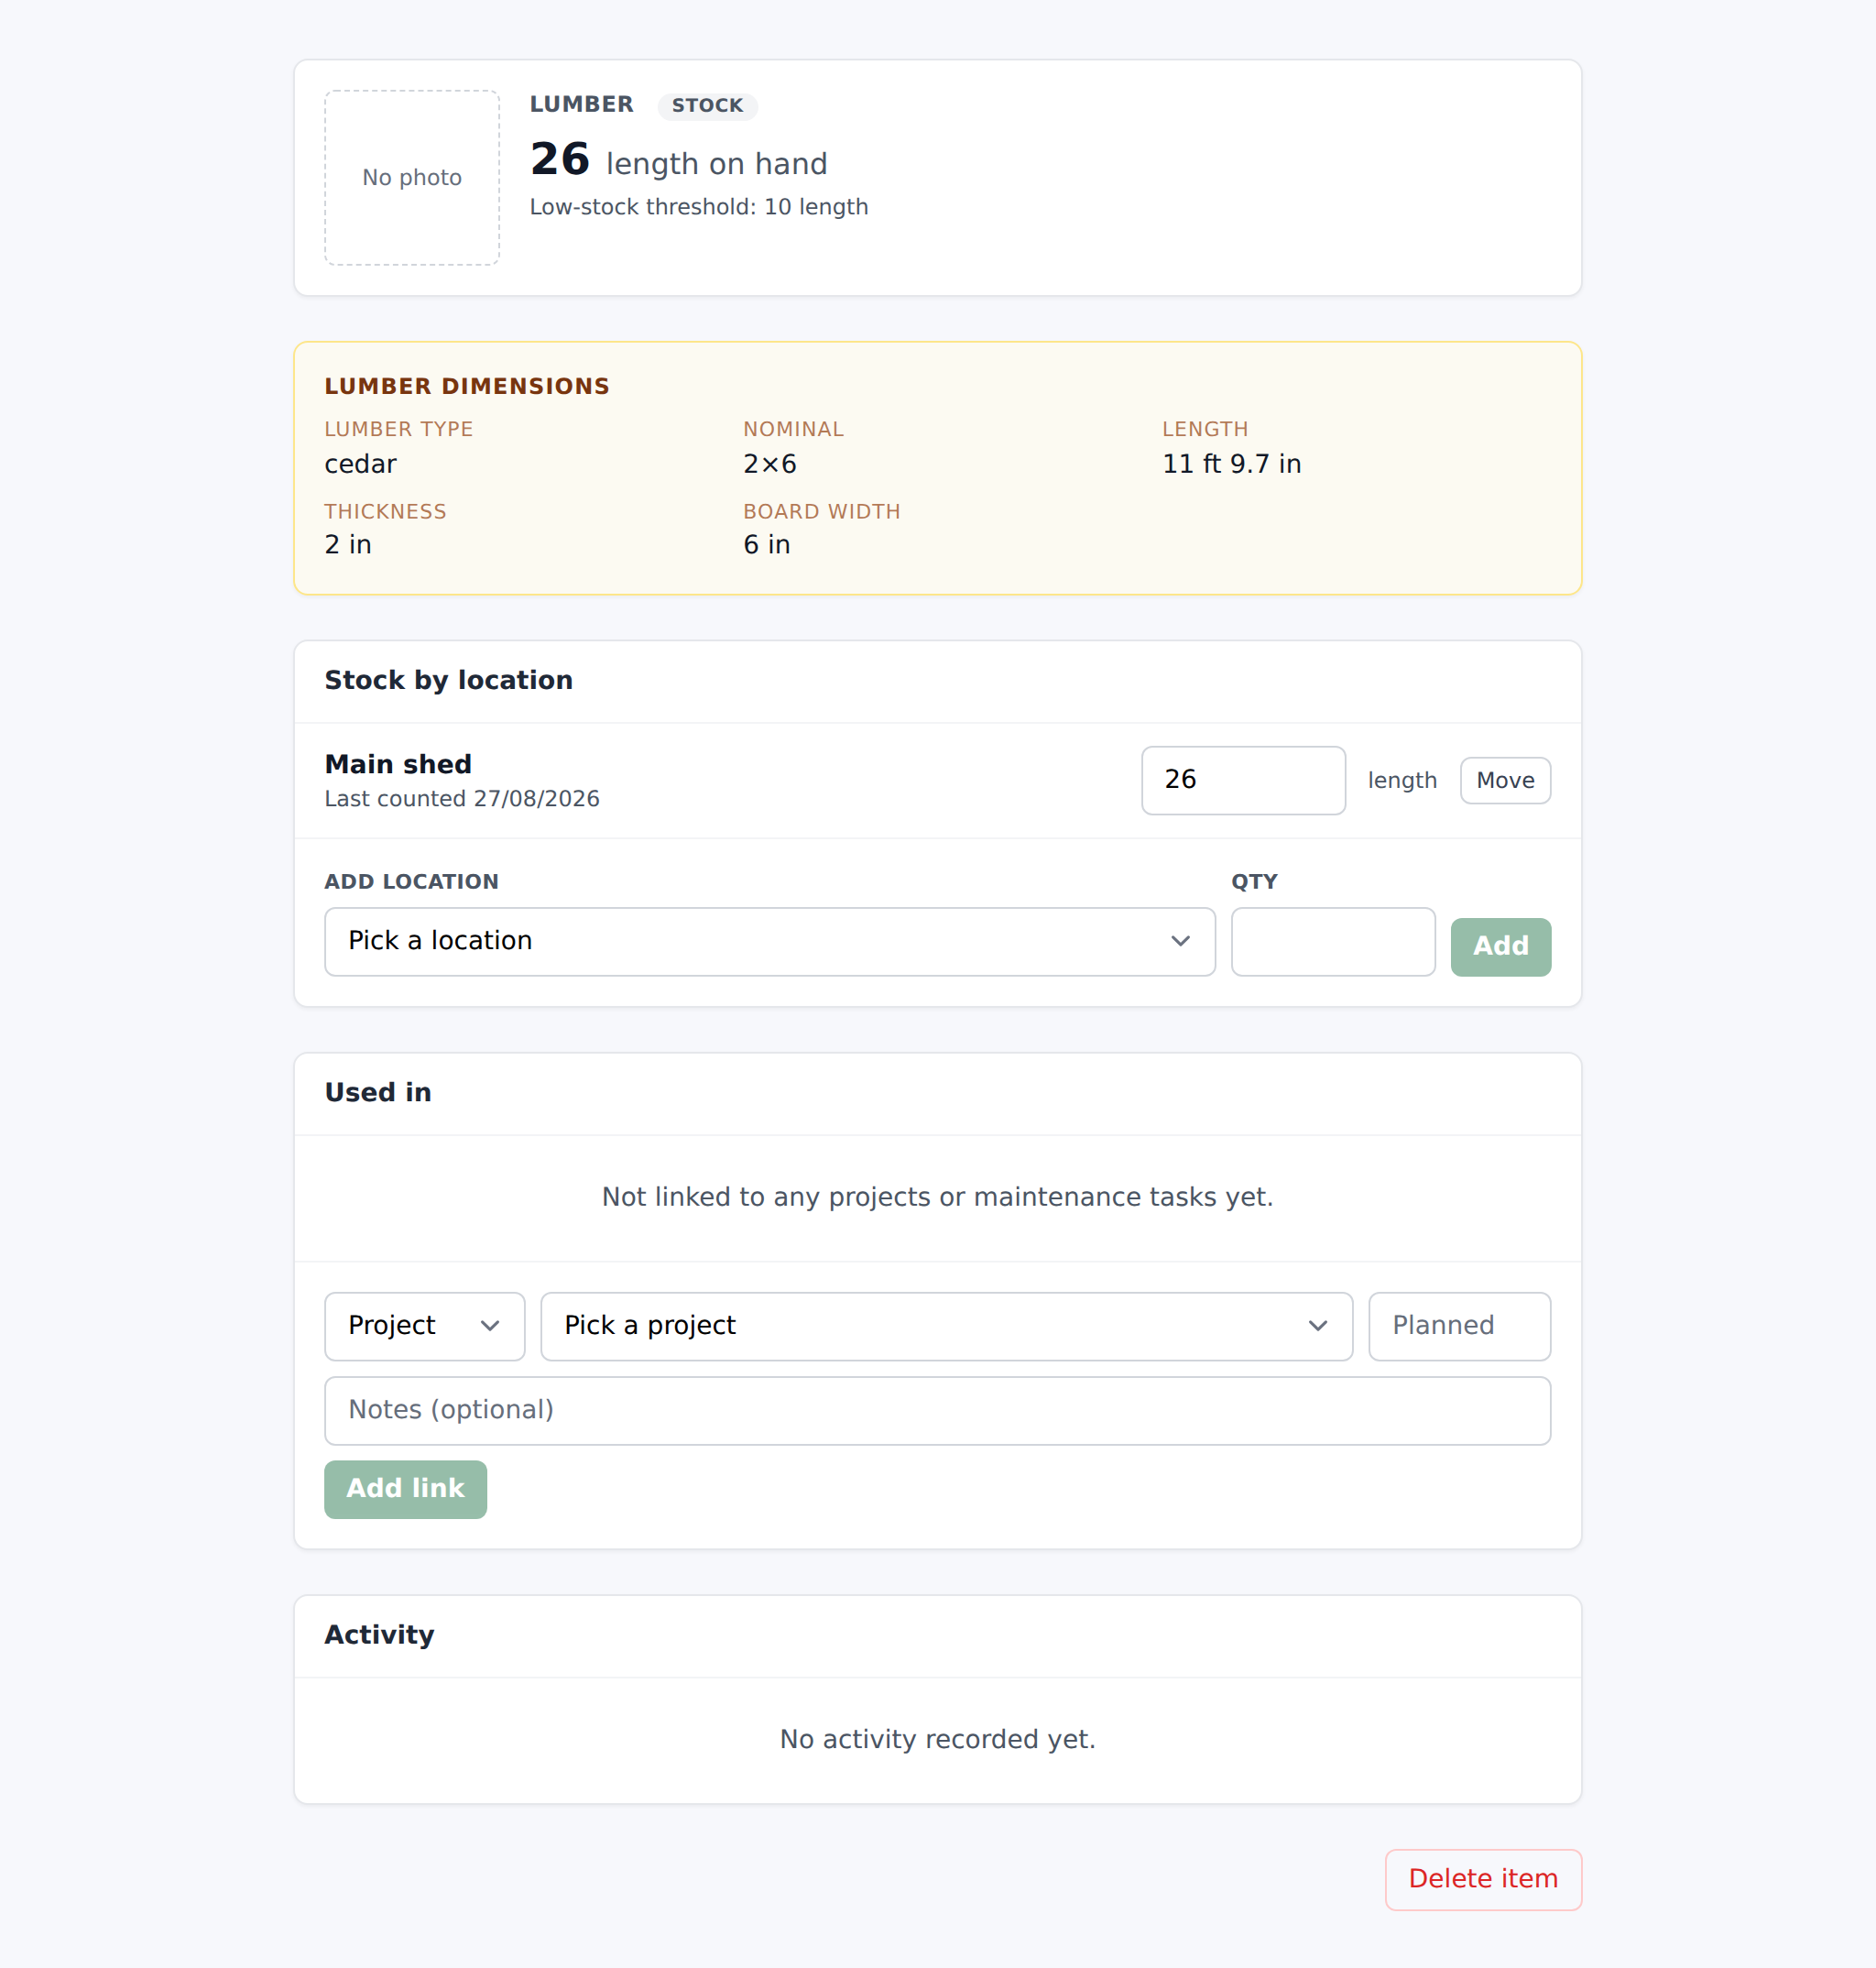
- Lumber dimensions — appears only when Category = Lumber. Helper: "Fill these in so the bridge calculator can spot this stock when it computes what you need." Sub-fields:
- Lumber type — pick from the built-in list, or add custom lumber types.
- Nominal label — display tag ("2×10"). Helper: "Just a display tag — the actual mm values below are what the calculator matches against."
- Length / Thickness / Board width — each respects the viewer's unit preference (imperial or metric).
- Description — free text up to 2000 characters. Where it lives on the shelf, any peculiarities.
- Photo — one image, up to 5 MB, JPG / PNG / WebP. Optional on create. Existing items get instant API upload with Upload photo / Replace photo / Remove buttons. Remove confirms "Remove this photo?".
- Initial stock (create + stock mode only) — pair a location select with a quantity so you don't have to open the item afterwards to seed a starting count. Warning when the org has no locations yet: "Add a storage location first if you want to log a starting quantity now."
- Archive (hide from default list) — edit only. Ticks the item off the Index unless the Archived filter is on.
- Delete — edit only, manager. Confirm:
Delete "{name}"? Stock rows will be removed too.
Stock — consumables with per-location counts
Stock items track quantity separately per storage location. So 2×10 lumber might be 84 pcs at the Main Shop, 12 pcs at the East Trailhead cache, and 0 pcs at the Job Trailer. The Show page renders a Stock by location card with one row per location, each with a numeric input for the current qty, a Move button, and a last-counted timestamp with the counter's name.
Empty state: "No stock recorded yet. Add a location below."
Any active member who can see inventory can adjust counts. You don't need Manage inventory. Setting a fresh value is recorded as a count, so the whole history of counts is there to read — helpful when auditing "when did we last actually walk out to the cache and count?".
Setting vs adjusting: you can set a count to exactly what you counted, or adjust it by an amount. The field app's ± buttons adjust; typing into the box on either the phone or the dashboard sets.
Every change that moves the number is written into the item's history, with who made it and when. So a count that takes 84 down to 60 reads as "consumed 24" rather than just leaving a new number in place of the old one.
Assets — checkouts (who has what)
Asset items don't have per-location stock. Instead they have an at-home count vs an out count — one checkout per "trip out and back", open until it is returned.
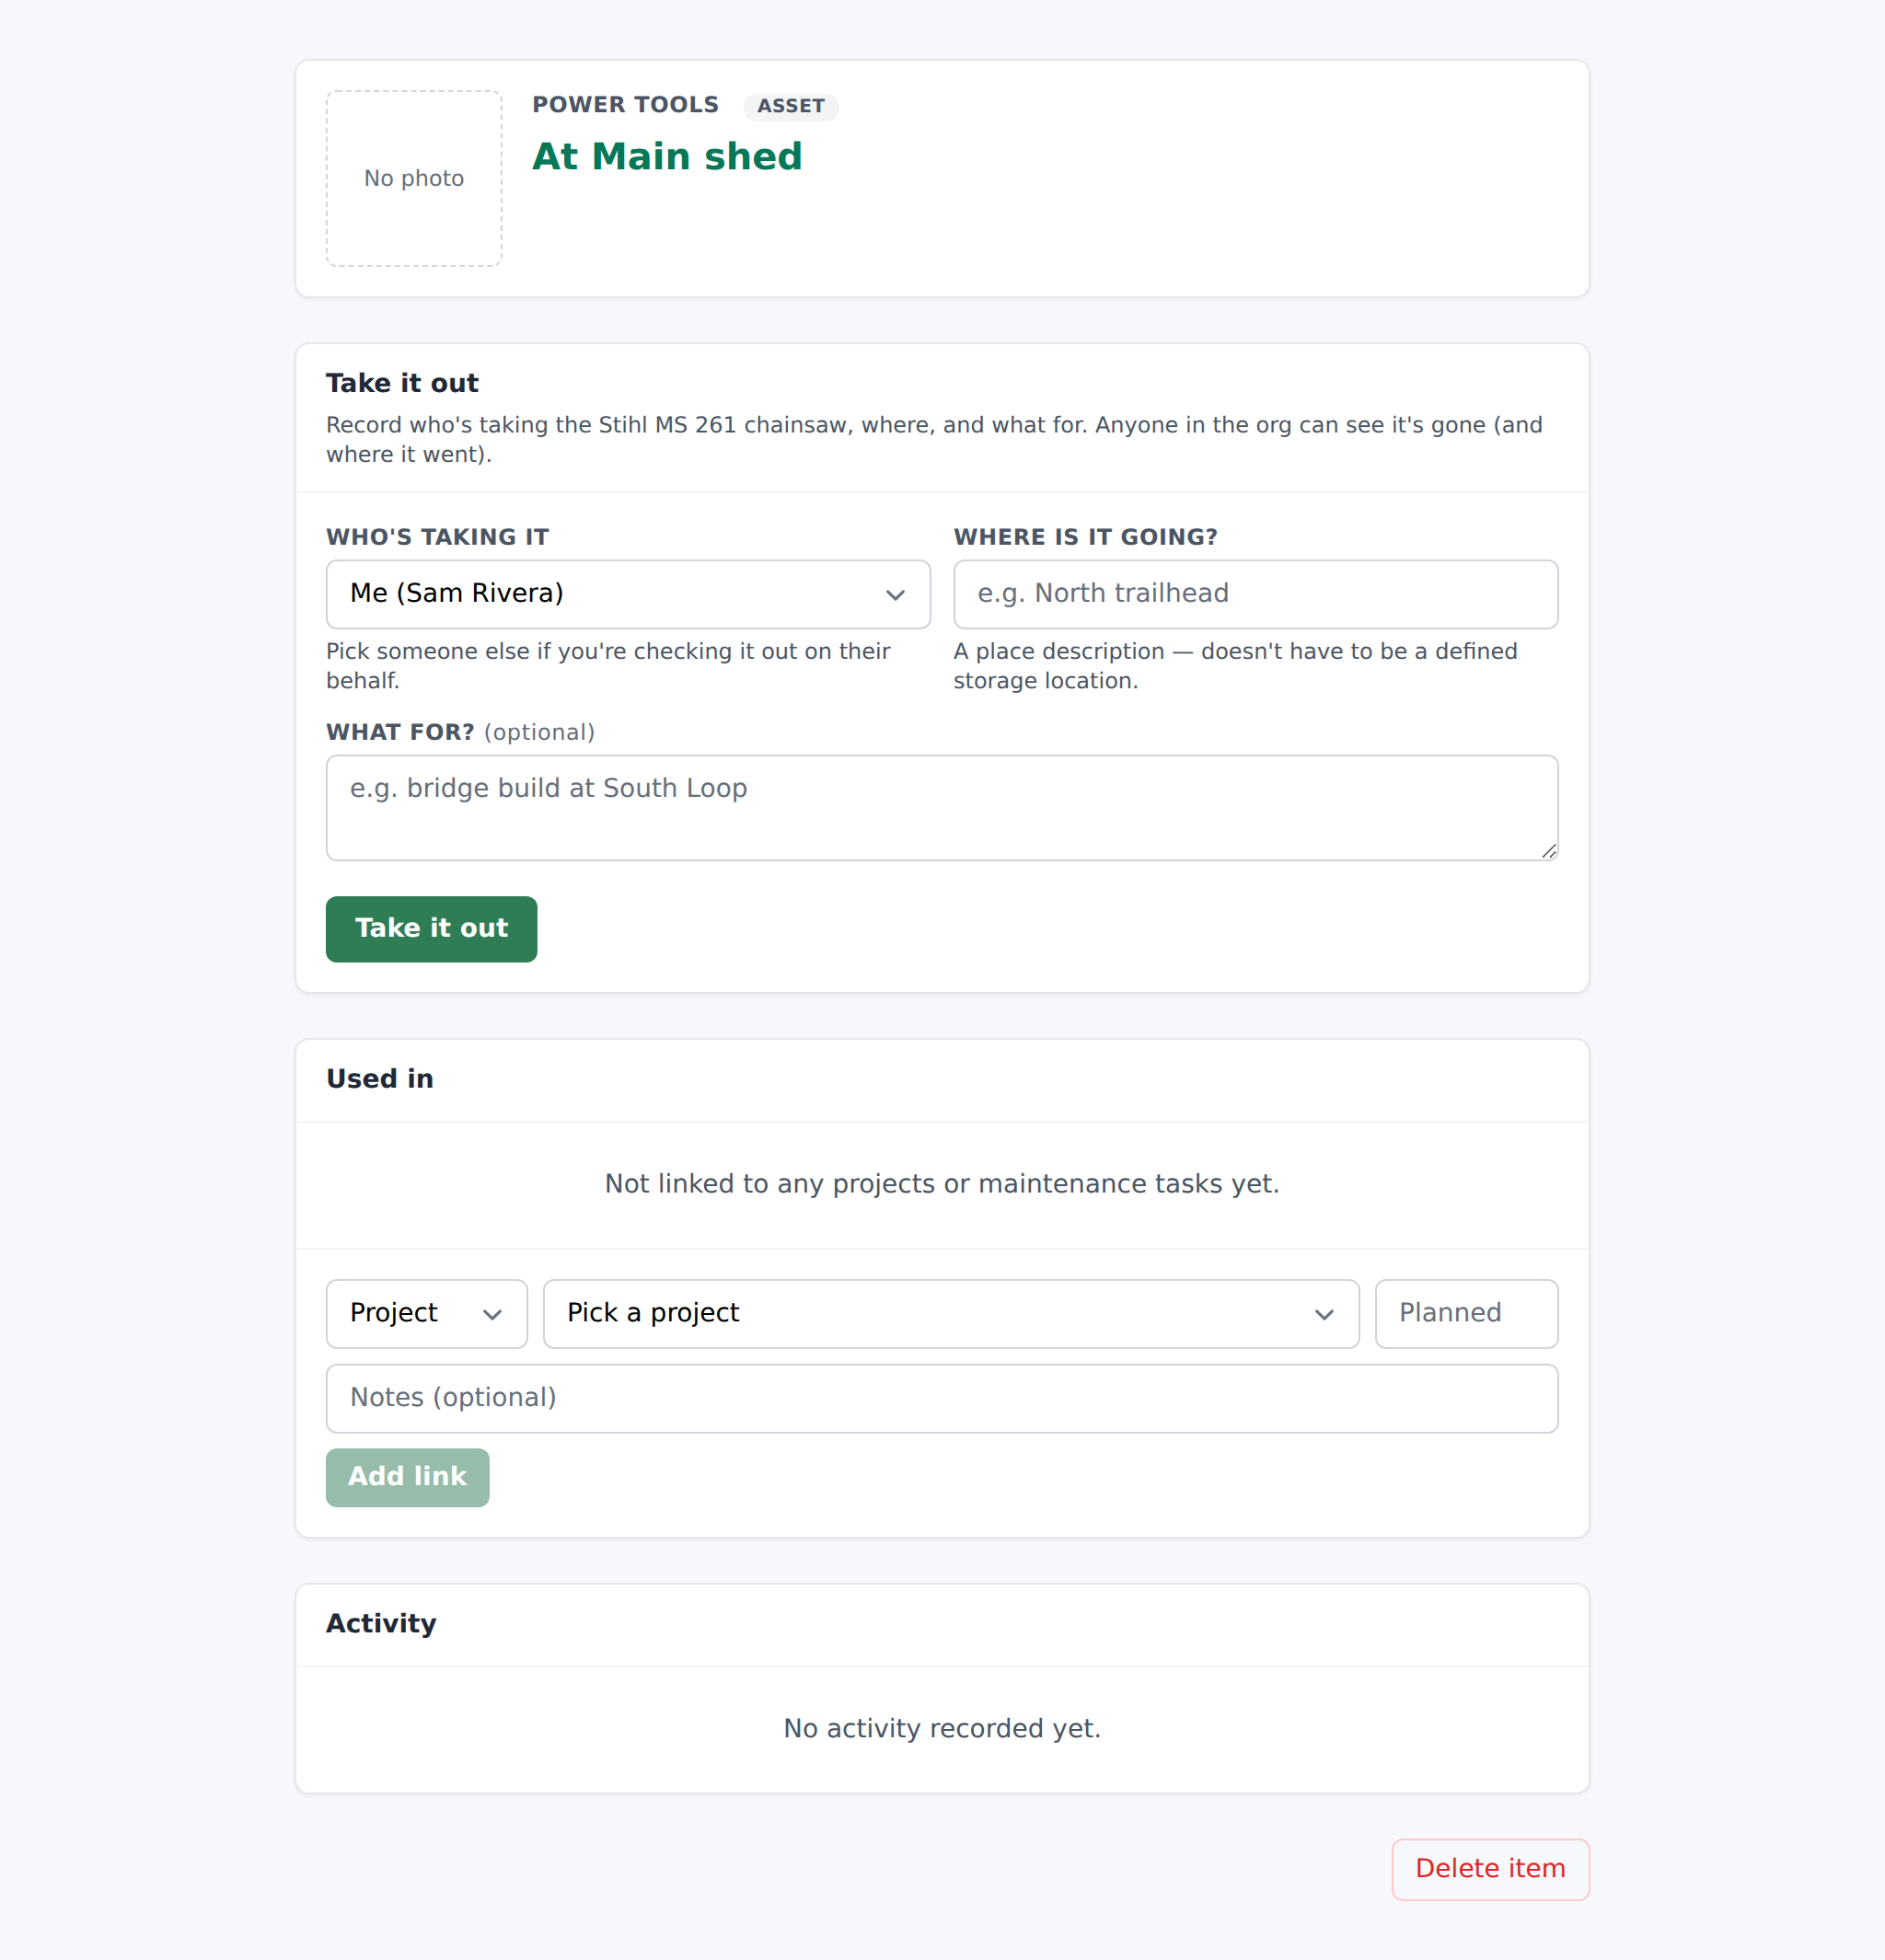
The Show page's CTA card is titled Take it out with the copy "Record who's taking the {item name}, where, and what for. Anyone in the org can see it's gone (and where it went)."
Fields:
-
How many are you taking? — only appears when you own more than one. A plus / minus stepper that stops at the number currently at home, with "The rest stay at {home location}." underneath.
-
Who is taking it — a list starting with Me ({your name}), then every active member. Pick somebody else if you are recording it on their behalf.
-
Where is it going — a search box. Type and it looks through your outstanding maintenance tasks and your trails at the same time; type a trail name and you get the trail itself as well as the work on it, so one box covers "up Granite Ridge" and "the washout on Granite Ridge". Picking a task links the trip to it, which is what puts the tool on the job rather than just somewhere.
You do not have to pick. Type North trailhead, Section 4 and press on — the words are recorded as the place, exactly as before. Nothing matching is a real answer and the box says so.
Out of signal it searches what is on the phone instead of the whole org, and tells you that is what it is doing rather than presenting a short list as a complete one.
-
Note — optional, anything the next person should know.
-
Bring back by — optional. A day the crew agreed on; the card that shows while the item is out turns red once that day has passed.
Submit button reads Record it (or Recording… while in flight).
Two people cannot take the same last unit. If both tap at once, one wins and the other sees "None available — all are already checked out." or "Only N available right now." TrailsIQ settles the race for you; it cannot check out stock that isn't there.
Bringing it back. A card for each open trip carries a Bring it back button, which opens a short sheet asking how it came back — optional, and the place to say "chain needs sharpening, ran fine otherwise" so the next person reads it before they take it. An item you own several of can be out on several trips at once, so each card closes its own trip.
A linked trip reads as one. While the item is out, its card says Out on a task over the task's title and the trail under it — the title as it reads now, not as it read when the trip was filed. Both are kept: the link so the name can be re-read, and the typed text so a deleted task still leaves a legible record of where the thing went.
Trips section on the Show page — "Past and present check-outs. Newest first." — shows the last 50 rows.
Machinery — hours and the pre-trip check
An equipment item becomes machinery the moment somebody puts a
number in Hour meter on its edit form. There is no machinery
switch to find: the reading is what says this thing has an hour meter,
and leaving the field blank keeps a set of loppers a set of loppers.
Two things turn on once it is filled in.
Take it out asks for the reading. The field opens on the last
number written down, ringed so it is clear it is the one thing you
cannot answer from the shed door — it has to be read off the machine.
Whatever you type is kept on that trip, so the history can say what
the meter said when each person took it. The item's own figure only
ever moves up: a reading below the one on file is a typo rather
than a machine that ran backwards, and letting it through would make
every later number wrong with nothing to point at.
Hours logged then appears on the Details tab, next to make and
model, serial and fuel.
Service due at is the second hours field, and it is hours rather
than a date on purpose: a machine wears by use, so one that sat in the
shed all winter is not due and one that ran every day in May is. Put
in the figure from the service sticker — the app does not work it out
from an interval, because an interval needs a last-service reading
nobody has written down and would then be wrong for every machine you
bought second hand.
Service every turns that into something that keeps itself true.
Fill in an interval — every 50 h — and closing a service task moves
the due-at on by itself. It is measured from the reading at the
service, not from the old due-at, so a machine serviced thirty hours
late does not come due again thirty hours early and hand that drift to
every service after it. With no interval the due-at is a one-off you
move yourself.
Details then carries a Service line that counts down in the units
you care about: "29 h left · due at 175 h" while there is running
left, and "Due now · 6 h past 140 h" in red once the meter is past
it. It needs both numbers and says nothing without them — a due-at
beside no reading is not a figure anybody can act on.
Servicing a machine is ordinary maintenance
An item with Machine details carries three rows on its page, and a
service box above them once it has an hour meter and a due-at.
Give it a Service checklist on the same edit form and a fourth row
leads the list: Start service, which opens that checklist as this
machine's service. Checking off its last task logs the service at the
hour reading taken when it started and moves the due-at on, the same
as closing a service task. While one is under way the row reads
Continue service. The Checklists article covers writing the list.
Log service or repair and Report a problem both open the usual
task wizard with the type set to Service / Repair and the machine
already attached — the second files it as high priority, which is the
only honest difference between "it is due an oil change" and "it will
not start". They land on the same queue as every other piece of work,
with the same notifications and the same history, because a machine's
service is work somebody has to go and do and a parallel system for
it would be a second place to look.
Two things are different from an ordinary task:
- The wizard skips what you have already answered. A machine
lives at its home location, so the task takes that pin and the
Where is it? step does not run; and the row you tapped is the
urgency, so How urgent is it? does not run either. Give the
machine a home location with a map pin and the whole thing is three
steps — the photo, the details, and done. Without a pinned home
location the wizard asks where, because a task with no position
never appears on the map or inside an offline download.
(Picking Service / Repair from the type list yourself is the
longer path — it still asks where, because nothing has told it —
but it does not ask how urgent either. That step's two questions
are about a trail obstruction, and neither is answerable about a
machine in a shed. A task filed that way starts at Medium and the
priority can be changed on the task afterwards. It will take a pin
anywhere, too: that type never needs a trail.) - Resolving it is the service record. Closing the task stamps the
machine's hour reading onto it and advances the due-at. The
Last serviced line on the item page is read straight off that
task — there is no separate service log to keep in step, which is
the whole point.
Manual and safety sheet is the third row. Add a PDF or a photo of
a page, up to 25 MB, and name it — left blank, the file's own name is
used. Mark it as a Safety sheet rather than a manual and it sorts
to the top of the list, because that is the one somebody wants at a
trailhead with cold hands. Anybody on the crew can read them; managers
add and remove them. Adding one needs a connection.
Check before it goes out is a list you write per machine, on the
same edit form — up to eight lines, in your crew's own words. A saw
and a towed compactor do not have the same walk-around, which is why
there is no fixed list. Whatever you put there appears as tick boxes
in Take it out, and what was ticked is kept with the trip. A machine
with no list is asked nothing.
Moving stock between locations
The Move button on any stock row opens a sheet titled Move stock with the header "Move from {source} (on hand: X unit)". Pick a destination location and a quantity to shift.
Runs in a DB transaction with row locks so a race between two crew members moving from the same location can't oversell. Writes two audit rows linked by a batch UUID (one debit at source, one credit at destination, kind = move).
Refuses if the source doesn't have enough: "Source location does not have enough stock to move."
Low-stock alerts
Set Low-stock threshold on any stock item — when a count crosses from at-or-above to below the threshold, a low-stock push notification fires to every manager and owner.
Push title: "Inventory low". Body: "{Item name} is at {qty} {unit} (threshold {threshold})".
Fires only on the crossing, not on every count below threshold. So a session of counting 3 shovels three times in a row doesn't spam three notifications. Once you re-stock above the threshold and the next count drops back below, the notification fires again.
Crossings back up above the threshold are silent — the amber Low pill on the Index list handles that visually, and re-notifying "we're OK now" adds noise without action.
Linking inventory to a project or maintenance item
The Show page's Used in card lets managers link an item to specific projects or maintenance tasks with a planned quantity. Empty state: "Not linked to any projects or maintenance tasks yet."
Form (manager only):
- Type — Project or Maintenance.
- Target — pick a project ("Pick a project" / "No projects yet") or an open task ("Pick a task" / "No open tasks").
- Planned qty — integer.
- Notes — optional.
Submit Add link (Linking… while in flight). Unlink asks Unlink "{target}" from this item?.
Reservation math applies when the linked target is a maintenance issue with status in progress:
- The link's
planned qty − consumed qtyis subtracted from the item's on-hand count. - The Show page renders a blue Reserved by card listing each in-progress reservation with an "In progress" pill and "X of Y already drawn" text.
- The Index page's On hand cell shows the available number first, with a blue Available chip and a subline "X reserved · Y on hand".
So a shovel item with 5 on hand, linked to an in-progress bridge-build maintenance issue with planned=2, consumed=0, reads as 3 available (2 reserved · 5 on hand) on the Index page. When the crew draws the shovels for the bridge build, they update consumed on the link and the reservation shrinks.
Project links never reserve. Only links to an in-progress maintenance item do. Project links are informational only — useful for reporting ("how much lumber is planned for the Spring Rehab project?") without holding stock.
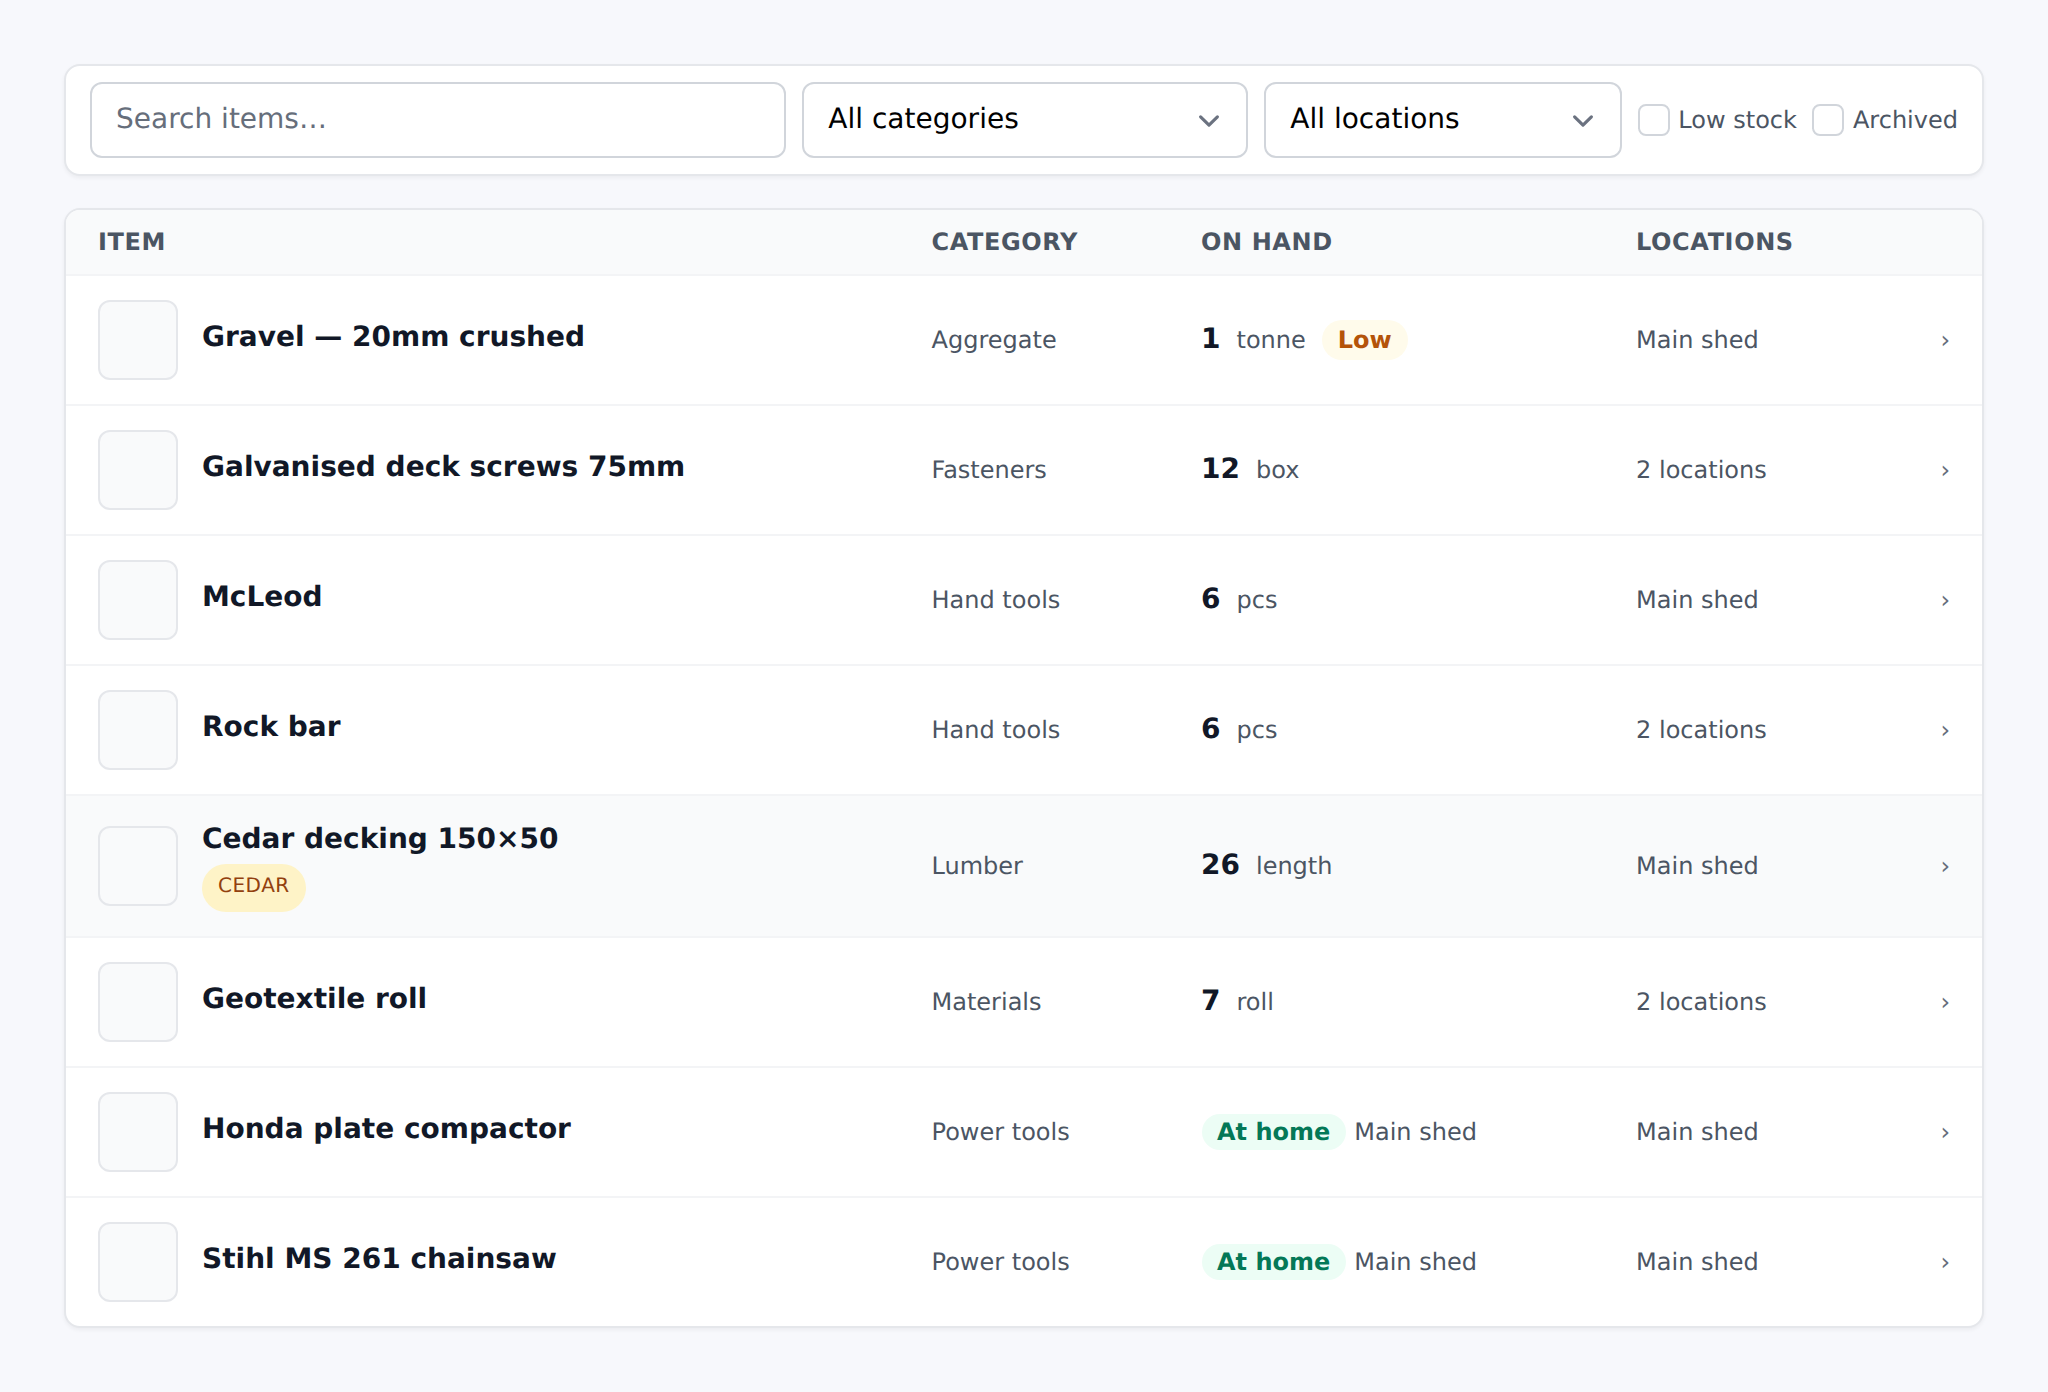
The inventory Index page
Route: /inventory. Header title: Inventory. Header actions (right side):
- Manage categories — manager only.
- Locations — manager only, jumps to Settings → Storage locations.
- Export PDF — visible to any inventory viewer.
- + Add item — manager only.
Filter bar underneath:
- Search (placeholder "Search items…").
- Category select ("All categories" default).
- Lumber-type sub-select — only appears when Category = Lumber AND matching items exist ("All lumber types" default).
- Location select ("All locations" default).
- Low stock checkbox — filter to items below threshold.
- Archived checkbox — include archived rows.
Desktop table: Item (with a 40×40 photo thumbnail), Category, On hand, Locations. Row is clickable → jumps to the item's Show page. Mobile view is a stacked card list.
Row pills:
- Assets: green At home with the home-location name, or amber Out with the assignee.
- Multi-unit fleets: "3/5 at Main Shop" with a "2 out" chip.
- Stock rows: quantity + unit.
- Low-stock items: amber Low chip.
- Items with in-progress reservations: blue Available chip.
Empty state: "No items yet. Add the first one." — the CTA link only renders for managers; everyone else just sees the copy.
No bulk-select checkboxes. No bulk edit, no bulk move. Every edit is one row at a time. Fine for the typical org's 50–200 SKUs; larger fleets would want batch tools we haven't built yet.
Field-app inventory
The Field App has the full inventory surface — the home tab has an Inventory tile that opens a slide-in panel with three views:
- List — grouped by category, with the same search + category + location filters as the dashboard. Lumber-type filter appears when Lumber is selected.
- Item detail — the same facts as the dashboard's Show page, laid out for a phone. See Reading an item below.
- New item / Edit item — manager only, same form as the dashboard.
Reading an item
An item page answers three questions and puts each one on its own tab, so the one you came for is a tap rather than a scroll. Edit sits next to the close button at the top.
A stock item opens on Stock: how much there is in total, then a row per place it is kept. Each row carries the place, what kind of place it is, when somebody last counted it, and big − / + buttons with the count between them — tap either, or type straight into the number. Stock at another location and Move between locations are both here.
Equipment opens differently, because a machine has no per-location count — it is on the shelf or out with somebody, and that is the first thing the page says. A card at the top carries its picture, where it is, and one button: Take it out. Pressing it opens a sheet over the page rather than unfolding a form underneath, so the questions are one screen with one job and Record it is the only way out that writes anything. While it is out, a card names the person, the place and the job, with its own Bring it back. Equipment has two tabs rather than three.
Details is what the thing IS — category, unit, the low-stock number, and for lumber a block of dimensions with the volume of one piece worked out for you. Any notes you saved on the item are at the foot of it, with the photo.
A machine carries three more: make and model, serial and fuel, all on the same Edit form as everything else and all optional. Fuel is a plain box rather than a list, because what is worth writing down is as often a mix ratio as a kind — Gas · mixed 50:1 is one fact. A field you leave blank does not appear on the page at all, so an item you have not filled in reads as an item rather than as an empty form. These are for equipment only: they are not offered on a stock item and are not stored on one.
Activity is everything that has happened: every count and move for a stock item, and every trip for a machine. A run of taps in one visit shows as one line that says how many changes it stands for.
Reading the list
The line under the title says whose catalog this is, how many items are in it and how many places they are kept, so the size of the thing you are scrolling is answerable before you scroll it.
Categories are a row of chips rather than a picker, each carrying how many items it holds. A category your org has set up but never put anything in is left off the row — its only outcome would be an empty list — and the counts are taken with whatever else is filtering, so a chip says what tapping it will show rather than what it would show on a clear screen.
Sort by name or by quantity. The control on the right of the filter row names the order the list is in; tap it to swap. Quantity puts the biggest pile at the top of each category, which is the order you want when you are deciding what to take.
Anything on a shelf with nothing on it gets counted in an amber chip in the filter row — 3 out of stock — and tapping it narrows the list to exactly those. Those rows also read differently: the number goes gray and says out instead of the unit, and the row itself is tinted.
A row leads with its amount. The quantity is the first thing on it, in the unit you set, going amber and reading low when it is under the threshold for that item. An item kept in more than one place names each of them with its own count rather than saying "2 locations", which is the number somebody loading a truck is actually after. Equipment is the other shape: a picture or an icon, where it lives, and whether it is Ready or Out.
A long category shows its first few and offers the rest. A lumber rack can run to dozens of lines; the section shows enough to read its shape with a Show N more under it, so the next heading is never a screen away.
Manage locations sits at the foot of the list and names the places you keep things, which is the quickest way to answer whether you already made one for the trailer.
Managers with manage_inventory get an Add item button in the bottom corner of the panel, above the dock.
Share PDF — where the device supports it (iOS + Android native shells), the panel offers a Share button that opens the OS share sheet with the inventory PDF attached. Useful for firing off a stock snapshot to a partner or a grant funder from the trail.
Empty states: list empty and no filters — "No inventory yet. Tap Add item to create the first one." Empty stocks on an item — "No stock recorded yet. Tap a location below to add some." Offline — "You're offline. Inventory will refresh once you're back online."
Working offline: almost everything in Inventory saves without a connection. Counts, the +/− buttons, moving stock between locations, editing an item, adding or removing an item photo, and editing a location all go into your queue and upload by themselves once you have signal. You get a green line confirming it on the screen you made the change from, the number you set shows straight away rather than the old one, and the pending badge in the header counts it — tap that to see everything waiting, item by item.
Two things need a connection and say so when you try: adding a new storage location, because stock cannot be assigned to a location that does not exist on the server yet, and deleting one, because that has to check whether stock is still assigned to it first.
Activity on the phone groups a run of taps. Taking a stack of lumber out of the shed is a row of presses on −, and the phone shows that as one line — the total that came off, the count you are left with, and a note saying how many changes it stands for. A different location, a different person, a change in the other direction or a long pause all start a new line, and the full list of individual changes is still on the item's page on the dashboard, which is where you can remove one.
Offline create: tapping Add item while offline still works — the item is queued in the field-app outbox and lands on the server the next time the device gets signal. The row shows in the list with a blue Pending badge and is disabled for detail-tap until it syncs. A photo attached to the create rides along in the queue and uploads once the item exists, and the initial Add quantity (seed-stock) is folded into the same POST so a queued create → sync lands the item AND the starting count atomically.
Photos, cost tracking, barcodes
Photos — one photo per item, up to 5 MB, JPG / PNG / WebP. No gallery, no annotations. The photo shows as a 40×40 thumbnail on the Index list and full-size on the Show page.
Cost tracking — not built. No unit cost, no total value, no per-project spending rollup. If you need to answer "how much did we spend on lumber in Q2?", the closest surface today is the Expenses dashboard (Category = Supplies or Tools) rather than inventory.
Barcode / QR — not built. No barcode field, no QR generation for tagging shelves. If those matter for your ops, tell us.
Permissions
Two permissions in the catalog:
- View inventory — "See the inventory list, item details, stock counts and asset-checkout status. Required to use any of the inventory surfaces. Counting stock and checking assets in/out are allowed for anyone with this right."
- Manage inventory — "Create new items + storage locations, edit catalog rows (name, category, photo), delete items, manage the org's custom-category list. Counts and check-outs/-ins stay open to anyone who can see the inventory."
Defaults: Owner + Manager + Field worker get both TRUE. Volunteer gets both FALSE.
Counting and checking assets in/out are open to anyone with View inventory — not gated behind Manage. This is deliberate — the crew member at the shelf can update the count and the crew member with the chainsaw can log the checkout, without needing to bother a manager.
If you want volunteers helping with counts, grant them View inventory on their row (or in Settings → Roles & permissions if you want it default-on for the whole role).
Sidebar link only shows for viewers with the permission. Storage locations link (Settings → Storage locations) is gated by View inventory too.
Common gotchas
- Tracking mode is one-way — pick Stock or Asset at create time and it sticks. If you accidentally created an asset item that should have been stock (or vice versa), the fix is delete + re-create.
- Deleting a storage location is blocked while stock rows still reference it. Move or zero-out the stock first.
- Deleting an item cascades its stock rows. Confirm reads "Stock rows will be removed too." Loss of history — if you might need the audit trail, archive instead of delete.
- You can't shrink the number owned below the number currently checked out. API returns "Can't reduce total below N — that many are currently checked out." — wait for the trips to close (or record returns) before shrinking the fleet.
- Removing an activity-log entry does NOT undo the stock change. Confirm literally says "Remove this activity entry? This only forgets the log line — the stock change itself stays as it is." Adjust the count separately if you also want to reverse the number.
- Lumber measurements belong to the Lumber category. Move an item to a different category and they are removed on save — the edit page warns you before you save, so it is not a surprise.
- Low-stock alerts fire only on the crossing. Repeated counts below threshold are silent (no spam). Crossing back up is also silent — the amber Low pill on the Index list is the ongoing signal.
- Project links never reserve stock — only links to an in-progress maintenance item do. Link an item to a project for reporting and to a specific maintenance task if you want the reservation math to kick in.
- Field workers can count stock and check assets in/out by default. Only creating / editing / deleting the catalog row itself needs Manage inventory. That's a feature — the person at the shelf shouldn't need a manager to update a count.
- No cost tracking, no barcodes. If your ops needs either, work around: use the Expenses dashboard for spending totals, print labels externally and stick them on shelves.
What's next
- Set up your handful of real storage locations before creating items. Empty locations later is more work than getting them right upfront.
- If you'll be using the bridge calculator, tag Lumber items with the dimension fields on the create form — the calculator matches millimetre-for-millimetre against your stock.
- Grant View inventory to volunteers if you want them helping with counts on volunteer days — they can adjust counts without being able to touch the catalog.
- Read the Members, roles & permissions article for the per-user override workflow (grant / revoke Manage inventory on a specific person).
- Read the Projects and work planning article to see how linked inventory reservations show up on the Project's Show page.