Team
Work hours, expenses, and per-issue time logs
Log crew time and spend three ways — quick time logs on a maintenance issue, payroll work hours on the dashboard, and expenses for reimbursement. Covers the shared draft → submit → approve flow, mileage, category setup, month rollups, and PDF exports for payroll + finance.
TrailsIQ tracks crew labor and spend through three related surfaces: quick time logs you file against a specific maintenance issue in the field, work hours you submit for payroll on the dashboard, and expenses you file for reimbursement. They share the same draft → submit → approve flow, the same rollups, and the same permission model, so once you learn one, the others feel identical.
The three concepts
- Quick time log (per maintenance issue) — a "how long did I work on this specific issue" note filed straight from the issue's detail card in the field app. Duration in minutes + a short note + the work date. Rolls up to the linked project's Hours worked tile and powers the org-wide Work report under Reports in the menu.
- Work hours (payroll timesheet) — a decimal-hours entry with a category (regular work, trail maintenance, admin, meeting, training, travel, holiday, vacation, sick, etc.) and optional description + project or task link. Submitted for approval and exported as a PDF timesheet.
- Expense (reimbursement) — an amount + currency + category + optional receipt image + optional project or task link. Uses the exact same approval + export machinery as work hours.
Work hours and Expenses ask the same questions in the same order — Day, Week and Month across the top, a review queue for approvers, the same draft → submit → approve flow, the same rollups and the same permissions. Hours are tracked the same way money is.
They do not currently LOOK alike. Expenses has been rebuilt and Work hours is still on the older layout, so the two review queues in particular work differently. Where that matters below, the heading says which screen it is describing.
Quick time logs are the outlier — they live inline on a maintenance issue and don't go through the draft → submit → approve flow themselves. They land, they count, they roll up, and each one also puts a draft on the timesheet of the person it is for, which is where the approval happens.
Logging time from the field app (quick time log)
Open a maintenance task on the field app. The detail card shows a Work log action alongside Edit and Share, with a small badge counting any entries already filed. Tap it and the full-screen "Work log" overlay slides up.
Header reads "Work log · Xh Ym total" when there are entries. Under Add entry you get three inputs — hrs, min, and What did you do? — and a Log button.
Any active member can log. Owners and managers can delete anyone's log; field workers and volunteers can only delete their own.
Existing entries render under a History heading (empty state: "No time logged yet."). Tap the pencil on any row to edit hours / minutes / activity / date inline, then Save or Cancel.
If you open a task and get "This task isn't in your current organization — it may have been moved, deleted, or you've switched orgs. Refreshing now…", you switched orgs since the task was cached. The app auto-refreshes.
Where the time surfaces:
- The Project's Hours worked tile — every quick time log on an issue linked to a project rolls up here.
- The org-wide Work report — Reports → Work report — aggregates by user, by trail, and by issue type over a 30-day default window. Once anybody on your Team page is marked paid staff, the totals split into Volunteer hours (members who are not paid staff, plus any outside volunteers) and Paid staff hours, and their rows under By member say paid staff. Each hour is counted by the role its person had on the day it was worked, so somebody hired partway through the window has their earlier time counted as volunteer time. If trail users send you reports from TrailsIQ Go, a banner at the top counts how many arrived in the window and how many are still waiting for review, with a button that opens them. Rejected reports are counted too, even though rejecting one deletes it. Export CSV in its header downloads the raw entries, whose last column, role, says volunteer, paid_staff or outside; Share offers a PDF with the hours totalled (split the same way, with a TrailsIQ Go line when there were any) or a link to the report exactly as you are looking at it.
- The maintenance issue's own history — so anyone re-opening the issue sees who logged what.
Volunteers who are not on your team
A trail day often has helpers who will never have an account — a school group, a scout troop, neighbors who turned up. Under Who worked? on the field app, or Volunteers not on your team in the dashboard's log form, put in how many of them worked the session. They get one entry between them, reading "8 outside volunteers", and their time is the session's length for each of them: eight volunteers for three hours is twenty-four hours.
Walk-ins at an event are counted the same way: a signup with no email on an event's attendee list is one of your Outside volunteers, for the length of the event. Somebody on your team who comes to an event gets the time on their own work hours for that day, already approved, and removing them from the list takes the entry away again. Events has the details.
That time counts everywhere volunteer time is counted — the task's total, the project's Hours worked, the Work report (as an Outside volunteers figure beside the total, with how many non-members and sessions it came from, as its own row under By member, and as a line in the PDF export), and your umbrella account's volunteer hours if you have one. It never lands on anybody's Work hours, because there is nobody's timesheet to put it on, so it does not wait for approval. Owners and managers can remove the entry, and so can whoever logged it.
Your logged time lands in Work hours
Every quick time log also appears in Work hours for the person it is for, on the same date, as a draft. It reads "From task:" followed by the task's name, so you can tell it from a line you typed in yourself. Review it with the rest of your week and submit it like any other entry — there is nothing to type twice. Unlike a draft you type yourself, it isn't private: whoever approves work hours can see it on your timesheet before you submit, so a crew lead who logged a session for you can check it arrived.
A few rules keep the two in step:
- The task decides the date and the hours. Change them on the task's work log and the work-hours entry follows. On the Work hours screen those two fields are locked on an entry that came from a task; the category and the description are still yours to change. Tasks default to Trail maintenance, or Infrastructure when the task is on a structure.
- Once the entry is submitted or approved, the task's time is locked. Editing or deleting that log is refused with a message saying why, because an approver has already looked at that number. If it needs changing, ask whoever approves work hours to send the entry back: it returns to draft, follows the task again, and you resubmit it. The note on a log can always be edited.
- Deleting the log removes its draft. Deleting the entry on Work hours only takes it off your timesheet — the time stays logged on the task.
- Time you already typed in is not doubled. If you entered hours on Work hours for that task on that day yourself, the log does not add a second entry.
- Only from now on. Time logged before this arrived was not copied across, because most crews had already entered those days by hand.
Organizations that have switched Work hours off in their workspace modules get none of this — quick time logs work exactly as before.
Logging the same session for everybody who was there
Most trail work is done by more than one person, and everybody's hours count. Under the three inputs — on the field app and on the dashboard's issue panel alike — is Who else worked this session?, listing every active member of your organization apart from you. Tick the people who were with you and each of them gets their own entry for the same date, the same duration and the same note.
It is the same session, so it is the same time for each person: two of you on a bridge for ninety minutes is ninety minutes each, not forty-five. If you want to record different amounts, log them separately.
An entry somebody else filed for you says so — the row reads "· logged by Dana Whitfield" under the name the hours belong to, so a total you did not enter yourself always has an author you can ask about it. Your own entries carry no such line. The draft it puts in your Work hours says the same thing, "Logged by Dana Whitfield", so you meet the name where you meet the hours.
The list is the people your organization has, so somebody who has been invited but has not accepted yet does not appear, and neither does anybody outside your organization. On the field app the list travels with the rest of your offline data, so you can log a whole crew's afternoon with no signal and it syncs when you find some.
Logging work hours from the dashboard
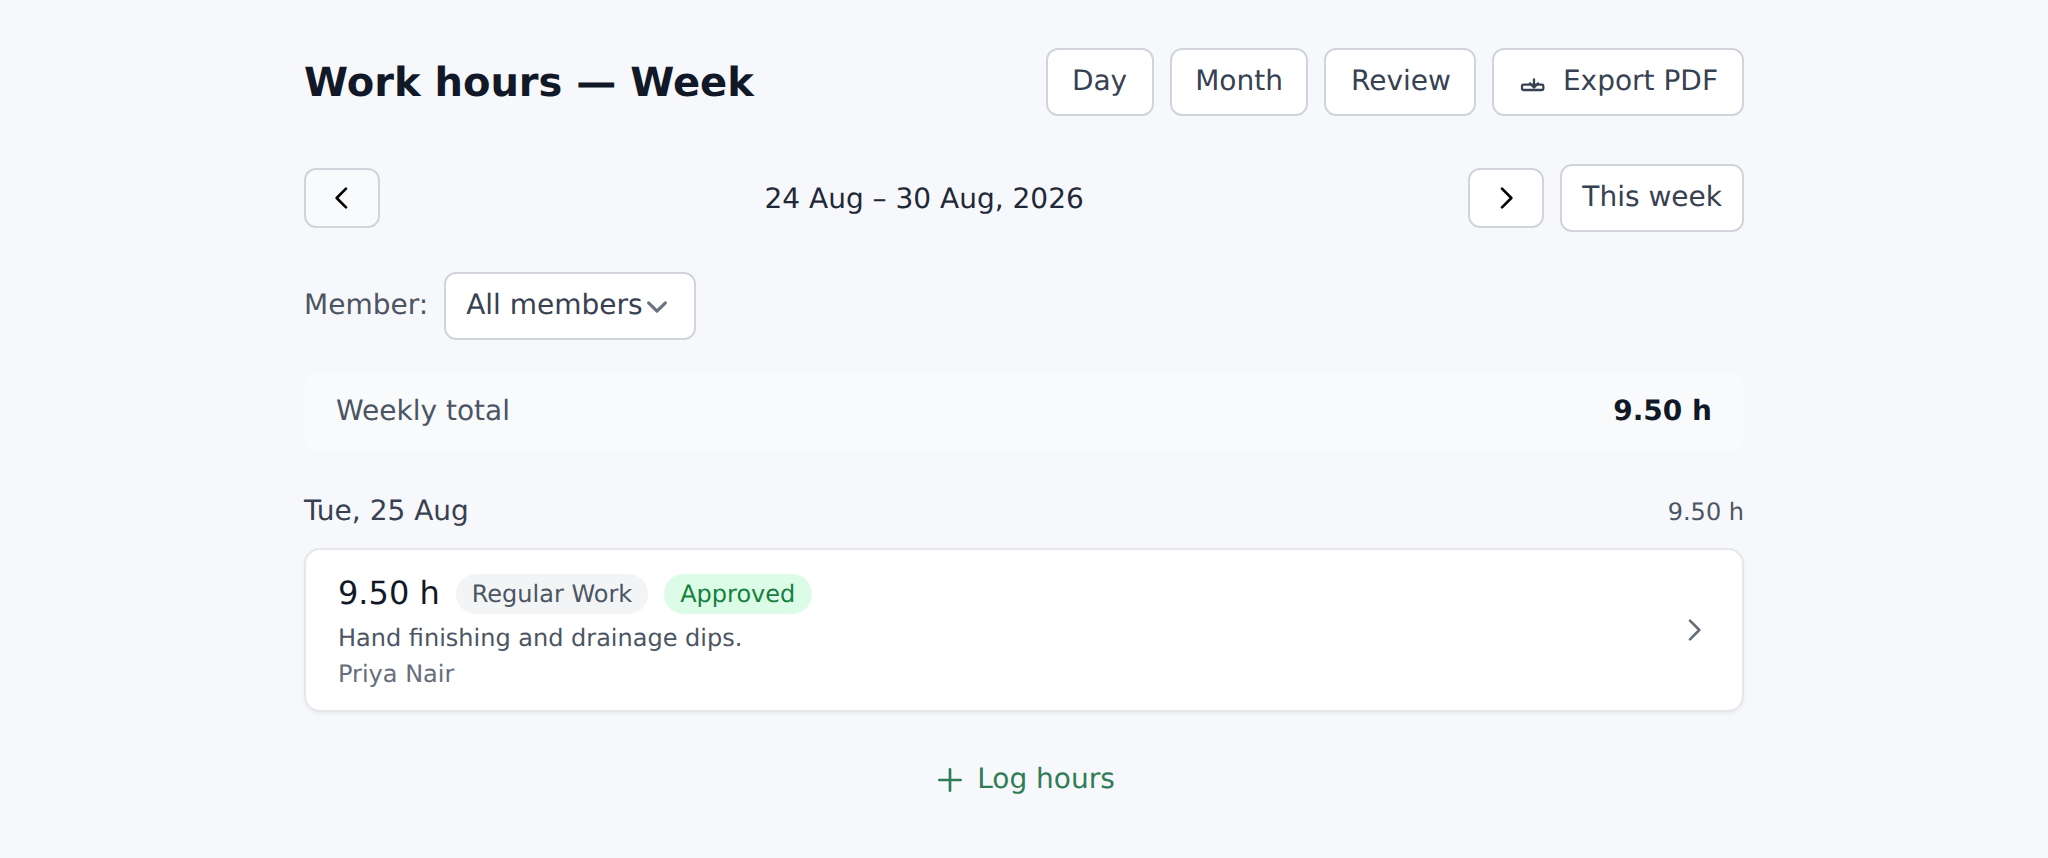
Open Work hours from the sidebar. Across the top are Day, Week and Month, and the page is the same on all three; the range only decides which days you are looking at and how the entries are grouped (by day, or by week in a month). Approvers also get Needs review, with a red count of entries waiting on them. Everybody gets Export PDF and Log hours, and Drafts whenever you have entries you haven't submitted yet, with an amber count of how many.
Under the header:
- The period bar — arrows to step back and forward, the period you are on, and Today, This week or This month to jump back when you have wandered off. Approvers get a member dropdown on the right, defaulting to All members.
- Four totals — the period's hours, what is still awaiting approval, what is approved, and how much is linked to a project or task.
- On Week, a bar per day, with today in amber. Press a day to open it.
- The entries, grouped, each with its hours, what was worked on, its category and link, who it belongs to and its status. Press a row to open it: that is where you submit, edit, approve, send back or delete it.
- On the right, the period's total split by category, the hours by member, and where the time went — the projects and tasks the hours are linked to.
Press Log hours to open the entry form in a popup over the page. Fields:
- Hours for — approvers only. Pick yourself, anybody on the team, or somebody invited who has not signed up yet (see Logging hours for someone else below). It starts on the member the page is filtered to.
- Date — required. It starts on the day you are looking at, or on today when today is in the period.
- Hours — 0.25–24 in 0.25 steps. Type it, use − and + to move a quarter hour at a time, or press 4 h, 6 h or 8 h under Quick fill.
- Category — pick from the enabled categories (see below).
- What you worked on — optional, up to 2000 characters.
- Link to project or task (optional) — pick either a project or a specific maintenance task, not both. If you set both the server silently drops the task link.
Save with Save entry or bail with Cancel. Entries land as drafts — private to you until you open the row and press Submit for approval, or press Submit N drafts above the list to send every draft on screen at once. Drafts in the header lists every draft of yours whatever its date, including hours drafted from a task weeks ago and anything sent back, and Submit all there sends the lot.
Logging hours for someone else
Anyone who approves work hours can log hours for another member — a volunteer who never opens the app, or a day somebody forgot to enter. Pick them under Hours for. The Category list switches to that person's categories, the ones their role is allowed under Settings → Work hours.
Hours you log for somebody else are approved as you save them, with you as the approver, because logging them is the check. They do not land in the member's drafts. Their timesheet shows the entry with Logged by and your name, so a total they did not type in always has an author they can ask. To correct one, delete it and log it again.
Somebody who has not signed up yet is in the dashboard's list too, under Invited, not signed up yet: anyone with an invitation on the Members page, including people added with Add without sending. Their hours are approved the same way and show under their name with (invited) after it. When they accept the invitation, every one of those hours moves to their new account. The member filter at the top of the list offers them as well, so you can see what is waiting for one person.
On the field app it is the same choice in a different shape. Open Work hours and press Log hours: the form opens on Hours for, set to you. Press Change to pick a member. The category buttons under it switch to that person's categories, and the button at the bottom says who the time is for, for example Log 2h 15m for Dana · today. It lists team members only; hours for somebody invited and not signed up yet are logged from the dashboard.
The field app's form also works a little differently from the dashboard's:
- Date is a strip of the last seven days, with today on the right. Press the date above the strip to pick an older day.
- Time moves a quarter hour at a time with − and +. You can also press 30m, 1h, 2h, 4h or 8h.
- Category shows the four categories you log most often as buttons. Everything else is under More, which has a search box.
There's no hourly-rate field. Payroll rates live outside TrailsIQ.
Logging an expense
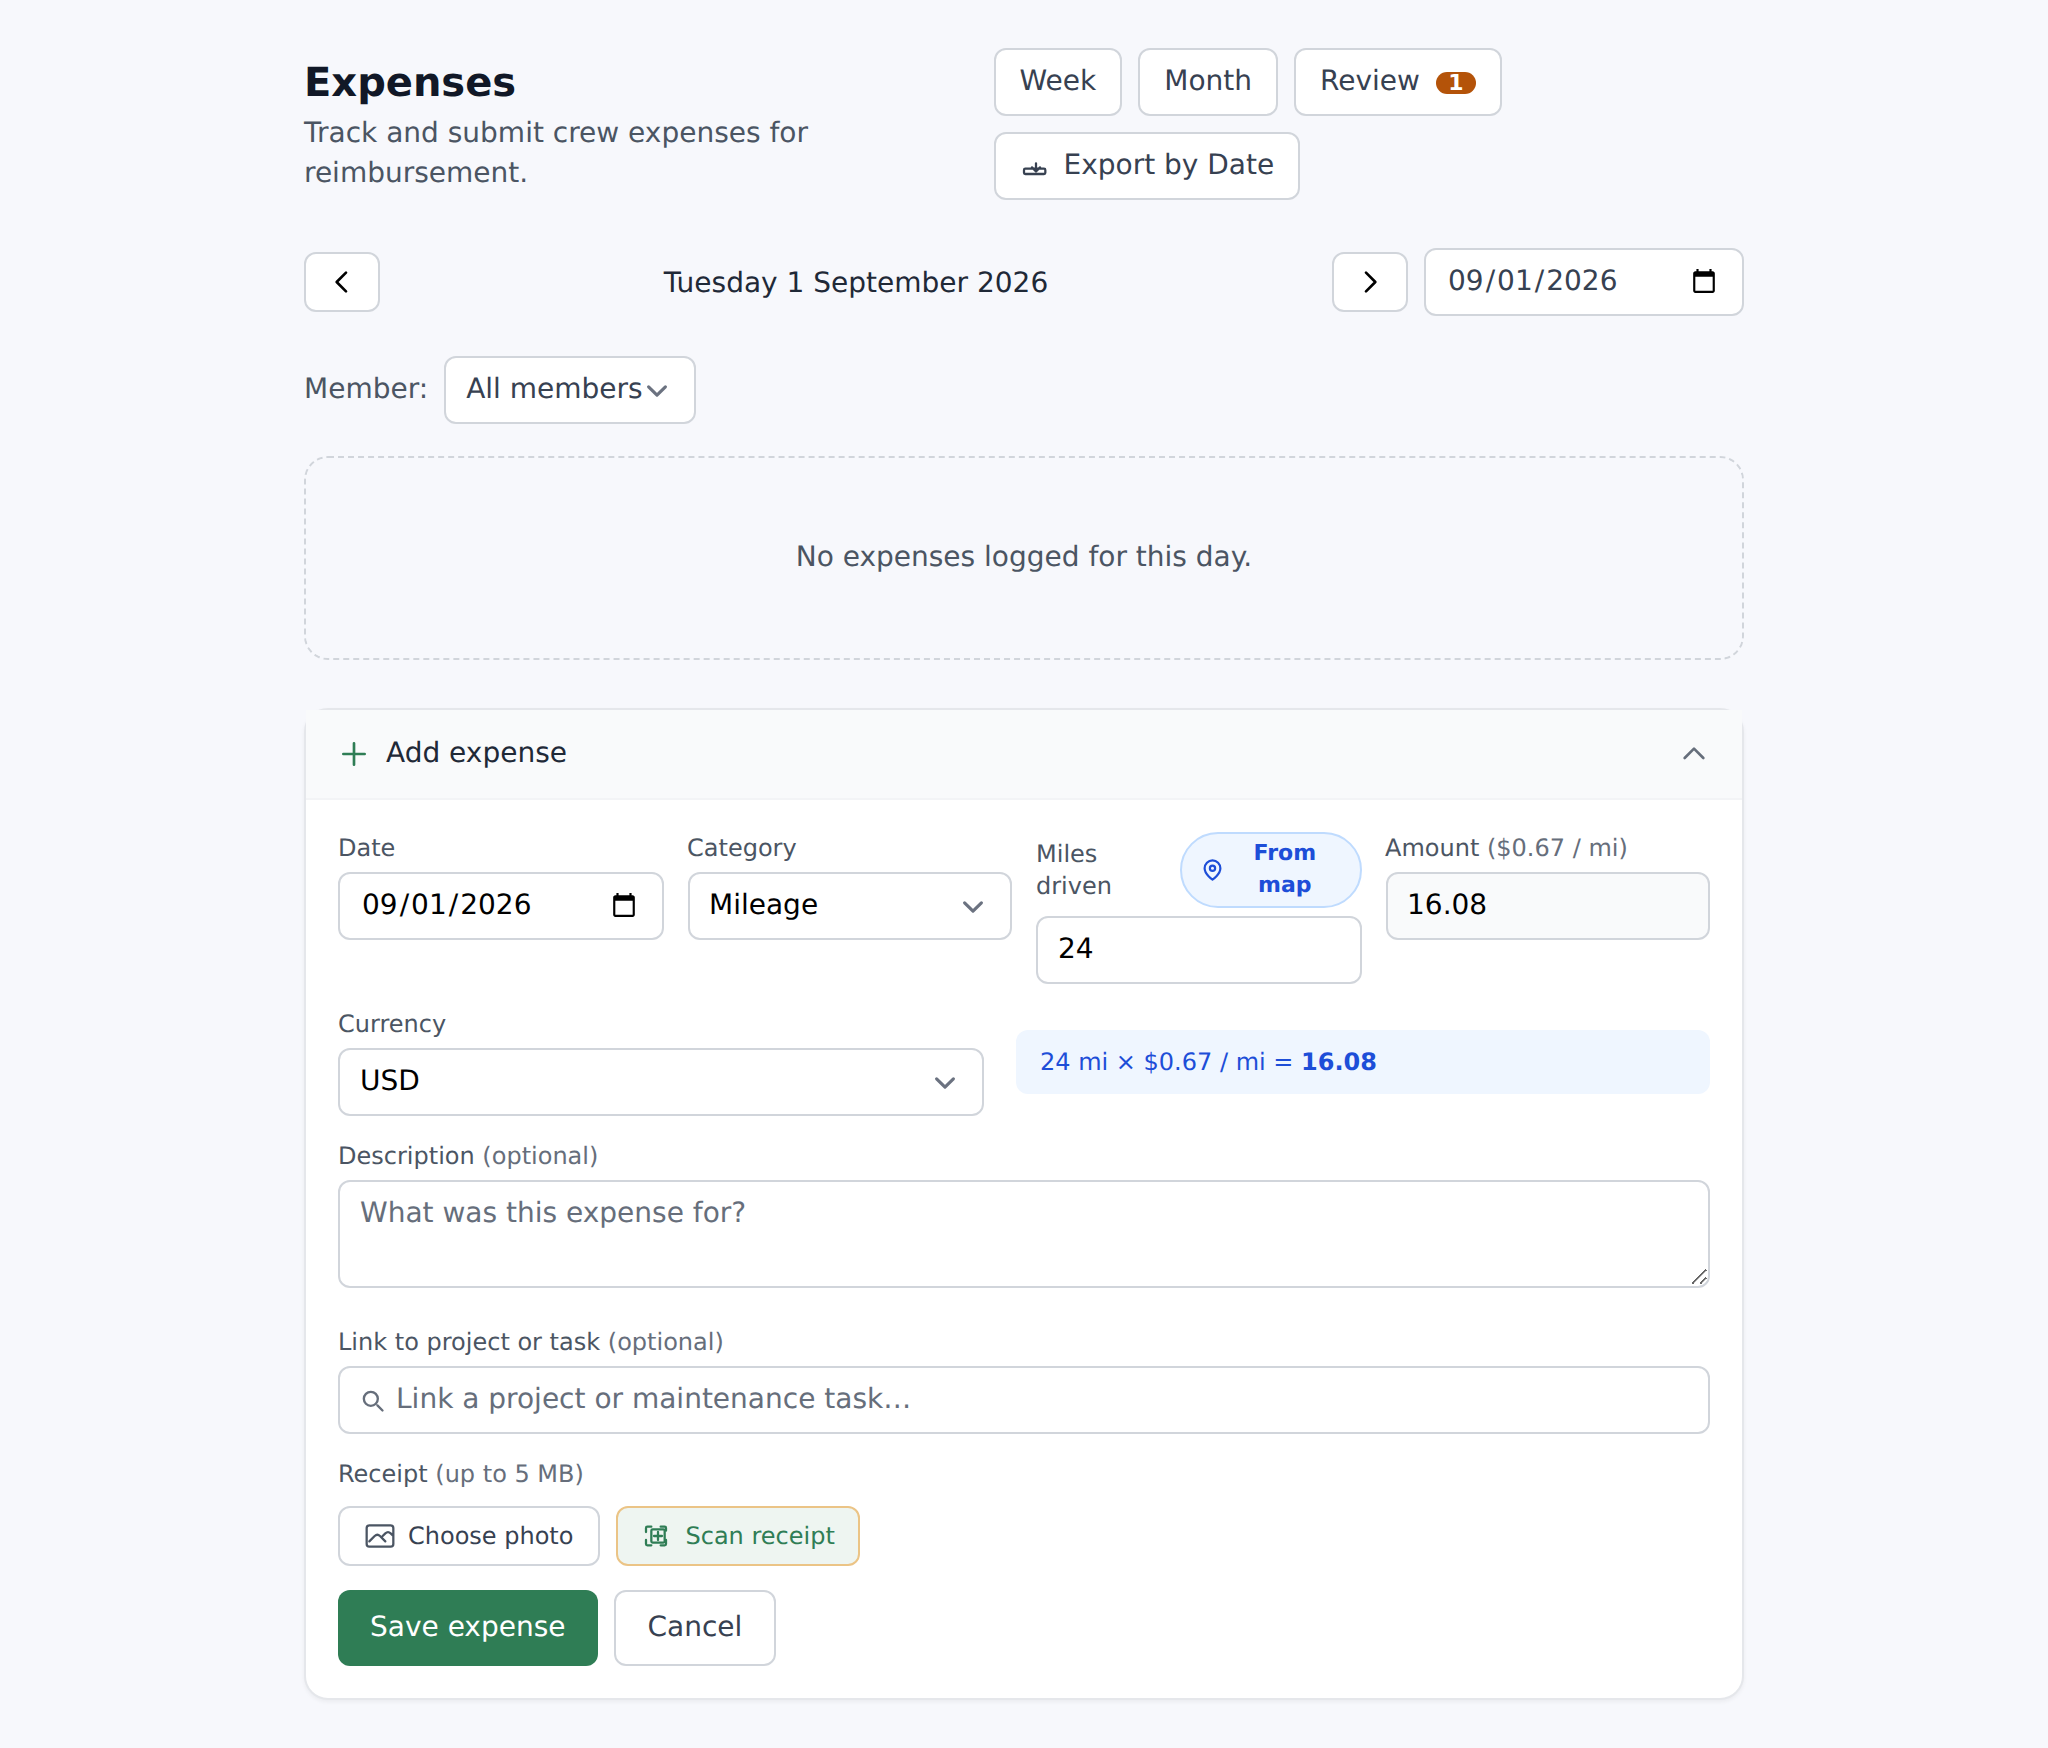
Open Expenses from the sidebar. It opens on today, with Day, Week and Month across the top and arrows and a date picker under them for moving around. Approvers also get a green Review button carrying the number of expenses waiting on them; when nothing is waiting the button is not there at all.
Add expense sits in the header of all three, and it always files against a day: press it from Week or Month and you land on the day view with the form already open, on today if today is inside the period you were reading and on that period's last day if it is not. The date is a field on the form, so you can change it.
Press Add expense and the entry form takes over the screen — it is a full-screen sheet, so nothing behind it is in the way, and the only way out is the × in its own top corner. It is the same form in the field app. Filing an expense from the phone and filing one from the dashboard are the same screen with the same controls in the same order, so there is only one of these to learn.
- Category — a grid of tiles rather than a dropdown. Five of your enabled categories get a tile of their own and the sixth is Other, which opens a panel carrying everything that did not fit — Accommodation and Transport on a workspace with the full catalog turned on. Anything you can file against is in one of those two places. Picking Mileage swaps the amount for a distance (see the Mileage section).
- Date — three chips for today and the two days before it, and a calendar button for anything else. Required, and it must be today or earlier.
- Amount — 0.01 to 99,999.99.
- Currency — dropdown of 10 codes (USD default: CAD, EUR, GBP, AUD, NZD, CHF, JPY, MXN, ZAR).
- Receipt (optional) — one image, up to 5 MB, JPG / PNG / WebP. Scan receipt opens the scanner, which finds the edges of the receipt, straightens it and attaches it; the amount and the date are yours to type in. Upload picks an image from the device instead.
- What was it for? (optional) — a note for whoever approves it.
- Link to project or task (optional) — same shared picker.
The running Total sits beside the green Add expense button at the foot of the sheet, so what you are about to file is on screen when you file it. Same draft → submit → approve flow as work hours.
On the field app, the scan button beside Add expense is a shortcut. Tap it from the expenses list, photograph the receipt, and press Done: a new expense opens with the receipt already attached, ready for the category and the amount. Close the scanner without taking a picture and you are back on the list.
Categories and org configuration
Both surfaces come with a catalog of categories, and both can be trimmed to just the ones your org actually uses.
Expense categories: Mileage, Fuel, Materials, Equipment, Food, Accommodation, Transport, Other. The catalog is fixed — you can switch any of them off, and there is no way to add one of your own. Switching one off removes its tile from the form, and a category that no longer fits the grid moves behind Other rather than disappearing.
Work hour categories come in three groups, and you can add your own:
- Day-to-day work — Regular work, Trail maintenance, Infrastructure, Points (points of interest), Lifts, Other.
- Office — Admin, Meeting, Training, Travel.
- Time off — Holiday, Vacation, Sick, Other leave. Kept separate so payroll can split paid work from leave on the same submission surface.
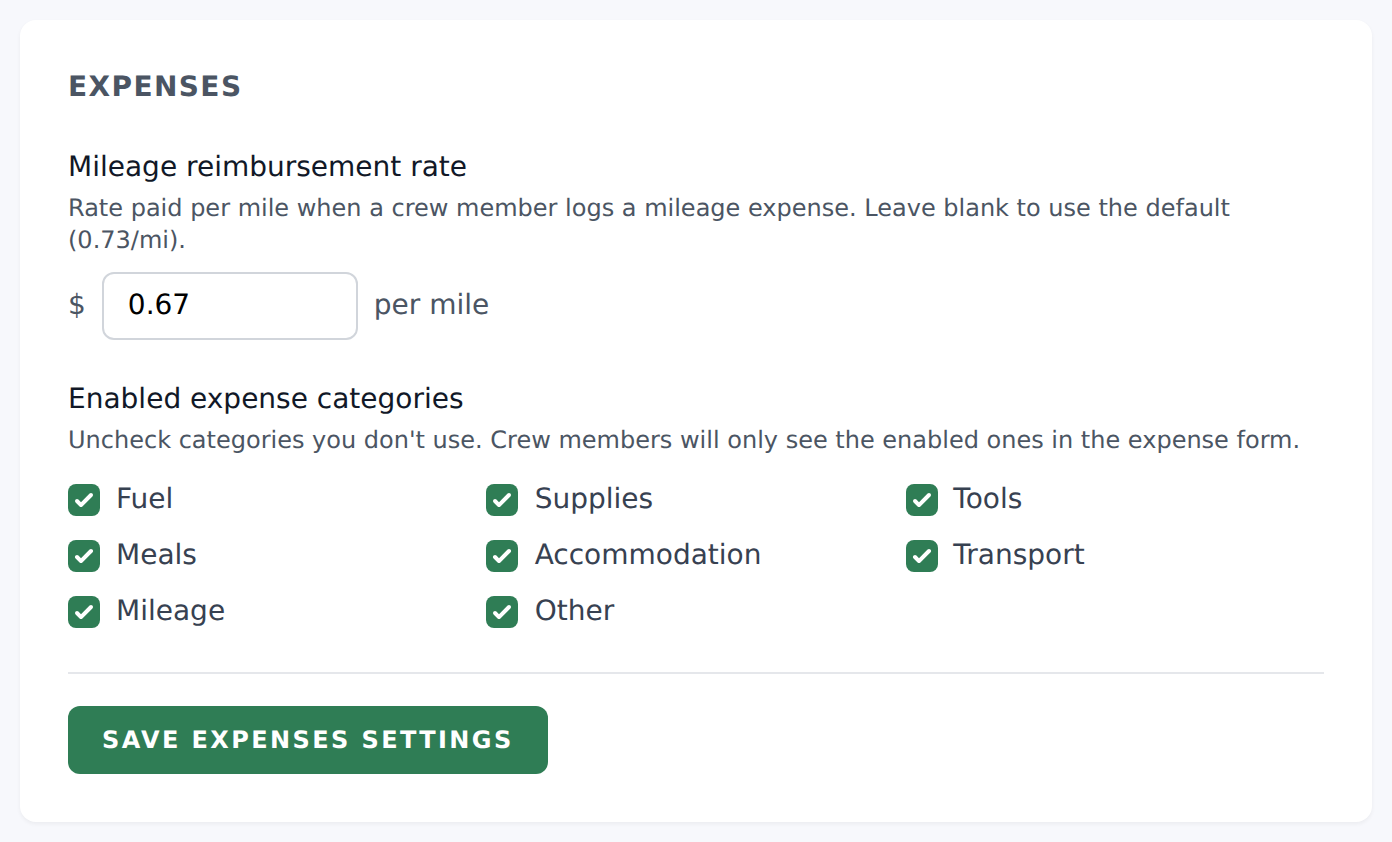
Settings → Expenses — untick the categories you don't use. A category you switch off stops being offered on the dashboard and in the field app.
Settings → Work hours — a table with a row per category and a column per role: Owner, Manager, Field worker and Volunteer. Tick what each role should see in the work-hours form, on the dashboard and in the field app. Volunteers can have a short list — Trail maintenance and Training, say — while field workers keep the full one with the time-off types. Every role needs at least one category. Until you change anything, every role sees every category.
Your own work-hour categories. Type a name under Add a category and press Add; it joins the table under Your own, ticked for every role, and is saved with Save work-hours settings. Your own categories count as work, not time off, so they count toward volunteer hours wherever those are added up. Press Remove to take one away. If entries were already filed under it, they keep it and still show its name; it simply stops being offered. Adding the same name again brings it back.
A manager editing somebody else's entry picks from the manager's own list, and an entry whose category has since been switched off for its author keeps that category until somebody changes it.
The currency amounts are shown in
Set it in Settings → Organization details → Currency. It is what
expenses, mileage rates, build estimates, proposals and contracts are
written in, across the dashboard, the field app and every PDF.
Changing it relabels; it does not convert. A figure saved as 4,000
stays 4,000 and starts reading in the new currency, so change it
before you start filing rather than after. A signed contract is the
exception and keeps the currency it was signed under — re-opening one
next year shows what the parties agreed to, not what Settings says
today.
An individual expense also carries the currency it was filed in, so a
crew member who buys fuel across a border is recorded honestly rather
than converted at a rate nobody chose.
Expenses do not carry tax. The tax rate under Organization details
applies to proposals and contracts — the documents that leave your
organization. Reclaiming tax on a receipt is a different job: it needs
a rate per row and a record of whether the amount you typed already
included it, and applying one organization-wide rate to a fuel receipt
would produce a number your accountant would have to unpick. File the
amount you actually paid.
Mileage
Mileage is one of the expense categories, with its own UI branch and its own reimbursement rate.
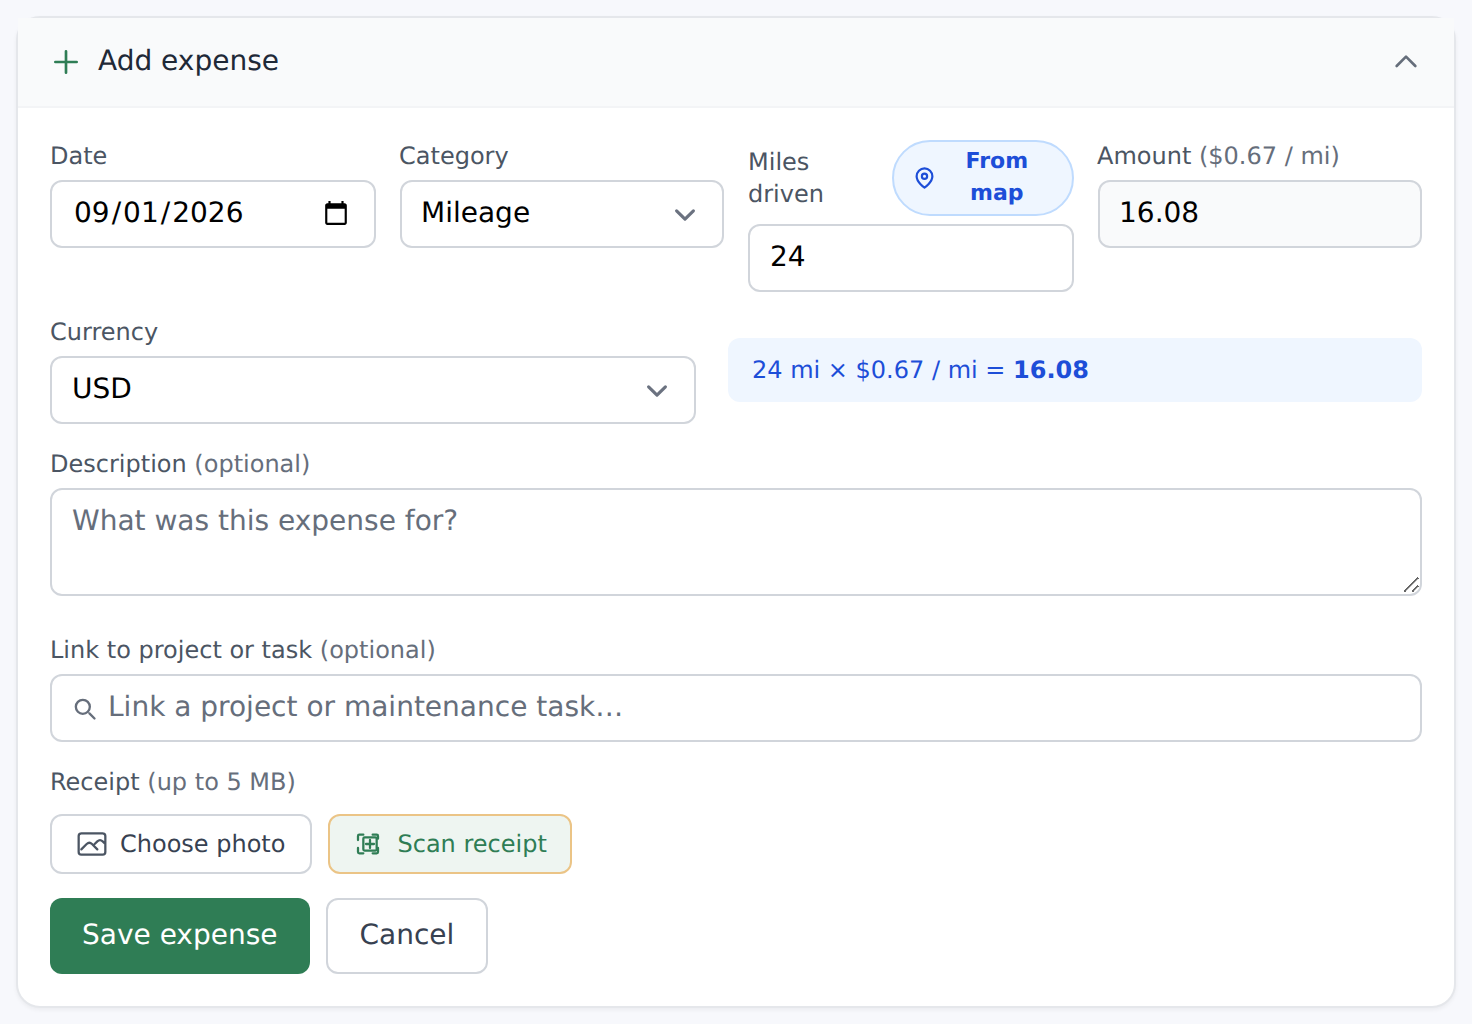
When you pick Mileage on the expense form, the Amount card swaps for a distance input (0.1–99999, step 0.1) with From map beside it, and the line under it shows the arithmetic — e.g. "24.6 mi × $0.73 / mi" and what that comes to.
The distance is in your organization's units. An organization set to imperial gets Miles driven and a per-mile rate; one set to metric gets Kilometers driven and a per-kilometer rate. The two always match, so the rate you set is the rate the amount is worked out from — you never enter one unit against a rate meant for the other.
The org sets the rate in Settings → Expenses → Mileage reimbursement rate. Range: 0–9.9999, step 0.0001. If unset, the rate falls back to 0.73 per unit of distance.
The rate isn't retroactive. Historical mileage expenses keep whatever amount was computed at save time. Changing the rate tomorrow doesn't rewrite yesterday's mileage. The distance is stored on the row alongside the amount and the unit it was entered in, so an auditor can always reconstruct what happened — and so switching your organization to metric next year cannot quietly re-price a claim you already paid.
From map
Beside the distance field is a From map button. It opens a map where you tap the stops you actually made — or search an address — and returns the real driving distance along roads rather than a straight line. Round trip is one tap, so the drive home counts, and a route you drive often can be saved and reused on the next claim.
Search finds the places you already have. Trails, points of interest, infrastructure and storage locations are all in there, alongside any address — and businesses, so a hardware store or a fuel stop can be typed by name rather than looked up as a street number. Tap one and it becomes a stop. Only things that have a position are offered, so everything in the list can actually be tapped.
The order is the drive. Every stop after the first shows how far it is from the one above it, so a claim can be checked leg by leg rather than as one total. Drag a stop by the handle on its left to move it up or down the run; the numbers stay with the position, so stop 1 is always where you set off from. Tap a stop to swap it for somewhere else, or tap the × to drop it.
The map's own buttons are bottom right — face north, change how the map looks, and center on where you are. They are the same three on every map in TrailsIQ.
Your trails are on the map. Every trail in your organization is drawn under the roads, with its name once you zoom in, so you can find the trailhead you drove to by the trail rather than by a street name. When you have not placed a stop yet and the map does not know where you are, it opens framed on your trails. The route you are building always draws on top of them.
So are your trailheads and parking lots. Each one is drawn as the same sign your website uses — a green flag for a trailhead, a blue P for parking — and tapping a sign makes it a stop. They are also listed in the search before you type anything, after your saved places and routes, so the usual end of a drive for trail work is one tap away. They come from your Points of interest page: anything there with the trailhead or parking type shows up here.
Save the stops you keep driving to. The bookmark on any stop names it — Home, The yard, Bob's depot — and saved places sit at the top of the search the next time you open it, before you type anything. Save one under a name you already used and it moves that place rather than adding a second one with the same name. Tick Share with team and everyone in your organization gets it; leave it clear and it is yours alone.
Saved places and saved routes both appear under Saved in the map sheet, where you can remove any you put there. A place somebody else shared stays theirs to remove.
It is available from Core upward. On Starter the button is still there and still opens: it shows what the feature does and what plan includes it, rather than sitting grayed out with no explanation. Typing the miles in by hand works on every plan and always has.
The approval workflow
Both work hours and expenses flow through the same four states: draft → submitted → approved | returned. Both call the fourth one sent back.
- Draft — the entry exists on your dashboard but nobody else can see it. If you leave it as a draft, it doesn't count toward reimbursement or payroll.
- Submitted — you opened the row and pressed Submit for approval (or Submit N drafts above the list). Now it's in the approval queue.
- Approved — a manager approved it. Green pill, included in every rollup.
- Sent back — a manager returned it rather than approving it. Nothing is deleted: you keep the row, you can read whatever note they left, and you fix it and submit it again. Hours sent back go straight back to your drafts, marked Sent back with the note, so Edit and Submit work on them like any draft; like any draft, only you can see them until you resubmit. A returned expense drops out of the month's totals; returned hours do not — see the gotchas.
Hours without approval
Some teams do not want a manager signing off every timesheet. An owner or manager can turn approval off for work hours under Settings → Work hours by unticking Submitted hours need a manager's approval. With it off, submitting an entry approves it on the spot: it goes straight to Approved and counts everywhere approved hours count, with no reviewer named on it because nobody reviewed it.
Entries that were already waiting when you turned it off stay in the Review queue for somebody to decide. Turning it back on only affects what is submitted afterwards. Expenses always need approval; the switch is for hours only.
An approved expense can also be marked paid, which is a separate step and a separate decision — approving a claim says it is a fair one, and paying it says the money has gone out. A paid expense wears a Paid pill everywhere you would otherwise see Approved, and it still counts as approved spend in every rollup and on a project's costs, because it was. Work hours have no paid state: they go to payroll rather than to a reimbursement.
Batch submit. Whenever you have drafts on screen, Submit N drafts above the list sends them all. To catch the ones outside the period you are looking at, press Drafts in the header: it lists every draft you have, whatever its date, with Submit all above it. Press Drafts again to go back to the week.
Reviewing expenses
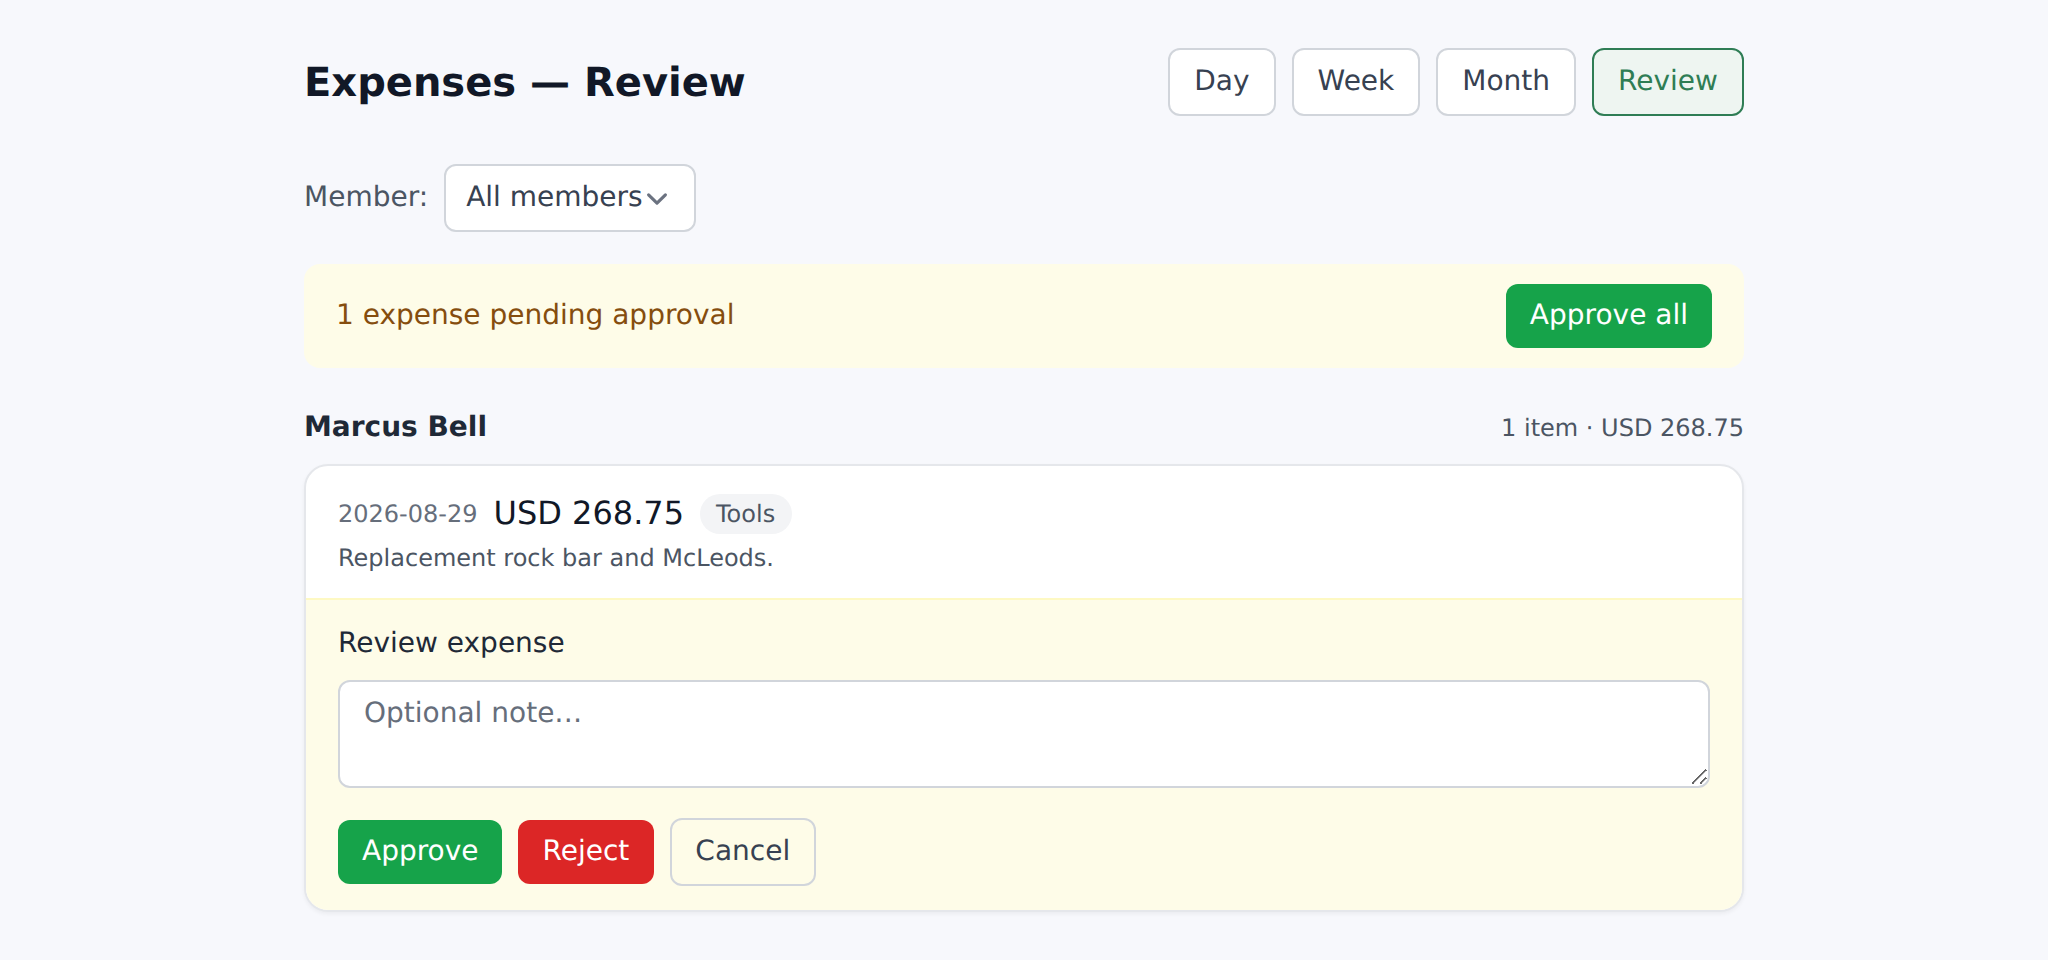
Expenses → Review, for anyone with Approve expenses. The queue is grouped by member: each card is headed with their name, the total waiting, how many rows, the date of the oldest one and how many of them came with a receipt.
Every row is built to be decidable without opening it — the receipt as a thumbnail you can recognize a till roll in (or a dashed None where there is not one), the date, the amount, the description, the category and the project or task it was filed against. Beside those sit chips naming anything worth a second look first: no description, no distance on a mileage claim, more than 90 days old.
Three ways to work the queue, fastest first:
- Approve all in the header, when you have already read them.
- Tick the rows you trust — the box on a row, or the one on a member's header to take everything of theirs — and the banner offers to approve them together, showing the total you are about to approve, or to send them all back under one note.
- Open a row for the whole record: the receipt full size, the link, the description and the review history, with Approve and Send back in the same panel.
Sending back takes a note; approving does not. An approval needs no explanation, and an expense returned with no reason is a crew member guessing what to change.
A row you have decided stays where it is, grayed out and wearing its verdict, instead of vanishing out from under you — so you keep your place in a list you are working down. Every count and total on the page already leaves it out, and the panel on the right keeps a running tally of what you have approved in this sitting.
Worth a look is the rail beside the queue. It collects the rows carrying a flag, and any two claims from the same member for the same amount in the same category, which is the shape of a double submission. Both are pointers rather than verdicts — people really do drive the same round trip twice — and tapping one opens the row it names.
Export sits in this header too, so a reimbursement run can be exported from the screen where it was approved — the current month in one press, or any window up to a year under Custom range….
To pay in the same header carries the amount your organization currently owes across every approved expense nobody has reimbursed yet, and opens the payment run below.
Paying people back — the payment run
Expenses → Review → To pay, for anyone with Approve expenses. Approving a claim is a judgement about the claim; this is the list of people you owe money to and the place you record that you have paid them.
It opens on everything outstanding — every approved expense that has not been marked paid, whatever month it belongs to — because "what do we owe" is a question with no natural cut-off. Each person is one card with their total and how long they have been waiting, since one person is one payment however many receipts are behind it.
Export gives you the run in two shapes. The spreadsheet is the one to work from: a row per person with the amount to send, then every expense behind it. The PDF is the same run on your letterhead, for filing. Both carry a reference like PR-20260910-A3F1 — the same run exported twice gets the same reference, so you can type it in when you record the payment and find it again on a bank statement months later.
Then pay them, come back, tick what you paid and press Mark paid. You can add a check number or transfer reference; it is optional, and it is the only thing that ties these rows to a line in your accounts.
Mark only what you actually paid. Anything approved while you were at the bank stays on the run for next time — that is why the button takes the rows you ticked rather than everything outstanding.
Marked something by mistake? Undo on the row puts it straight back on the run. The approval underneath is untouched.
Picking a window narrows by APPROVAL date, not by the date on the receipt. A receipt from March that only got approved last week belongs in last week's run — that is when you became liable for it. If you narrow the window, anything approved before it that is still unpaid is called out in its own line so an old claim cannot sit outside every window you look at.
The person who filed the expense sees the Paid pill on their own row and gets a notification when it happens, which is the answer they have been waiting for since it was approved.
Reviewing work hours
Work hours → Needs review, for anyone with Approve work hours, is the same page showing every submitted entry whatever its date, grouped by member. Press a row to open it, add a note if you want one, and press Approve or Send back. Approve all shown approves everything in the list, after asking once; filter by member first to approve one person's week. The note is optional either way, unlike on expenses, and it is the only thing the author has to go on. Press Needs review again to go back to the week.
A work-hours decision does not notify the person who filed it — only the submission notifies approvers. An expense decision does reach its submitter either way; see the gotchas. So if you reject work hours, tell them.
Rollups — Day / Week / Month
Every view has totals at the top:
- Work hours — Day, Week and Month all carry the same four figures (the period's hours, awaiting approval, approved, and linked to work) and the same panel on the right: the total by category, hours by member and where the time went. Approvers see everybody's hours; everyone else sees their own.
- Expenses, Day — "Total: X.XX".
- Expenses, Week — grouped by day with a weekly total per user.
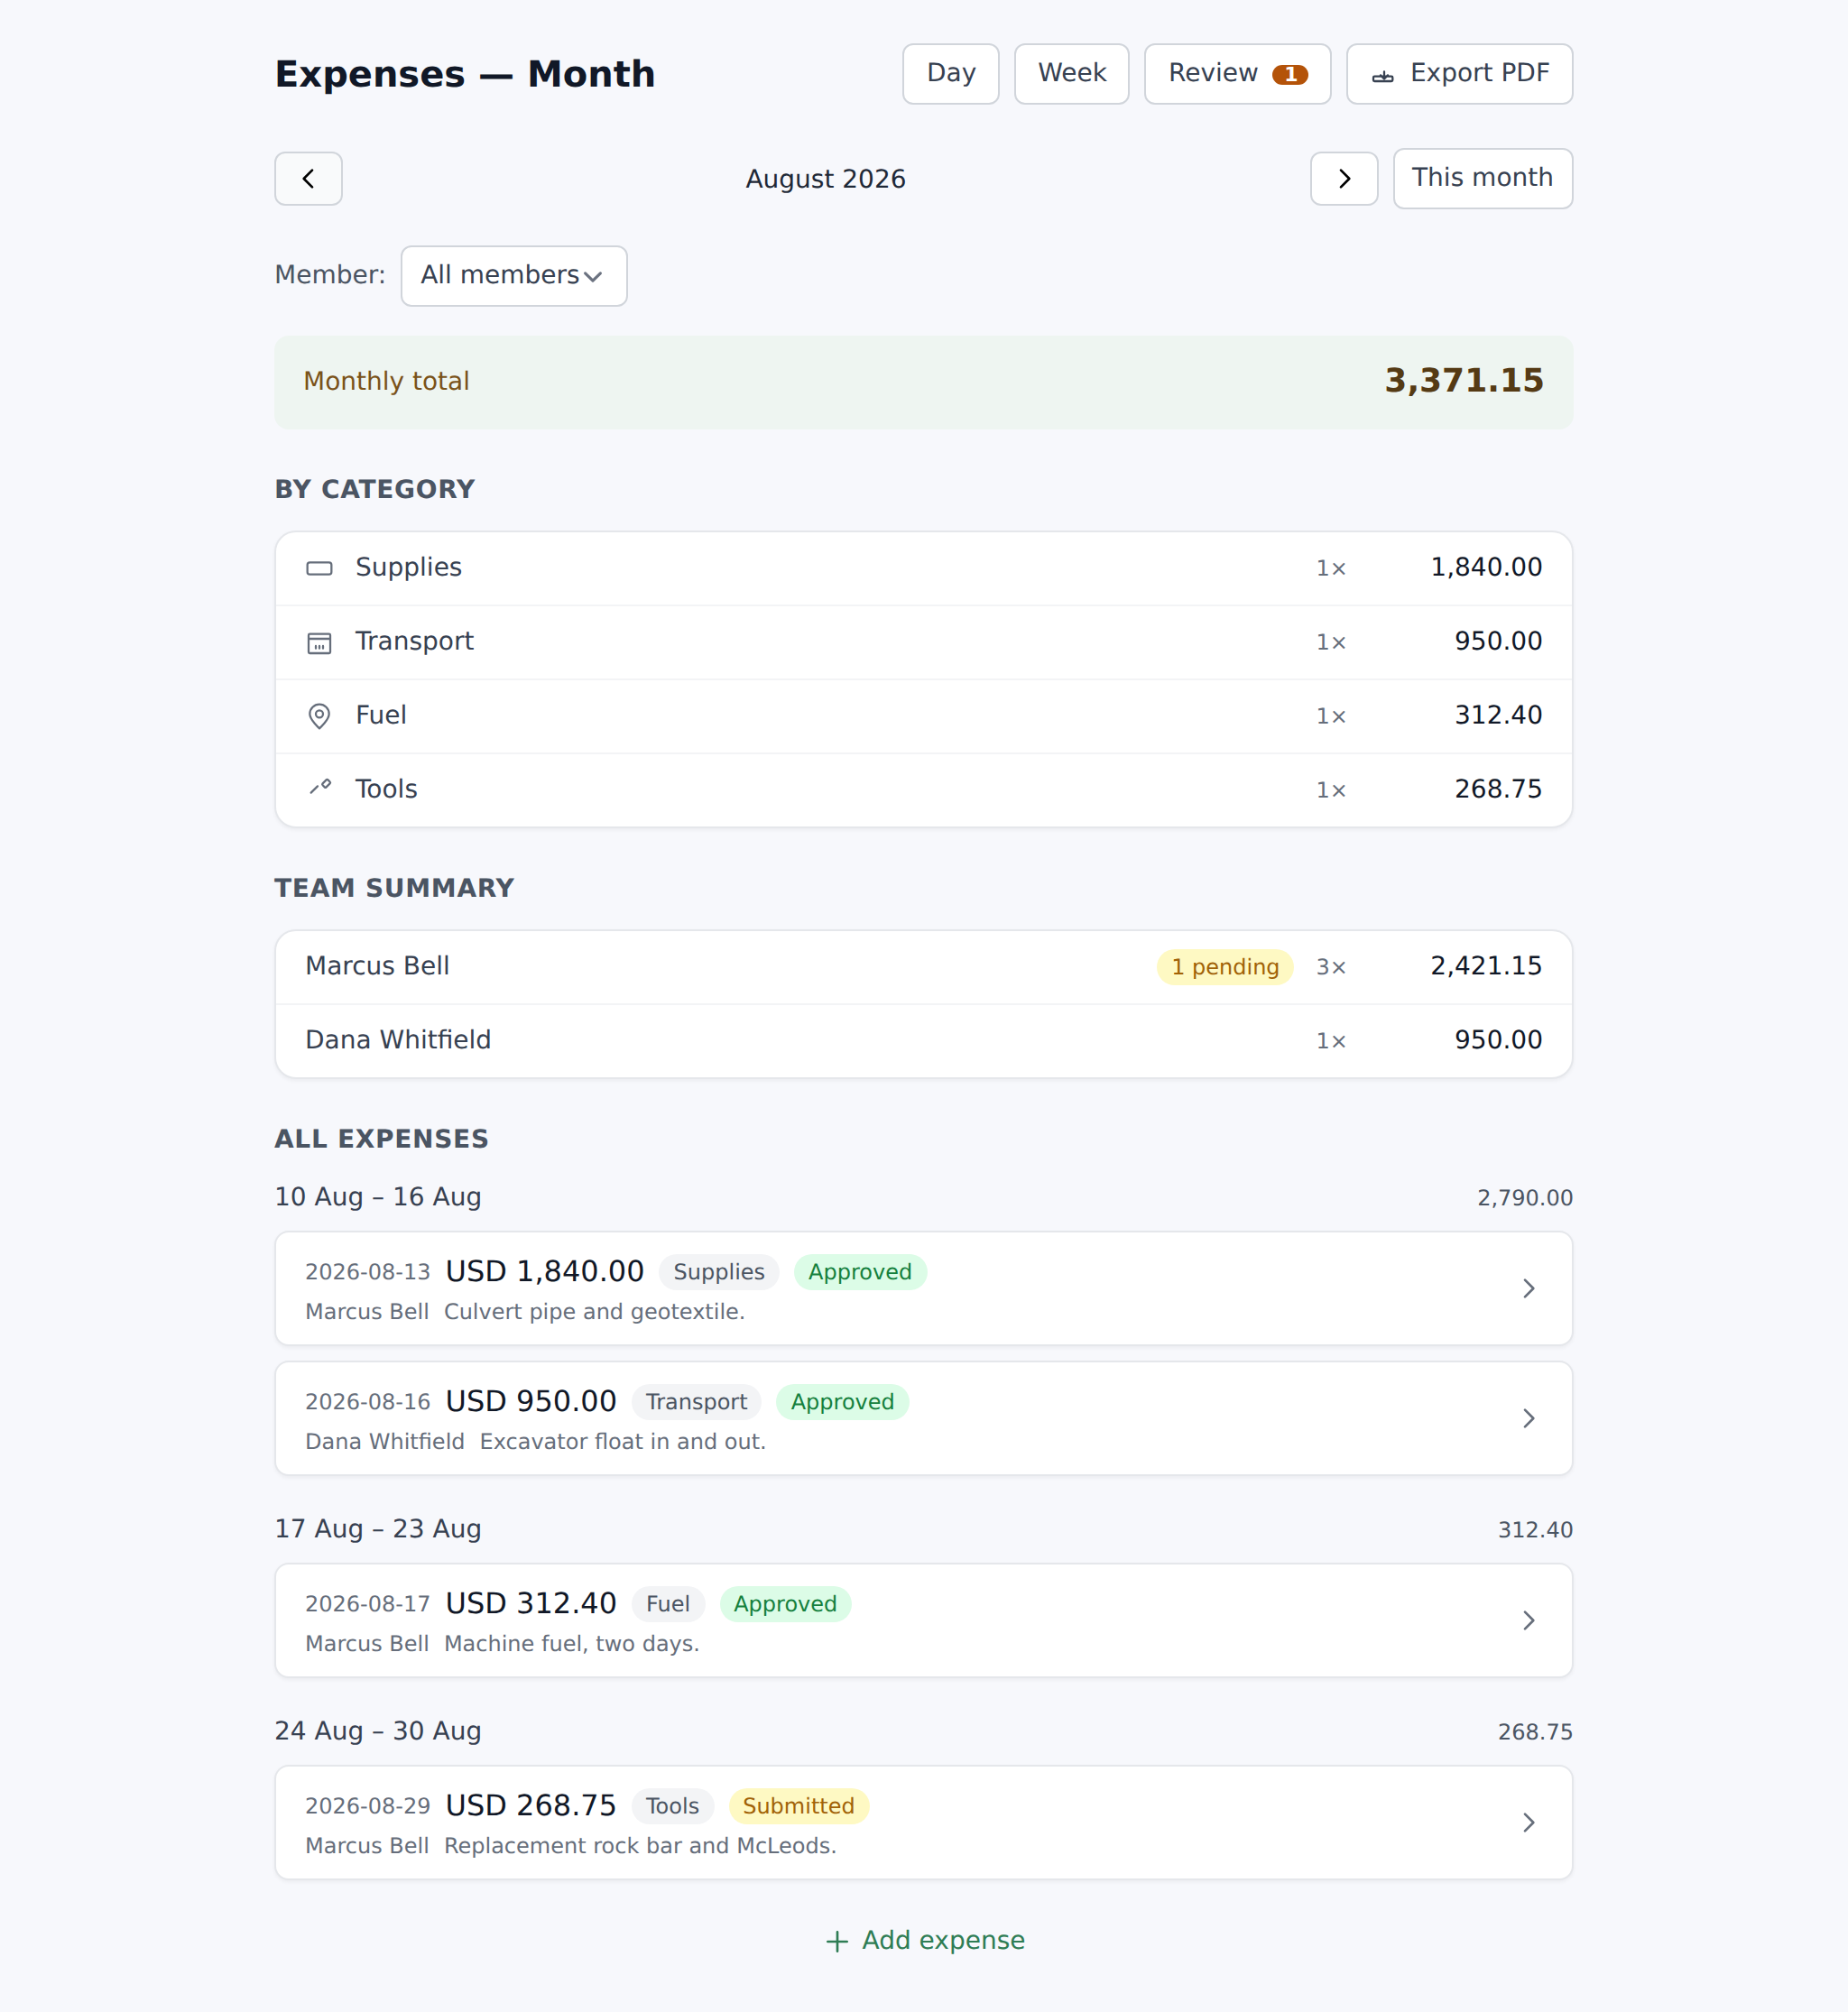
- Expenses, Month — three sections:
- Monthly total — big blue banner.
- By category — rows of "{category} · Nx · total" so the finance person can see where the money went.
- Team summary — one row per crew member with a pending badge + their total. Only visible to approvers.
An expense sent back leaves the month's totals; hours sent back do not. An expense that is not being reimbursed has stopped being money spent, so it drops out of "money spent this month". Time somebody worked is still time somebody worked even when payroll would not take it, so it stays in the hours total.
Per-project rollup: every project's page has an Hours worked tile — "12.5 h — Across N linked items, summed from the work log." It counts quick time logs only, not payroll hours. So a project whose crew has filed plenty of work hours and no quick time logs reads 0 on the tile even though the work plainly happened. If the two ought to agree for you, tell us — today the tile answers one of the two questions and says which.
Org-wide Work report, under Reports → Work report — aggregates every quick time log by user, by trail, and by issue type. It opens on the last 30 days.
What it shows. Across the top: total time logged, split into volunteer and paid staff hours once anybody on your Team page is marked paid staff; tasks touched; and how many days of the window had any work on them. Each carries what the same figure was over the window before it, so a quiet fortnight is visible as a quiet fortnight rather than as a number you have to remember. Under them, one row per person with their hours, tasks filed and tasks resolved — press a column heading to sort by it — then a breakdown by task type with the average each kind of fix costs, the same by trail, and the individual entries every one of those numbers is built from, grouped by day.
Daily rhythm is a calendar of the window, one square per day, Monday first. The deeper the color, the more time was logged that day; hover a square for the day's hours and entries. Days outside the window are drawn as empty outlines so the weeks line up. Under it: your busiest day, the average across days that had any work, and how much of the time fell on a weekend. Over a long window the calendar lies on its side, one column per week.
Changing the window. 7 days, 30 days and Season are one press each. Season runs from January 1 to today and is compared with the same dates last year, so a spring that started late reads as late rather than as a collapse against the winter. For anything else, the date button opens a calendar with the usual shortcuts down the side; click the first day and then the second, and nothing reloads until you press Apply.
Narrowing it down. The row of filters under the header narrows the whole page to one member, one trail, one task type, or volunteer or paid hours. Pressing a row under By trail does the same for that trail. The filters are in the page's address, so a narrowed report can be bookmarked or shared with Copy link, and Clear filters puts everything back. The hours filter narrows time only: a task is not volunteer or paid, so tasks filed and resolved stay as they were. The exports carry whatever window and filters are on screen — the number you are looking at is the number you get.
Dashboard tile for approvers: "Expenses to review" stat with a click-through to the queue.
Editing and deleting
Same rule for both work hours and expenses:
- Drafts — the author can edit or delete freely.
- Submitted / approved — locked, and so is an expense that was sent back. (Hours sent back are drafts again.) Trying to edit shows "Only draft entries can be edited." / "Only draft expenses can be edited."
- Delete — the author can delete their own drafts. Managers can delete any row regardless of state. On work hours, so can anyone else you have given Approve work hours.
- Expenses have one exception: the author can also delete their own approved expenses (edge case for reversing a reimbursement they later realize was a mistake).
Confirm dialogs: "Delete this entry?" / "Delete this expense?"
Quick time logs on maintenance issues: field workers can edit + delete their own; managers can edit + delete anyone's. No draft state of their own — the log lands and counts, and its draft on Work hours carries the approval. Once that draft is submitted or approved, the log's date and hours are locked for everybody until it is sent back.
Platform admin acting-as — when a TrailsIQ platform admin is impersonating another user, entries they file are stamped to the target user, not the admin.
Photos and receipts
Only expenses attach a receipt image. One receipt per expense, up to 5 MB, JPG / PNG / WebP. It counts toward your organization's storage. Thumbnails on the row open a full-screen lightbox.
Editing an expense lets you take the receipt off and put a different one on in the same save.
Receipt storage counts against your plan's storage quota. If your org is full, uploads fail with "plan_limit_reached" (HTTP 402). Free space (delete stale images) or upgrade in Billing.
Work hours and quick time logs have no photo attachment. Attach photos to a maintenance issue instead if you need visual documentation of the work.
Exporting for payroll or finance
Work hours exports as PDF:
- Week export — the week on screen for the visible member (or all members). On the Day view the button reads Export week PDF and exports the week that day is in.
- Month export — the month on screen.
Reviewer signatures embed on approved rows (the reviewer's stored signature from their Profile → Signature setting). Both are one-click from the page header.
Expenses exports as PDF with more range flexibility:
- Export in the header of every expenses screen. The first row is the period you are looking at — this day, this week, this month, or the current month on the review queue — and it downloads in one press.
- Custom range…, the second row, opens a calendar for any window up to 366 days. That is the one for a pay period that does not line up with a week or a month. Longer than a year, split it into two.
- Rejected rows are excluded — the export is what someone hands to a finance department, so it must match the on-screen weekly total exactly.
- Receipt images embed as base64 data URIs so the PDF renders offline in DomPDF without needing to fetch from storage.
- Org logo embeds on the header.
Work report — every quick time log across the organization for the window you selected, one row each, with the date, the minutes, who logged them, and the task, trail and note if there were any. Great for reporting hours to a grant funder or a land manager.
If PDF export returns "PDF export is being provisioned — try again after the next deploy.", the DomPDF package isn't installed. Ping support.
Permissions
Two dedicated permissions gate the approval queues:
- Approve work hours — "Open the work-hours review queue, approve or reject submissions, see team-wide totals." Default on for Owner + Manager, off for Field worker + Volunteer.
- Approve expenses — same shape. Default on for Owner + Manager.
Grant either to a specific field worker (via Members → Edit → Permission overrides on their row, or org-wide via Settings → Roles & permissions) if you want them helping the manager keep the queue clean.
View team-wide totals — "See who-owes-what summaries on the Month views for hours + expenses. Read-only — does not include approval rights." Default off across the board. Grant to someone who needs to see the totals for reporting without giving them approval power (a bookkeeper, say).
Any active member can create their own entries — the log/submit flow is not permission-gated. The one way to record time for somebody else is on a task: Who else worked this session? gives each person you tick their own entry, marked with who logged it. Timesheet entries are always the person's own.
Common gotchas
- Drafts are invisible until you submit. Even to managers filtering by member. If a crew member "logs" but forgets to Submit, no reimbursement or approval happens. The field-app expenses list warns "You have N draft expense(s) waiting for approval — drafts aren't reimbursed." with a Submit all button.
- An expense sent back is kept, but leaves the totals. The author still sees the red pill and the note, and the row stays there to be fixed and resubmitted — but it is excluded from weekly and monthly totals, category breakdowns, the team summary and every PDF export. Work hours you reject DO stay in the totals.
- Task vs project link is exclusive. The picker offers one or the other, and sending both is refused with a message that says so rather than quietly keeping one.
- Mileage rate isn't retroactive. Historical rows keep the amount computed at save time. Change the rate tomorrow and only new mileage expenses use the new rate.
- Currency is per-entry, not per-org. The picker defaults to USD. A crew member traveling can log an expense in another currency; the finance team reconciles on export.
- A quick time log becomes a Work hours draft, not an approved entry. The Projects "Hours worked" tile and the Work report count the time as soon as it is logged; Work hours counts it as a draft until somebody submits and approves it. So the two can show different totals for the same week while drafts are waiting.
- The submitter is told when a decision lands. Approved or not, whoever filed the expense gets a notification with the reviewer's note. It sits under Expense decision emails in Settings if somebody would rather not have it.
- Field-app CREATE for quick time logs, expenses, and work hours goes through the offline outbox — enter offline and the entry queues; it syncs when signal returns. EDIT of an existing entry stays online-only (the row has to be loaded to edit anyway), so a mid-trail edit of yesterday's expense will fail if you're out of signal.
- Expense reminders are per-user opt-in under Profile → "Expense reminders" (weekly / monthly, email / push). Turn them on if you have crew members who forget to submit.
- Receipts count against org storage quota. Delete stale receipts (via edit → remove) if you're bumping the plan limit.
What's next
- Trim your expense and work-hour categories in Settings → Expenses / Work hours before your crew starts logging — the shorter list is faster to pick from and reads better on the PDF export.
- Set your Mileage reimbursement rate now if you'll be reimbursing crew for driving. Once entries start landing at the default rate, changing it won't retroactively fix them.
- Grant the Approve work hours / Approve expenses permissions to a bookkeeper via Members → Edit → Permission overrides if you want the queue reviewed by someone who isn't a manager.
- Read the Members, roles & permissions article for the full permission overrides workflow.
- Read the Projects and work planning article to see how the per-project Hours worked tile is populated from quick time logs.