Website
Events — signups, waivers, waitlists and reminders
Create events with per-event public pages, RSVP forms, waivers, waitlists, iCal feeds, and day-before push reminders. Includes recurring events, walk-in signups, and the pivot that pins open maintenance issues to volunteer workdays.
Events are your org's calendar of workdays, rides, races, gatherings and anything else you want to invite people to. Each event has its own public page, its own signup form, a waitlist when it fills, an iCal feed, automatic day-before push reminders through the Report App, and an attendee roster you can work from as the day approaches.
What an event is
An event is one entry, with a signup roster of its own. Each one carries:
- Identity & content — title, URL slug, excerpt, hero image, body (block canvas — same palette as the website builder).
- When — date (required, in your org's timezone), optional start / end times, an All day toggle. An event stays upcoming until its day is over in your time zone, on your website, in TrailsIQ Go and in reminders, wherever the reader is.
- Where — a free-text location string ("Trailhead, town, address…"). No coordinates, no map picker.
- Discovery copy — a Type ("Volunteer day", "Meeting", "Group ride") and an Audience ("All ages", "Members").
- Publishing — draft vs published, a first-publish timestamp, and a Notify followers when published switch.
- Recurrence — optional. Daily / Weekly / Monthly, every N units, optionally ending on a date. One row per series; occurrences are expanded at read time.
- Signups — enabled toggle, capacity (null = unlimited), deadline, per-event form-field visibility, and per-event copy overrides for the signup block.
- Waiver — enabled toggle plus the waiver itself, typed in or uploaded as a PDF or a picture. Attendees click-wrap; the timestamp + their IP are stored with each signup as the audit trail.
- Trail work — pin open maintenance issues this event will tackle so attendees know what they're signing up for.
There's no paid-event / ticketing flow — every signup is free.
Creating an event
Events lives in the sidebar under Public site authoring, and appears when two things are true: your plan includes Events, and your role has the Manage events permission on. On a plan without it the row is not in the menu; the Events page itself still opens and names the plan.
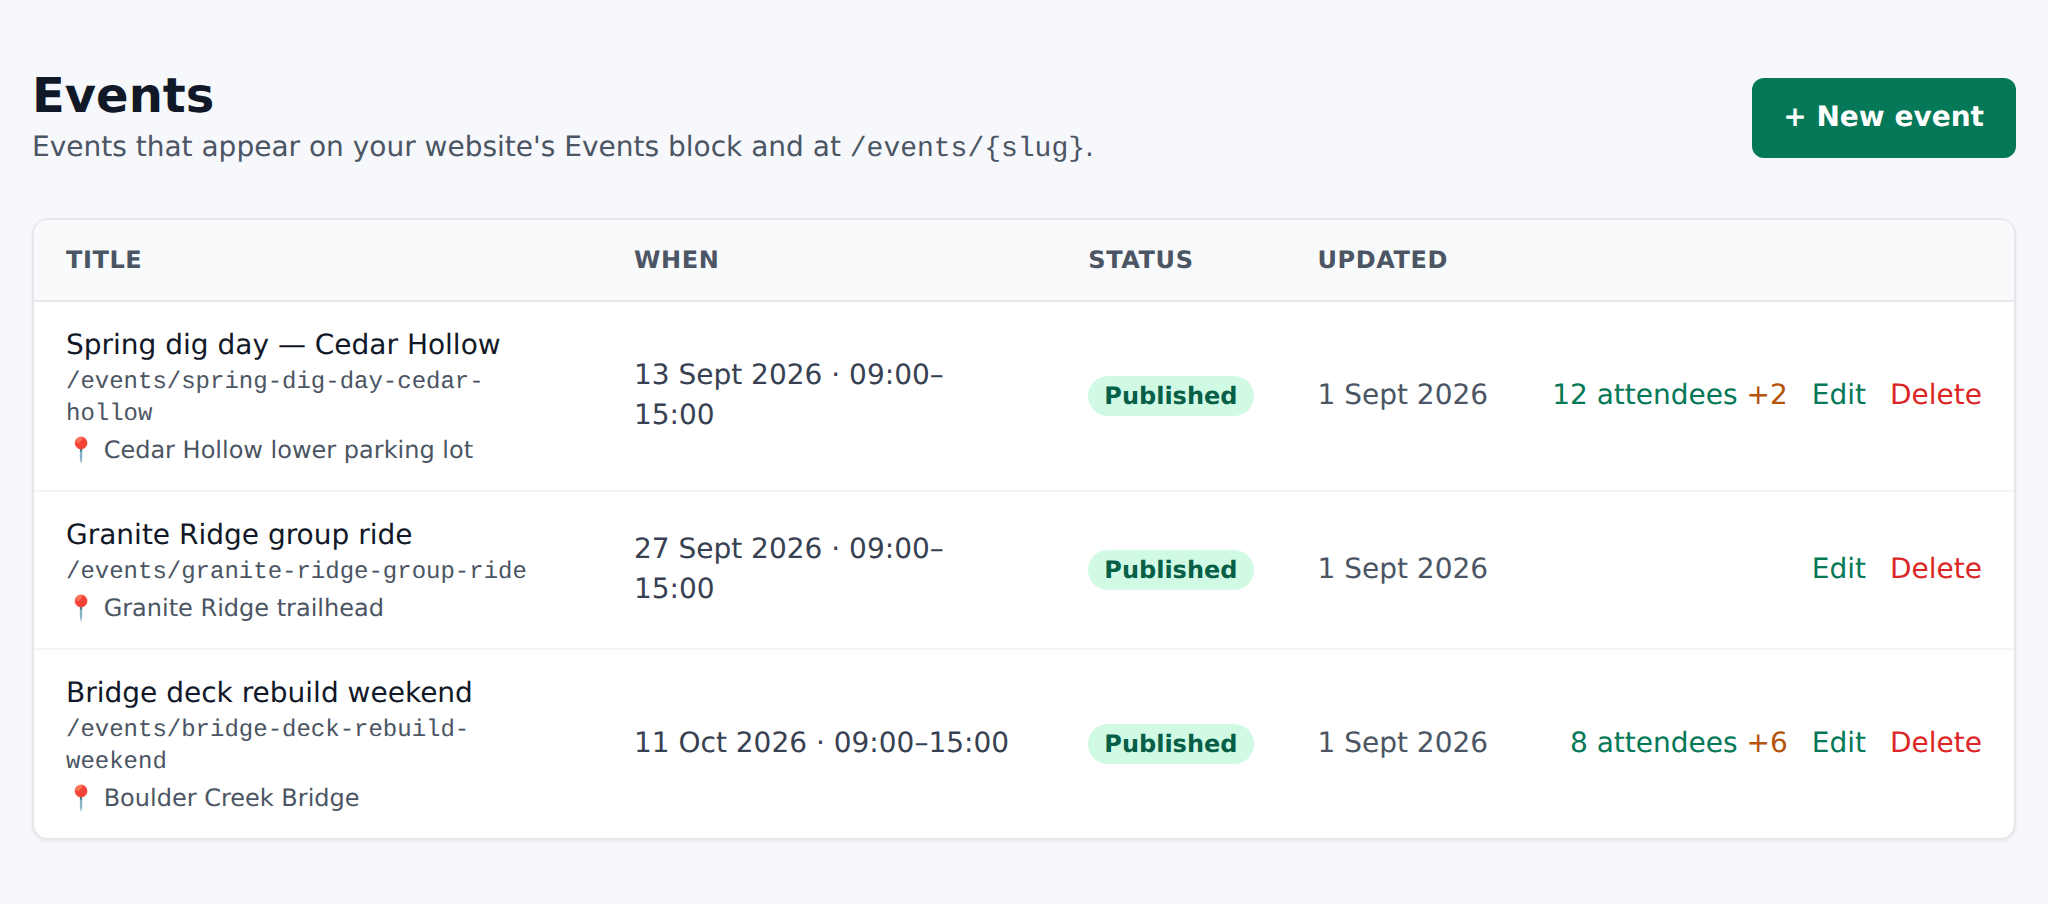
The Index page lists your events with per-row status pills — Published (green) or Draft (gray), with past events relabeled Finished regardless of prior state. Click + New event to open the editor. It is the same editor as the website builder and News, minus the block canvas at first: by default a new event shows only the Event details form, centered on the page. Click Custom page builder in the top bar to open the full builder when you want a rich per-event page: Layers and Add block on the left, the event page on a canvas in the middle, and the details on the right. Clicking a block there shows its settings in Content / Style / Advanced tabs, and the × at the top of them goes back to the details.
Top-bar controls: title "New event", the Custom page builder / Hide builder toggle, Desktop / Tablet / Mobile while the builder is open, a Draft / Published pill, All changes saved or Unsaved changes, Save (turns to Saving… while writing), View live once saved, and Publish / Unpublish. On a phone the bar takes two rows and the editor shows bottom tabs Details / Blocks / Preview instead of the builder toggle.
Flash toasts: "Event created.", "Event saved.", "Event deleted."
Every field on the form
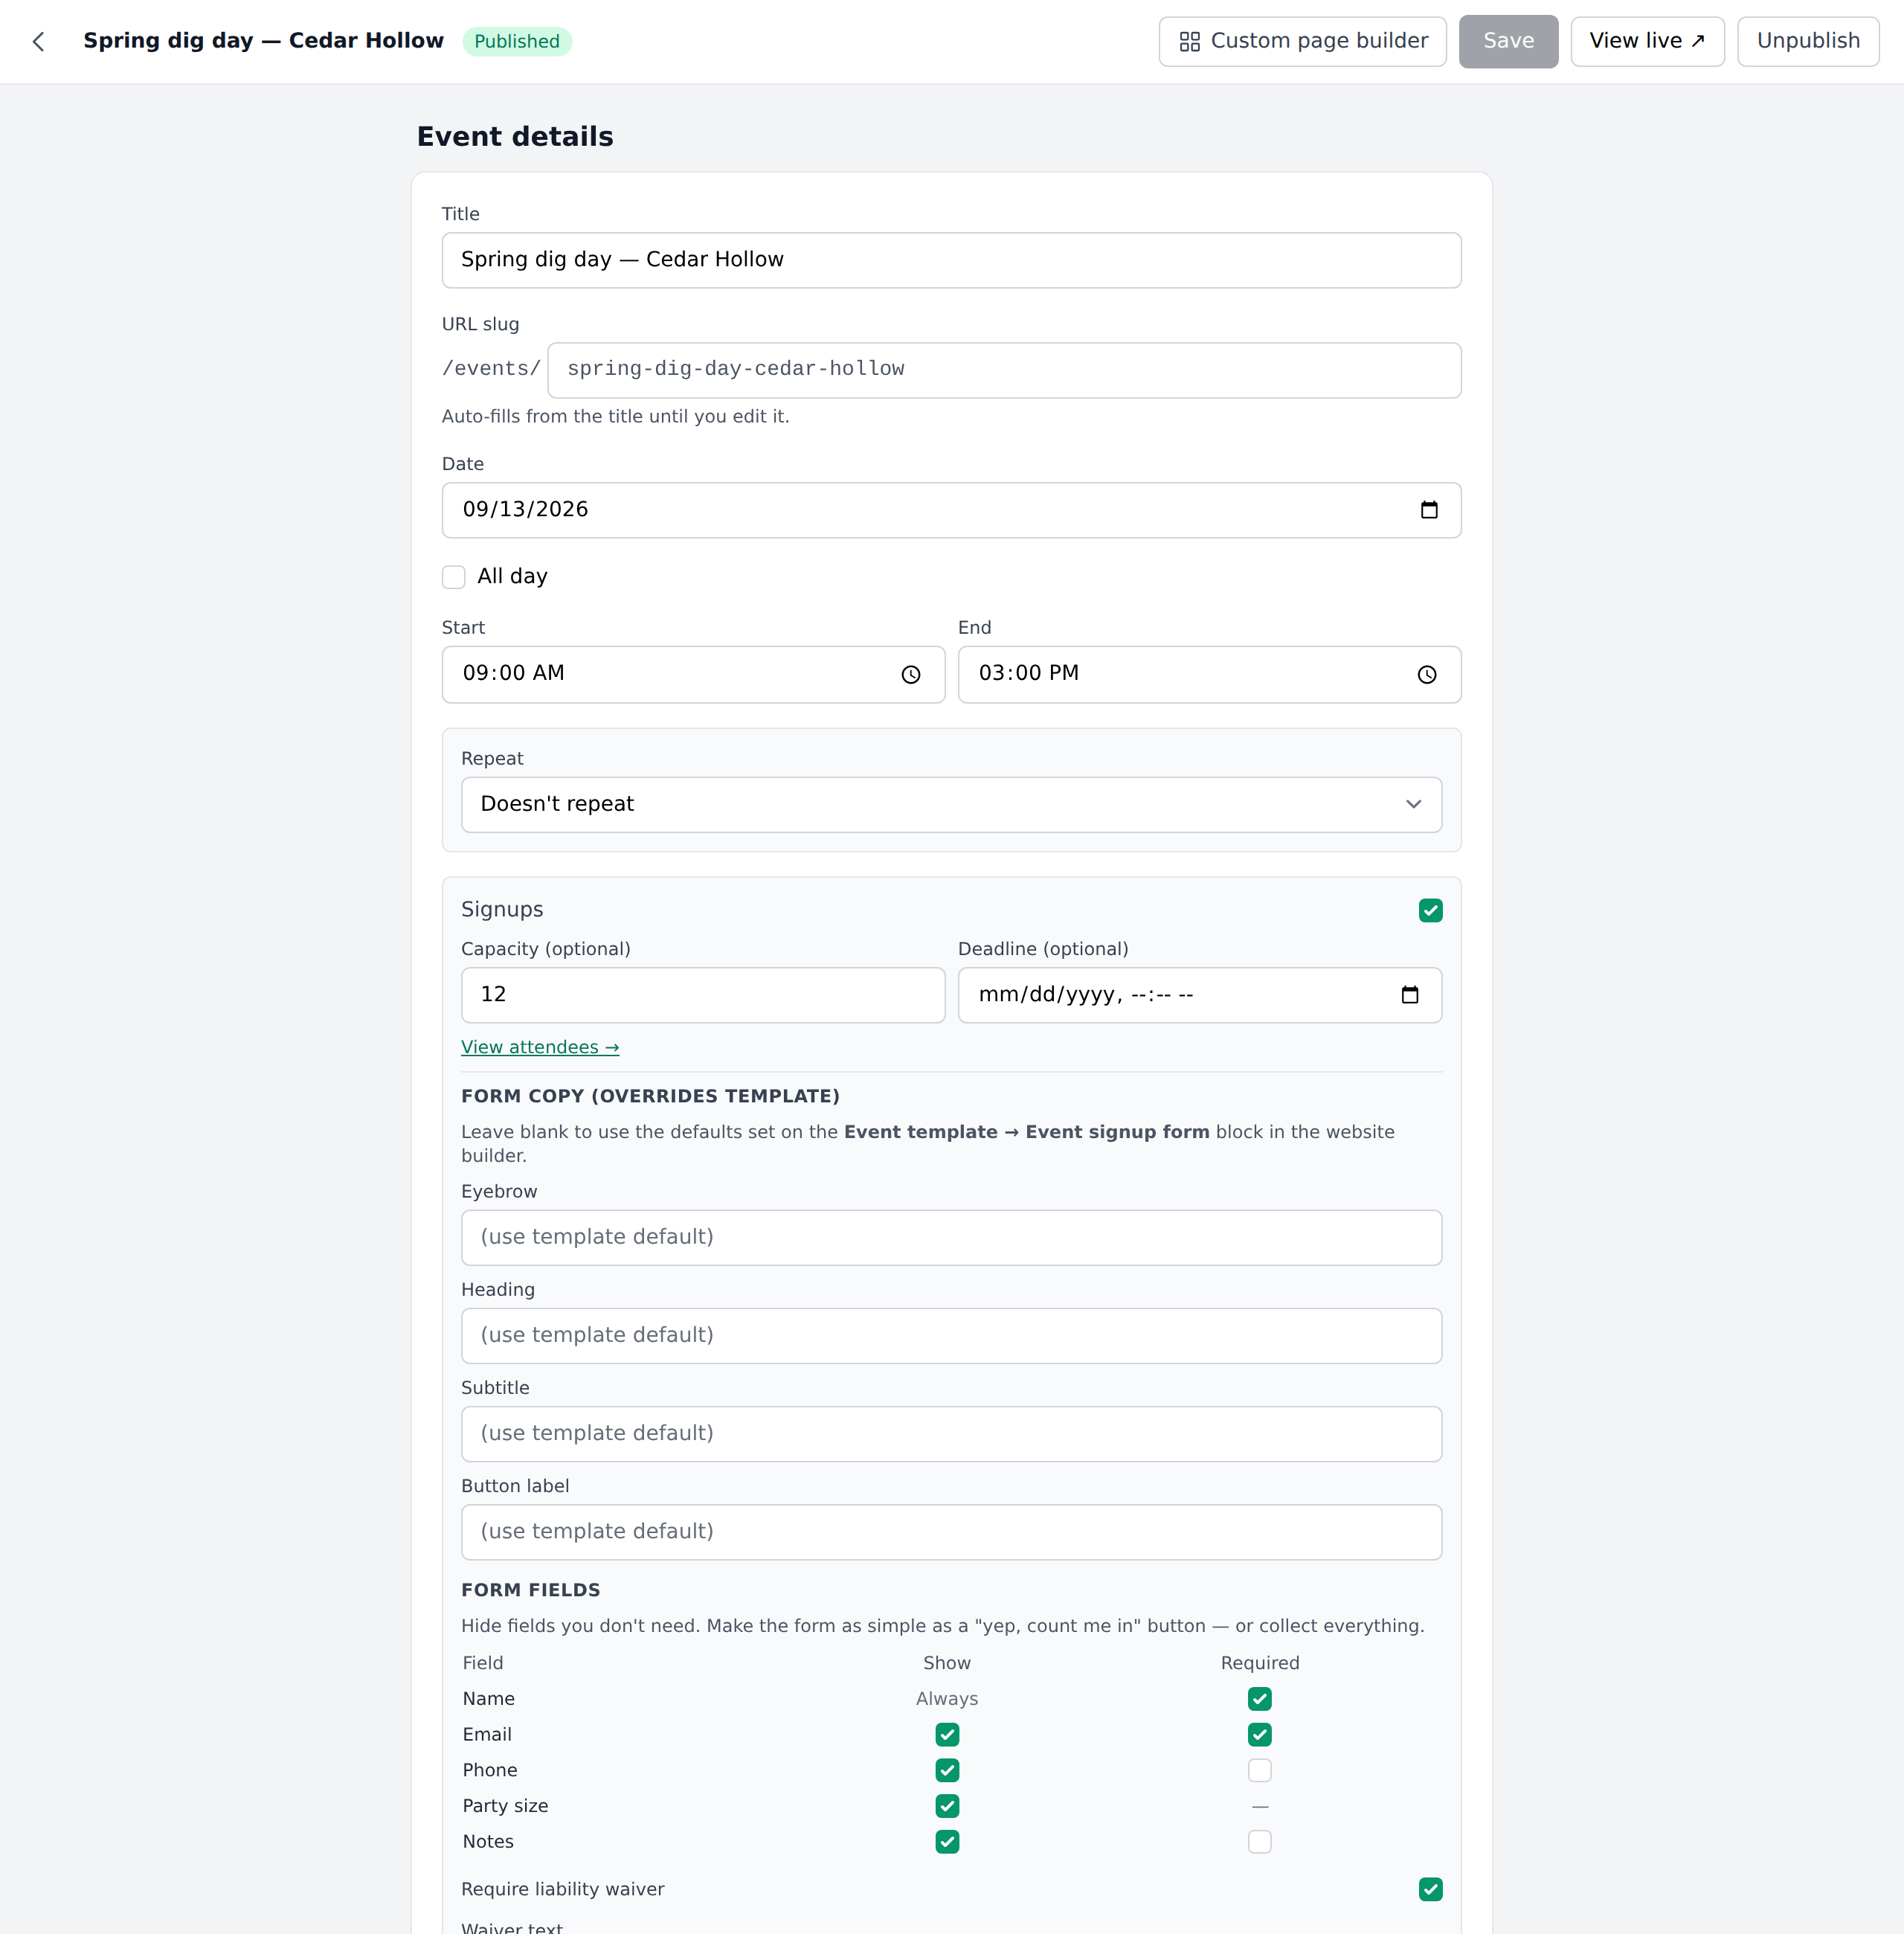
The right panel's Event details section, top to bottom:
- Title — placeholder "Event title".
- URL slug — prefixed with
/events/, placeholder "my-event". Auto-fills from the title until you edit it. Same slug rules as News. - Date — required date input.
- All day — checkbox. When ticked, Start and End hide.
- Start and End — time inputs, side by side.
- Repeat — dropdown: Doesn't repeat / Daily / Weekly / Monthly.
- Every N days/weeks/months — number 1–52. Label switches singular/plural.
- Ends on (optional) — date. Helper flips between "Repeats {freq} until {date}." and "Repeats {freq} indefinitely."
- Signups — the whole signup section (see next section for details).
- Location — placeholder "Trailhead, town, address…".
- Type — picked from your event types, or No type. Edit types beside it opens the list.
- Audience — placeholder "All, Members…".
- Excerpt — 3-row textarea, placeholder "Short summary used in the Events block + event-meta slot." Up to 500 characters.
- Hero image — upload widget, JPG / PNG / WebP up to 5 MB.
- Notify followers when published — checkbox: "Sends a 'New event' push + bell-inbox row to people who favorited your org with the New events notification on. Uncheck to publish quietly."
- Trail work — checkbox picker of open + in-progress maintenance issues.
At the bottom: "Hero, when, location, body — the layout these data points render through lives in your website builder → Event template page."
Event types
Every event can have a type: what kind of event it is. You start with Volunteer day, Meeting, Group ride, Race, Fundraiser, Social and Training, plus any label your events already had before types existed.
Event types at the top of the Events page (also under Settings) is where you change the list:
- Add a type for anything the defaults don't cover, with a color.
- Edit renames a type or changes its color. A rename changes it on every event of that type and on your website at once.
- ↑ ↓ set the order the type pickers list them in.
- Remove takes a type off the list. A type that events still use can't be removed; give those events another type first, or rename it instead. A default you remove doesn't come back.
The type shows beside the event on the Events page, on the event in the field app, and on your website's events list, where visitors can filter by it.
Signups — turning them on and customizing the form
The Signups toggle drives everything under it. Off: no public form, no roster page, no reminders. On: the public event page shows the RSVP form and the attendee roster becomes visible from View attendees →.
Helper text under the toggle: "When enabled, the event's public page shows a form for visitors to RSVP. Manage attendees from View attendees."
When Signups are on, these fields appear:
- Capacity (optional) — number, placeholder "unlimited". When exceeded, new signups become waitlisted instead of rejected.
- Deadline (optional) — date-time. After this timestamp the form refuses new signups.
- Link View attendees →.
- Form copy (overrides template) — four inputs (Eyebrow, Heading, Subtitle, Button label), each placeholder "(use template default)". Leave blank to use the defaults set on the Event template's Event signup form block in the website builder — set them here to override for this one event.
- Form fields — table with columns Field / Show / Required. Rows: Name (always shown, required-toggle only), Email, Phone, Party size (show-only, no required toggle), Notes. Helper text: "Hide fields you don't need. Make the form as simple as a 'yep, count me in' button — or collect everything." If you hide Email, an amber warning appears: "Without email, attendees won't receive the confirmation + cancel email — you'll only see them in this dashboard."
- Require liability waiver checkbox (see next section).
Selling tickets
To charge for places, add a ticket under Tickets in the Signups section. Each ticket type has a name and a price, such as Adult at 25 and Child at 10, and an event can have up to eight. Tick Members only on a type, such as a member's price, and type a Member code you share with your members: the form then asks for that code before anybody can buy a members-only ticket, without regard to upper or lower case. Leave the code blank to sell member tickets on trust. The code itself is never shown on your website.
Tickets are paid by card through your connected Stripe account (connect it under Settings → Card payments (Stripe); the event editor links there), and the money goes straight to it. Until Stripe is connected, the editor says so and the event page says tickets aren't on sale online.
Each ticket is one place, so Capacity counts tickets. Nobody can buy more tickets than there are places left, and a sold-out event shows Sold out. with no waitlist. An event with tickets has no free signup: everybody signs up by buying one.
The public form has built-in spam protection on every address your site uses, and repeated attempts from one visitor are slowed down. Nothing needs setting up.
Waivers
Require liability waiver turns on a click-wrap waiver on the public form. When on, choose how the waiver is added:
- Type it — paste the full text into the box, up to 20,000 characters. Picking a plain-text (.txt) file under Upload a file fills this box with its text instead, so you can still correct it.
- Upload a file — Choose a file opens your files. Pick the waiver as a PDF or a picture (JPG, PNG or WebP), up to 25 MB, and it uploads straight away. The editor then shows the file exactly as attendees will see it, with Replace and Remove beside its name. A Word document can't be shown on the signup form, so save it as a PDF first and upload that.
The file also goes into your organization's uploads library. Deleting it there takes it off the event, and the library warns you first.
On the public form:
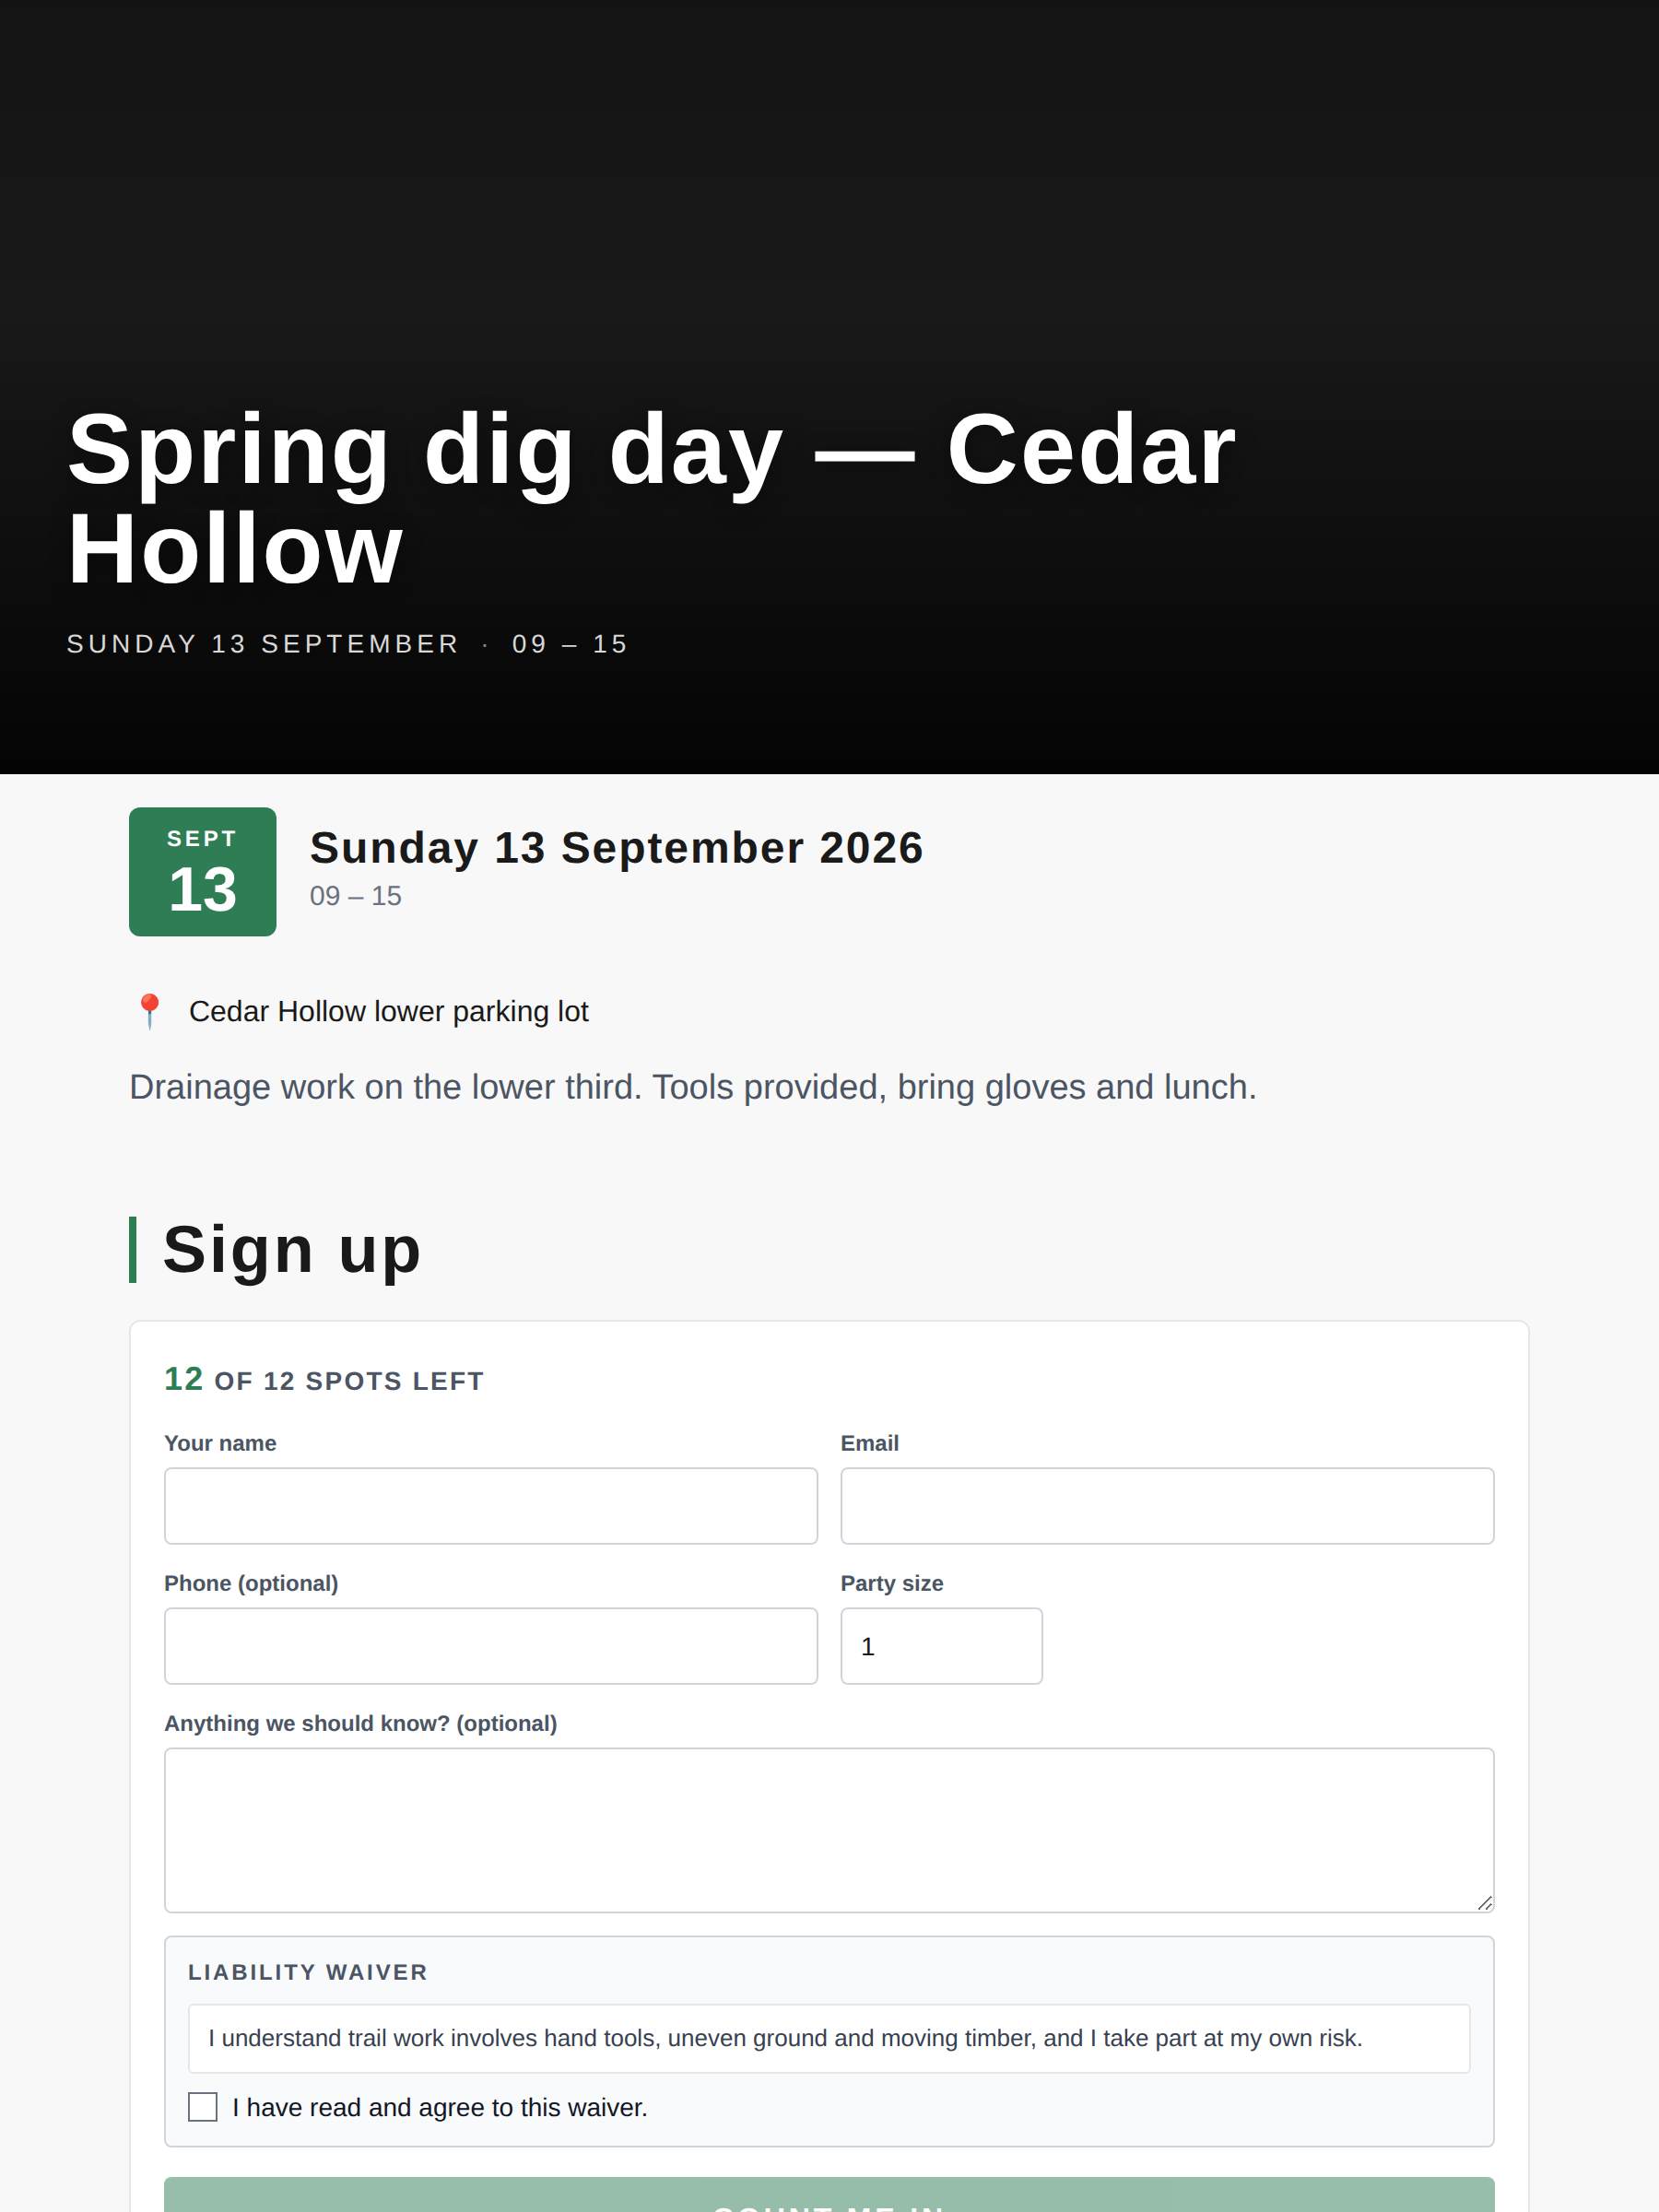
- The form shows a "Liability waiver" heading with the waiver and a required "I have read and agree to this waiver." checkbox.
- An uploaded waiver sits in a fixed-height window that scrolls on its own, so it can be read right on the form without downloading it and without pushing the form off the screen. Every page of a PDF is shown. An Open in a new tab link under the window opens the full file for anyone who prefers it.
- Server-side, an attempt without the checkbox fails: "You must agree to the waiver to sign up."
- Every signup row stores the exact timestamp and IP where the waiver was agreed. Managers see a "✓ waiver" badge on the roster with the signed timestamp on hover.
The same waiver, typed or uploaded, appears on the event in TrailsIQ Go.
Recurring events
Set Repeat to Daily / Weekly / Monthly and configure the interval + optional end date. The event is stored as one row per series and expanded to individual occurrences at read time.
- The public event page shows every upcoming occurrence in the Which date dropdown when signing up.
- The events index groups the next 12 months of occurrences (each recurring event contributes multiple rows).
- The dashboard attendee roster groups signups by occurrence date so a weekly volunteer day shows separate rosters for each Wednesday.
- Ending recurrence: leave Ends on blank for indefinite, or set a date. Setting Repeat back to Doesn't repeat clears the interval + end date fields on save (so stale values don't linger).
Signup deadlines apply per-occurrence: signups for a past occurrence are always refused, even when the series continues.
Trail work linkage
The Trail work picker links this event to open + in-progress maintenance issues. Search open issues by title in the picker; tick the ones this event will tackle.
Blurb: "Pin open maintenance issues this event will tackle. The public event page lists them so attendees know what they're signing up for." Empty state (no open issues): "No open maintenance issues. Add some from Maintenance in the sidebar."
Linked issues render on the public event page through the event_maintenance slot block (default heading "What we'll be working on"). Attendees clicking through get context: what's broken, where it is, how bad. Great for volunteer workdays where you want people to see the actual scope.
Linkage is many-to-many, per-event. Linking here doesn't change the issue itself. It does show on the issue's Work log, on the dashboard and in the field app: each linked workday with its date, how many people came and the hours it has already counted (or, before it is over, how many signed up). If you log time on that issue for the workday's date, for yourself or a teammate the workday already counts, the log form warns you first, so the same afternoon isn't counted twice. Log only time spent outside the workday there.
The signup flow (public side)
The public event page renders through the org's Event template (composed from event_hero + event_title + event_when + event_location + event_excerpt + event_body + event_maintenance + event_signup slot blocks — arrange them however fits your brand in Website builder → Event template).
The signup form, when enabled, sits on the event page as the event_signup block. On the Trailhead and Backyard designs, when it comes straight after the event's details, a wide screen shows it in a column beside them so the details and the form are read together; a phone shows it underneath. Fields are dynamically shown / required per the Form fields table you configured:
- Which date (recurring only — select of upcoming occurrences).
- Your name / Your name (optional).
- Email / Email (optional).
- Phone / Phone (optional).
- Party size — number 1–50.
- Anything we should know? — notes textarea.
- Waiver block if enabled.
Submit button label: whatever you set in the Form copy override, or the template default ("Count me in" out of the box). If the event is at capacity the button flips to "Join the waitlist" and the copy above the form reads "Event is full · N on waitlist".
Server-side responses:
- Success: "You're signed up. We'll see you at {title}." or "You're on the waitlist for {title}. We'll be in touch if a spot opens up."
- Duplicate email: "You're already signed up for {title} — see you there!" or the waitlist variant.
- Misspelled email: as somebody types, a line under the field asks "Did you mean jane@gmail.com?", and tapping the address fixes it. The form won't accept a common misspelling of a big provider (gmial.com, yaho.com, hotmail.con) or an address whose domain can't receive email, so the confirmation actually reaches them.
- Missing waiver: "You must agree to the waiver to sign up."
- Recurring event without a date pick: "Please pick a date for the event."
- Rate-limited: "Too many attempts. Try again in {s}s."
A paid event shows each ticket type with its price and − / + buttons in place of Party size, the total, and a button reading Continue to payment with the amount. The visitor pays by card on Stripe's page and comes back to the event page reading "Payment received. Your tickets for {title} are on their way to your email, with a QR code to show at the door." Leaving Stripe's page without paying charges nothing.
They are added to the attendee list once Stripe confirms the payment, and get an email titled "Your tickets for {title}" with a QR code, the ticket code under it, what they bought, what they paid and the calendar file. Show my ticket in the email opens the ticket on its own page, which works at the door as well as the email does, and so does a screenshot of either. Buying more with the same email for the same date adds to the same ticket, and the email lists everything they hold. A paid ticket has no cancel link: to cancel, they get in touch with you and you refund it.
Confirmation email. Unless you've hidden the Email field, each signup gets an email immediately. Subject: "You're signed up for {title}" or "You're on the waitlist for {title}". Body includes When / Where / Party-size, an Add to calendar button linking a per-occurrence .ics file (also attached to the email), and a Cancel my signup button that's a 14-day signed URL. The cancel page shows "Signup canceled — Thanks for letting us know, {name}. Your spot for {title} has been freed up. You can close this tab." Expired links show "This cancel link has expired. Get in touch with the organization directly."
Managing signups (dashboard side)
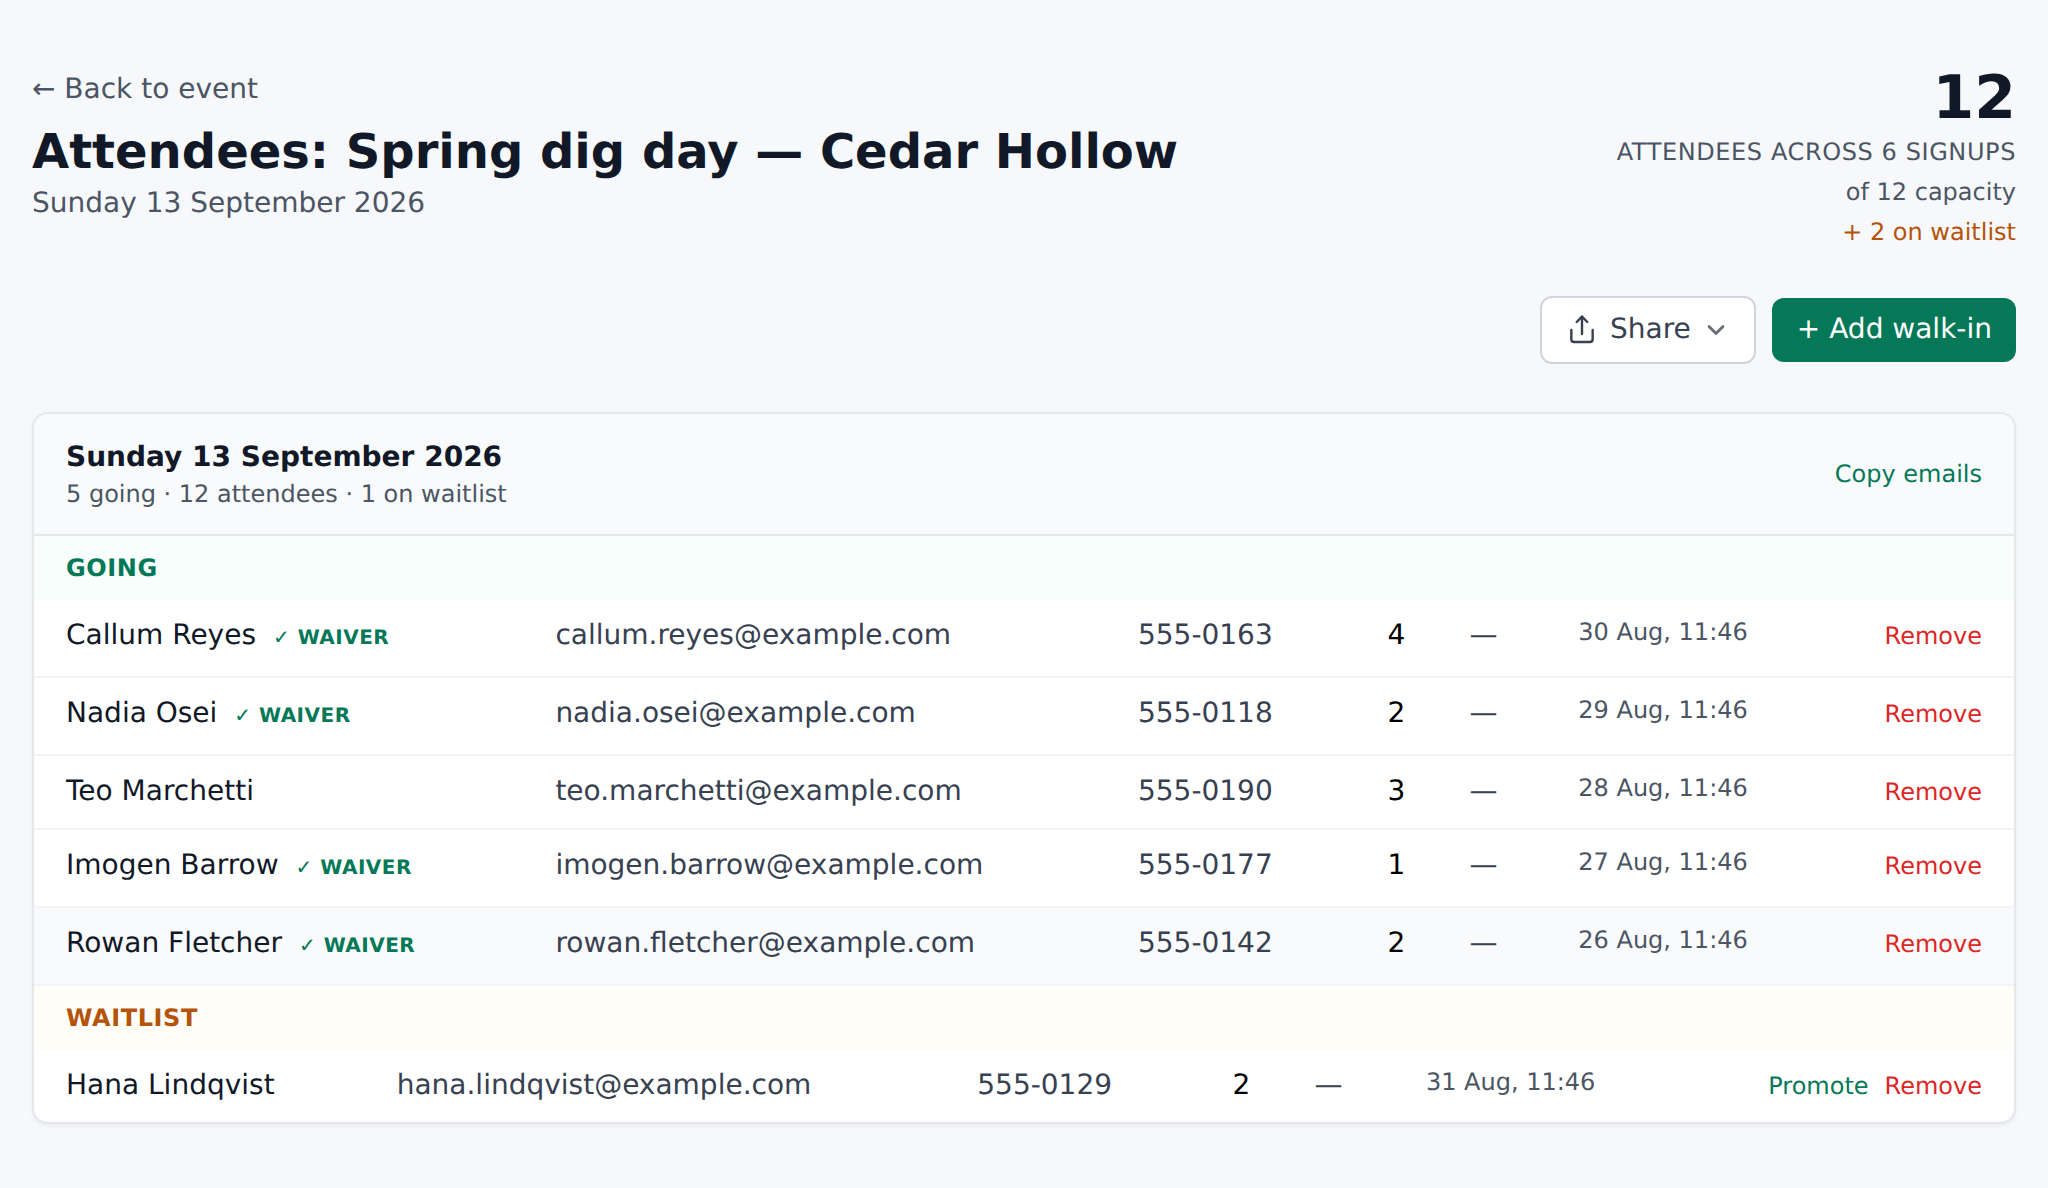
From the event's editor click View attendees → in the Signups section, or land on /events/{event}/signups. Header shows "Attendees: {title}", the giant attendee total, "attendees across N signup(s)", and, when capped, an "of {capacity}" subtitle + a "+ N on waitlist" chip when the waitlist is populated.
Actions in the header:
Both exports sit under Share above the roster.
- PDF check-in sheet — for the day: your letterhead at the top, then everyone going and waitlisted with their contact details, party size, date and whether the waiver is signed. Places taken and the waitlist count are totalled at the top.
- CSV spreadsheet — the same people as raw rows (Name, Email, Phone, Party size, Status, Source, Occurrence date, Notes, Signed up, Waiver signed at). BOM-prefixed for Excel.
- + Add walk-in — opens an inline form for someone signing up in person (Name / Email / Phone / Party size / Hours each / date if recurring / Status Going or Waitlist / Notes). Only the name is needed: leave Email blank for somebody who turned up on the day and didn't want to give one. Typing the name suggests people from your Volunteers list and your team, and picking one fills in what we already have for them. Walk-ins bypass capacity and skip the confirmation email.
Rosters group by occurrence date for recurring events; each group has a Going table and a Waitlist table. Per-row actions: Promote (waitlist → going, fires a personal push to app-signup attendees: "You're in: {title}"), Remove (browser confirm "Remove {name}'s signup?"; going-attendees get a "Signup canceled: {title}" push if they signed up through the app).
Per-row badges: walk-in (no email on the signup), team (the email belongs to somebody on your team), 📱 app (signed up through TrailsIQ Go — push-targetable), ✓ waiver (with signed timestamp on hover), paid (with the amount and the tickets they bought, and the ticket code on hover), and checked in once their ticket has been scanned at the door.
Paid tickets. Each ticket order is also listed under Settings → Payments, under Tickets. To refund one, refund the payment in your Stripe dashboard: a full refund takes those tickets off the person's signup, and once they have none left the ticket is canceled and no longer gets anybody in. A partial refund leaves the tickets as they are. Removing a paid signup from the list does not give the money back; refund it in Stripe.
At each group header, Copy emails copies all attendee emails as a comma-separated list to your clipboard with the alert "Copied N emails to clipboard." There's no built-in "email all" — paste into your usual email tool.
An amber banner appears if signups are off but existing rows remain: "Signups are currently disabled for this event. Existing signups are shown for reference; the public form won't accept new ones until you re-enable signups in the event editor."
Empty state: "No signups yet."
Volunteer hours from an event
Everyone who comes to an event counts toward your volunteer hours: in the Work report, in the annual report, and in the figures an umbrella account sees. Once the event's day has come, the Going table is headed Came so you can tick off who is there. Every row on it counts for the length of the event, from its start and end times, times the party size, but only once the event is over: after its end time in your organization's time zone, or the day after for an event with no end time. Signing up alone never adds hours. The total shows under the attendee count at the top of the page.
- Untick Came for anyone who signed up and didn't show. Their row stays on the list and stops counting.
- Change the hours on a row for somebody who left early or stayed on. Clear the box to put them back on the event's length.
- An event with no end time (or an all-day one) has no length to go by, so nobody counts until you enter their hours.
Where each person's time shows up depends on who they are:
- Somebody on your team (their signup email matches a member's) gets the hours on their own work hours for that day, already approved. Paid staff count as paid hours there, not volunteer hours. Untick them or remove the signup and the entry goes with it.
- Somebody with an email who isn't on the team is listed by name in the Work report and counts as a volunteer. They don't get an account or an invitation.
- A walk-in with no email counts under Outside volunteers, the same row as helpers logged on a task as a number.
In the Work report, event time appears as the task type Events, with the event's title in place of a task. Picking a trail in the report's filters leaves events out, because an event isn't on a trail.
Check-in from TrailsIQ Go
Volunteers who have TrailsIQ Go and are signed in to it can check themselves in on the day, so you don't have to write their names down. It is free on every plan.
Check-in on each row of the Events page opens the event's check-in page, and so does Check-in code on the attendee list. It is built to be opened on your phone at the meeting point, or printed:
- The QR code fills the top of the page. Volunteers scan it with the app (menu → Check in at a workday) or with their phone's own camera, which opens the app. Print a sign prints one page for the sign-in table: the event, when and where, a large code and a line on how to use it. Download PNG saves the code on its own. Make a new code replaces it, and the old one, printed copies included, stops working.
- Style in the QR builder (Change the look once you have one) opens the QR builder on the event's code, so you can give it your colors, dot shape and logo. Save as the check-in look keeps that look for every event's check-in code, on screen, on the printed sign and in the field app; each event still gets its own code. Back to the plain look undoes it. If the logo in the middle can't be loaded, the code is shown without it so it still works. Styling needs permission to use the QR builder.
- Check in by location is optional. Stand at the meeting point and tap Use my location here. From then on, anybody within 300 meters can check in from the event's page in the app without scanning. An event's location is written in words, so without this spot the QR code is the only way in. The spot is also where Open in maps on your website's event page drops its pin. Without one, the link pins the trailhead, network or trail your location names. A street address is looked up as written, and any other place name pins the middle of your trails. To send people somewhere exact, set the check-in spot. Turn off removes the spot.
- Checked in lists everybody who has checked in, with the time and how, and updates on its own while the page is open.
Check-in only works on the event's day, from an hour before the start time until two hours after the end time, in your organization's time zone. An all-day event, or one with no end time, is open all day.
No signal at the meeting point is fine. A volunteer who scans the code with no connection sees that their check-in is saved on their phone, and it uploads by itself once they are back in range. It counts as long as they scanned while check-in was open, even if it uploads that evening; a check-in saved more than a week ago is not accepted, so add them on the attendee list instead.
One code for all your events
Check-in code at the top of the Events page opens your main check-in code: one code for every event, so one printed sign can stay at the trailhead or the shed all season. A volunteer who scans it is checked in to whichever of your events is open for check-in at that moment. When two or more are open at once, the app lists them and they pick the one they're at. When none is open, the app says so and checks nobody in.
It only ever offers your own organization's published events. A draft doesn't show up on it, though a draft's own code still works.
The page lists what is open for check-in right now, so you can see what a scan would offer, and has the same Print a sign, Download PNG, Change the look and Make a new code as an event's page. Each event's own code keeps working alongside it; use whichever suits the day. Checking in by location still happens from the event's own page in the app.
What a check-in does:
- It finds their signup, if they signed up with the same email, and marks them as came. If they didn't sign up, it adds them. A full event or a passed signup deadline doesn't stop somebody who is standing there.
- They are a named volunteer. They show on the list by name with a checked in badge, and count by name in the Work report, never under Outside volunteers. They are not added to your team.
- A team member who checks in gets their hours on their own work hours, the same as any member who comes to an event.
You can still untick Came or change the hours on anybody who checked in.
Deleting an event asks first (Delete "{title}"? This can't be undone.) and removes its attendee list and its links to trail work with it.
Running an event from the field app
Everything you need on the day is on the phone. Tap Events on the field app's home screen (if you've arranged your home screen before, it's added at the end of your tiles). It opens on Upcoming, with Past beside it for the last year.
- New event — title, date, start and end times (or All day), where, a short description, whether to take signups on the website and how many places, and whether it's published. New events start as drafts. The length is what each volunteer is credited, so set an end time.
- Edit event — the same form. It changes only what's on it: the event's page, waiver, repeat rule and signup form stay as you set them on the dashboard.
- Type — the form picks from the same event types as the dashboard.
- Who's coming — open an event to see everyone signed up, grouped by date for a repeating event, with the waitlist under them. Once the list is longer than a screen, a search box finds somebody by name or email.
- Add a walk-in — a name is enough. As you type it, people you already know (your Volunteers list and your team) are suggested; pick one to fill in their email and phone. Add their email if they'd like to be named in your reports, their party size, and their hours if they didn't stay for the whole event.
- Check-in code — the event's check-in page on the phone: the QR code to hold up, Use my location here to set the check-in spot where you are standing, and who has checked in so far, updating on its own. It needs a connection. Anybody who checked in has a Checked in badge on the list.
- Scan tickets — on an event that sells tickets. Point the phone at the QR code on somebody's ticket email or ticket page. A green Admit 3, with their name and tickets, means they're in, and they are checked in on the list. It keeps scanning for the next person. It also tells you when a ticket has already been scanned (and at what time), when it's for another date of a repeating event (with Let them in anyway), when it's on the waitlist, when it was refunded, and when it isn't for this event. You can type the code printed under the QR code instead.
- After the day — every row has a Came box, ticked to start with, and an hours box. Untick anyone who didn't show and type hours for anybody who left early; the Came and Volunteer hours totals at the top follow. Move up takes somebody off the waitlist, and the × removes a signup.
The walk-in email field shows the same Did you mean line as the public form. On the dashboard a misspelled address can't be saved; in the field app it can, so a walk-in added with no signal is never lost over an address.
Walk-ins, ticking who came and scanning tickets work with no signal. Each is kept on the phone, a walk-in under Waiting to upload, and sent when you're back in range, like any other queued record. The scanner checks tickets against the list the phone already has, so a ticket bought after you last opened the event with signal isn't on it yet: open the event again with signal to bring the list up to date. Creating, editing and deleting events and removing people need a connection, and the app says so rather than failing. The list and each event you've opened are kept on the phone, so you can still read who's coming offline.
The field app shows Events to anyone whose role includes Manage events, on a plan with events.
Publishing an event
Simple boolean — Draft or Published. No scheduling. The topbar Publish / Unpublish button flips the state and saves in one click. Existing events auto-save after toggling; the "unsaved" dot clears.
First publish stamps the publish date and — unless you unchecked Notify followers when published — fires a "New event: {title}" push and bell-inbox row to everyone who's favorited your org and left New events notification on.
Repeatedly saving an already-published event never re-pushes: the notification only fires on the first false → true transition.
On the Events index, past events show a Finished pill regardless of prior draft / published state so you can tell at a glance which side of the calendar they're on.
Where events show up publicly
Five surfaces:
- Individual event page —
/site/{slug}/events/{event}(canonical) or/events/{event}on vanity. Composed through your Event template with the slot blocks you configured. - Events index —
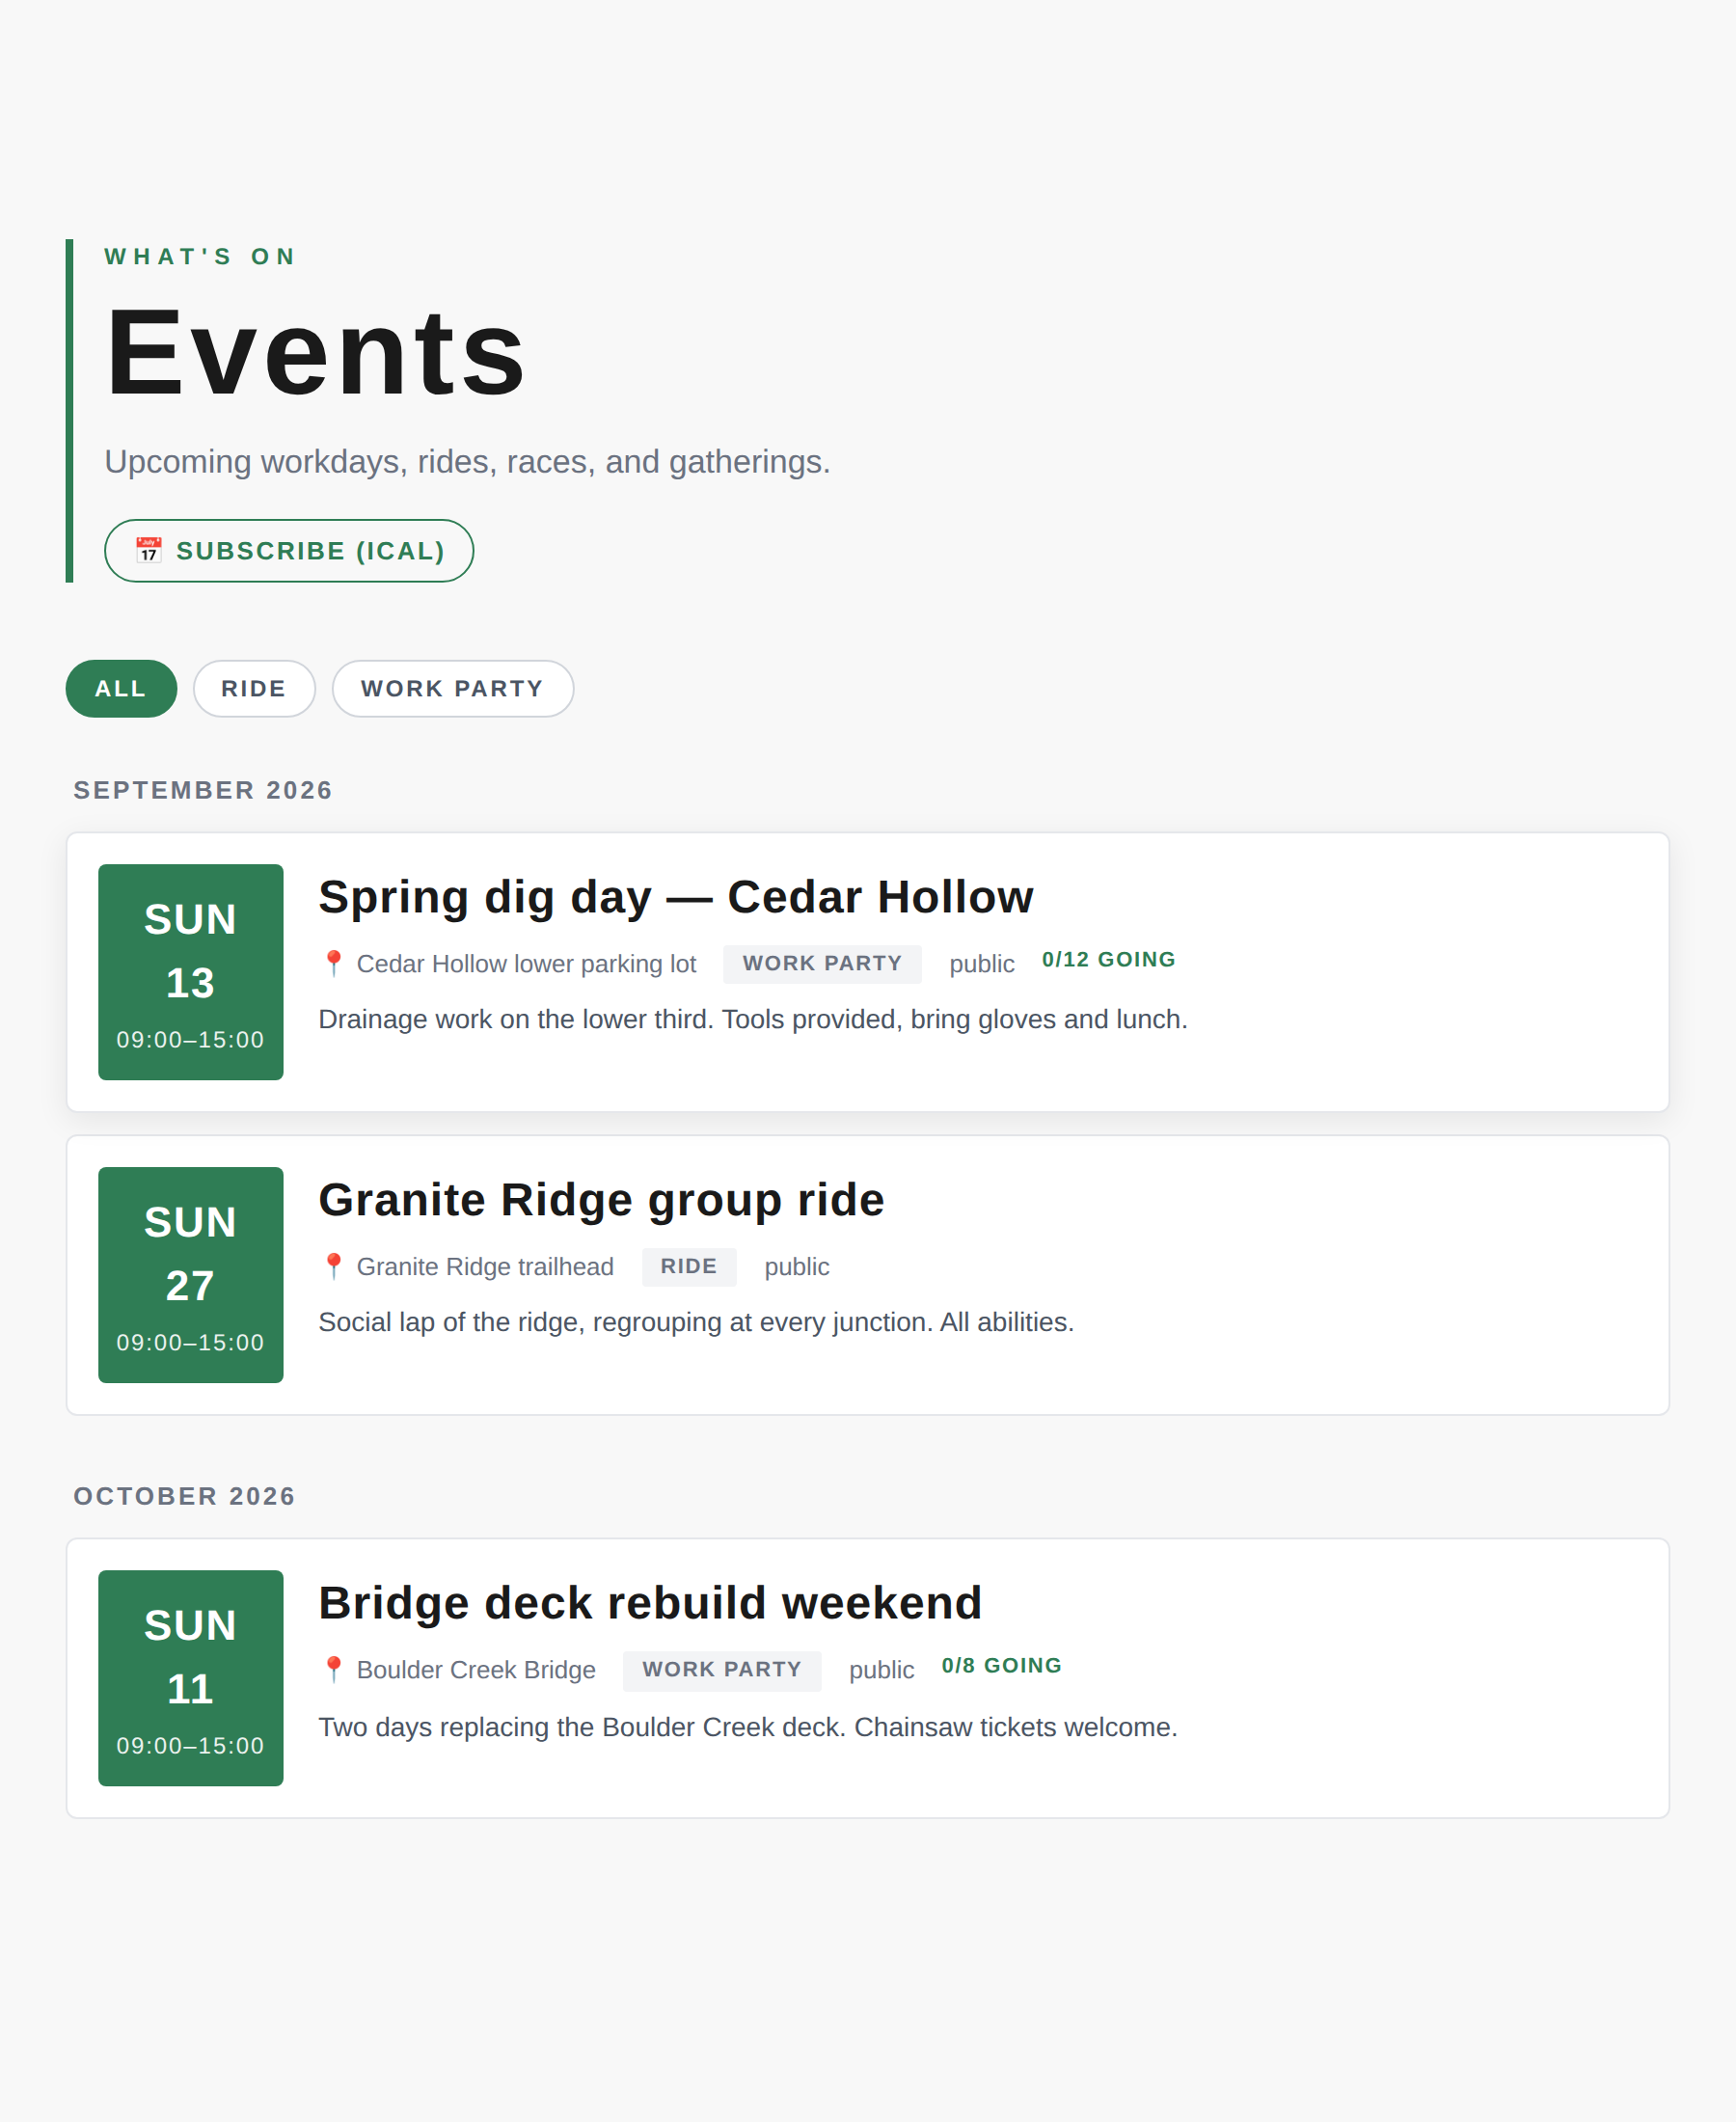
/site/{slug}/eventsor/eventson vanity. Header eyebrow "WHAT'S ON", heading "Events", subtitle "Upcoming workdays, rides, races, and gatherings." Row shows day chip, time, title, location, tag, audience, a ↻ Recurring marker, and N/C going if a capacity is set. Filter chips by type: All plus every type your upcoming events use. Empty states: "No upcoming events. Check back soon." / "No upcoming events tagged '{tag}'. Clear filter" Past events are hidden from the public index — the archive lives on the dashboard only. - Events list block — Drop into any website-builder page. Same auto vs manual toggle as the News grid block; auto-mode pulls up to 12 upcoming published events.
- iCal feeds —
/events.icsfor the whole calendar,/events/{event}.icsfor a single event (honors?date=for a specific recurring occurrence). Cached for 5 minutes. - TrailsIQ Go — Every event, every signup form, every cancel link works from the public app too. App signups carry a device ID so they're push-targetable for reminders + promotions.
Notifications and reminders
- On publish (once) — Push + bell-inbox row "New event: {title}" / "{Mmm d} · {location}" to every org follower who left the New events notification on. Skip with Notify followers when published.
- Reminder push (day-before / day-of) — An hourly cron fires per-occurrence reminders. Events that start at noon or later: reminder at 09:00 local on the same day. Events before noon: reminder at 17:00 local the previous day. All-day: reminder at 17:00 the previous day. Push title "Reminder: {title}", body "today at HH:MM · {location}" or "tomorrow at HH:MM · {location}". Per-signup dedup; only signups that came through TrailsIQ Go and left Event reminder on receive them.
- Confirmation email — immediate on signup, unless email is hidden or the signup was a manager walk-in.
- Promotion push — when a manager promotes a waitlist attendee (only if they signed up through the app): "You're in: {title}" / "A spot opened up — your signup is now confirmed."
- Manager-cancel push — when a manager removes a going attendee (app signups only): "Signup canceled: {title}" / "Your signup was removed by the organization. Reach out if you have questions."
No SMS. No email reminders — reminders are push-only through TrailsIQ Go.
Editing, canceling, deleting
- Edit — click the event to reopen the same editor. Slug is editable; the auto-fill from title stops once you touch it.
- Unpublish — flip to Draft. The public event page 404s immediately; existing signups stay in the roster. No emails or pushes go out on unpublish.
- Delete — from either the Index or the editor. Confirm:
Delete "{title}"? This can't be undone.Hard delete; cascades to every signup and the trail-work pivot. - Attendee self-cancel — the 14-day signed link in the confirmation email marks the signup as canceled. It's recoverable — you can see the row and re-promote if there's confusion.
- No dedicated "cancel event" button — either delete the event, or flip it to Draft (hides from public but keeps the roster + signups queryable).
Permissions and plan gating
Plan gate. Events are Pro and above. On a plan without it the sidebar row is hidden; the Events page still opens with the list read-only and an amber card at the top: heading "Pro plan required", body "Events are part of the Pro plan, alongside the website builder." + an "Upgrade to Pro" link. Create / edit / delete / image endpoints abort with "Events require Pro or Enterprise."
Role gate. The "Manage events" permission (blurb: "Create, edit and delete events on the org's public hub + website, and approve / decline signups. Requires Pro or Enterprise.") defaults on for owner + manager; off for field worker + volunteer. Toggle per-role from Settings → Roles & permissions. The sidebar entry is gated on this permission.
Anyone can sign up from the public form without an account. Spam protection is built in.
Common gotchas
- All-day is the schema default for recurring events but the editor starts new events with All day unchecked. Tick the box explicitly if you want an all-day event.
- Slug uniqueness is per org, not global. Two orgs can both have
/events/summer-workday. - Deleting an event hard-deletes all its signups. No trash. Use Unpublish if you want a soft-delete effect.
- Notify-on-publish only fires on the first draft → published transition. Saving an already-published event never re-pushes even if you toggle the checkbox.
- Hidden email field = no confirmation email, no calendar
.ics, no self-cancel link. The editor shows an amber warning about this. Attendees exist in your dashboard roster only. - Waitlist is manual promotion only. When a going attendee cancels, waitlisted attendees don't auto-promote. Watch the roster and click Promote explicitly.
- Signup form heading + button copy default to the Event template's block copy (Sign up, Count me in). Per-event overrides live in the Event editor's Signups panel under "Form copy (overrides template)".
- Recurrence values (interval + end date) are cleared on save whenever Repeat is Doesn't repeat. Flip repeat off intending to re-enable later and you'll have to re-enter the interval / end date.
- Public events index hides past events entirely. Managers can browse the full history in the dashboard (Finished pill); the public can only see upcoming.
- Event reminders go to app signups only. Signups that came through the public web form and left an email address don't get reminder push notifications — encourage attendees to install the app for reminders, or add a "Reminders" line to your confirmation email template.
- Paid tickets are refunded in Stripe, not here. Removing a paid signup from the attendee list doesn't give the money back.
What's next
- Style your Event template once in the website builder so every event inherits your brand — hero image size, when / location layout, signup form placement, related trails.
- Drop an Events list block on your home page and pin it to auto-mode so new events show up automatically.
- If your event needs a waiver, draft the waiver text in a doc first, paste it into the Waiver textarea, and test the click-wrap with a personal email — the audit trail is only as good as what you've drafted.
- Read the News article for the sister content type, and the Website builder article for the block-canvas mechanics your Event template + custom event body pages share.