Trails
Trail Planner — record, draw, or find a sustainable line
Plan trail before you build it: record a line in the field, draw it on the dashboard, or let the route finder search the hillside for you. Covers activity profiles, the half rule, the terrain analysis, build-cost estimates, editing and comparing options, walking a line more than once, public proposal pages, and exporting a finished plan into your live network.
The Trail Planner is where a trail exists before it exists. You get a line onto the map — walked, drawn, or proposed by the route finder — and TrailsIQ measures it against the terrain underneath, prices it, and gives you something to show a landowner or a board. Nothing in the planner touches your live trail network until you deliberately export it.
Three ways to start a line
Record it in the field. Open the Field App, start a Plan / Record session, and walk or ride the line. The native shell uses a dedicated GPS plugin rather than the browser's, so the trace survives a locked screen. This is the honest option — you find out about the wet spot and the rock band while you are standing on them.
Draw it on the dashboard. Trail Planner → Draw. Click along the line on the map. Every click is a vertex; the line is analyzed against the terrain as you go, so you can see a stretch turn red before you commit to it.
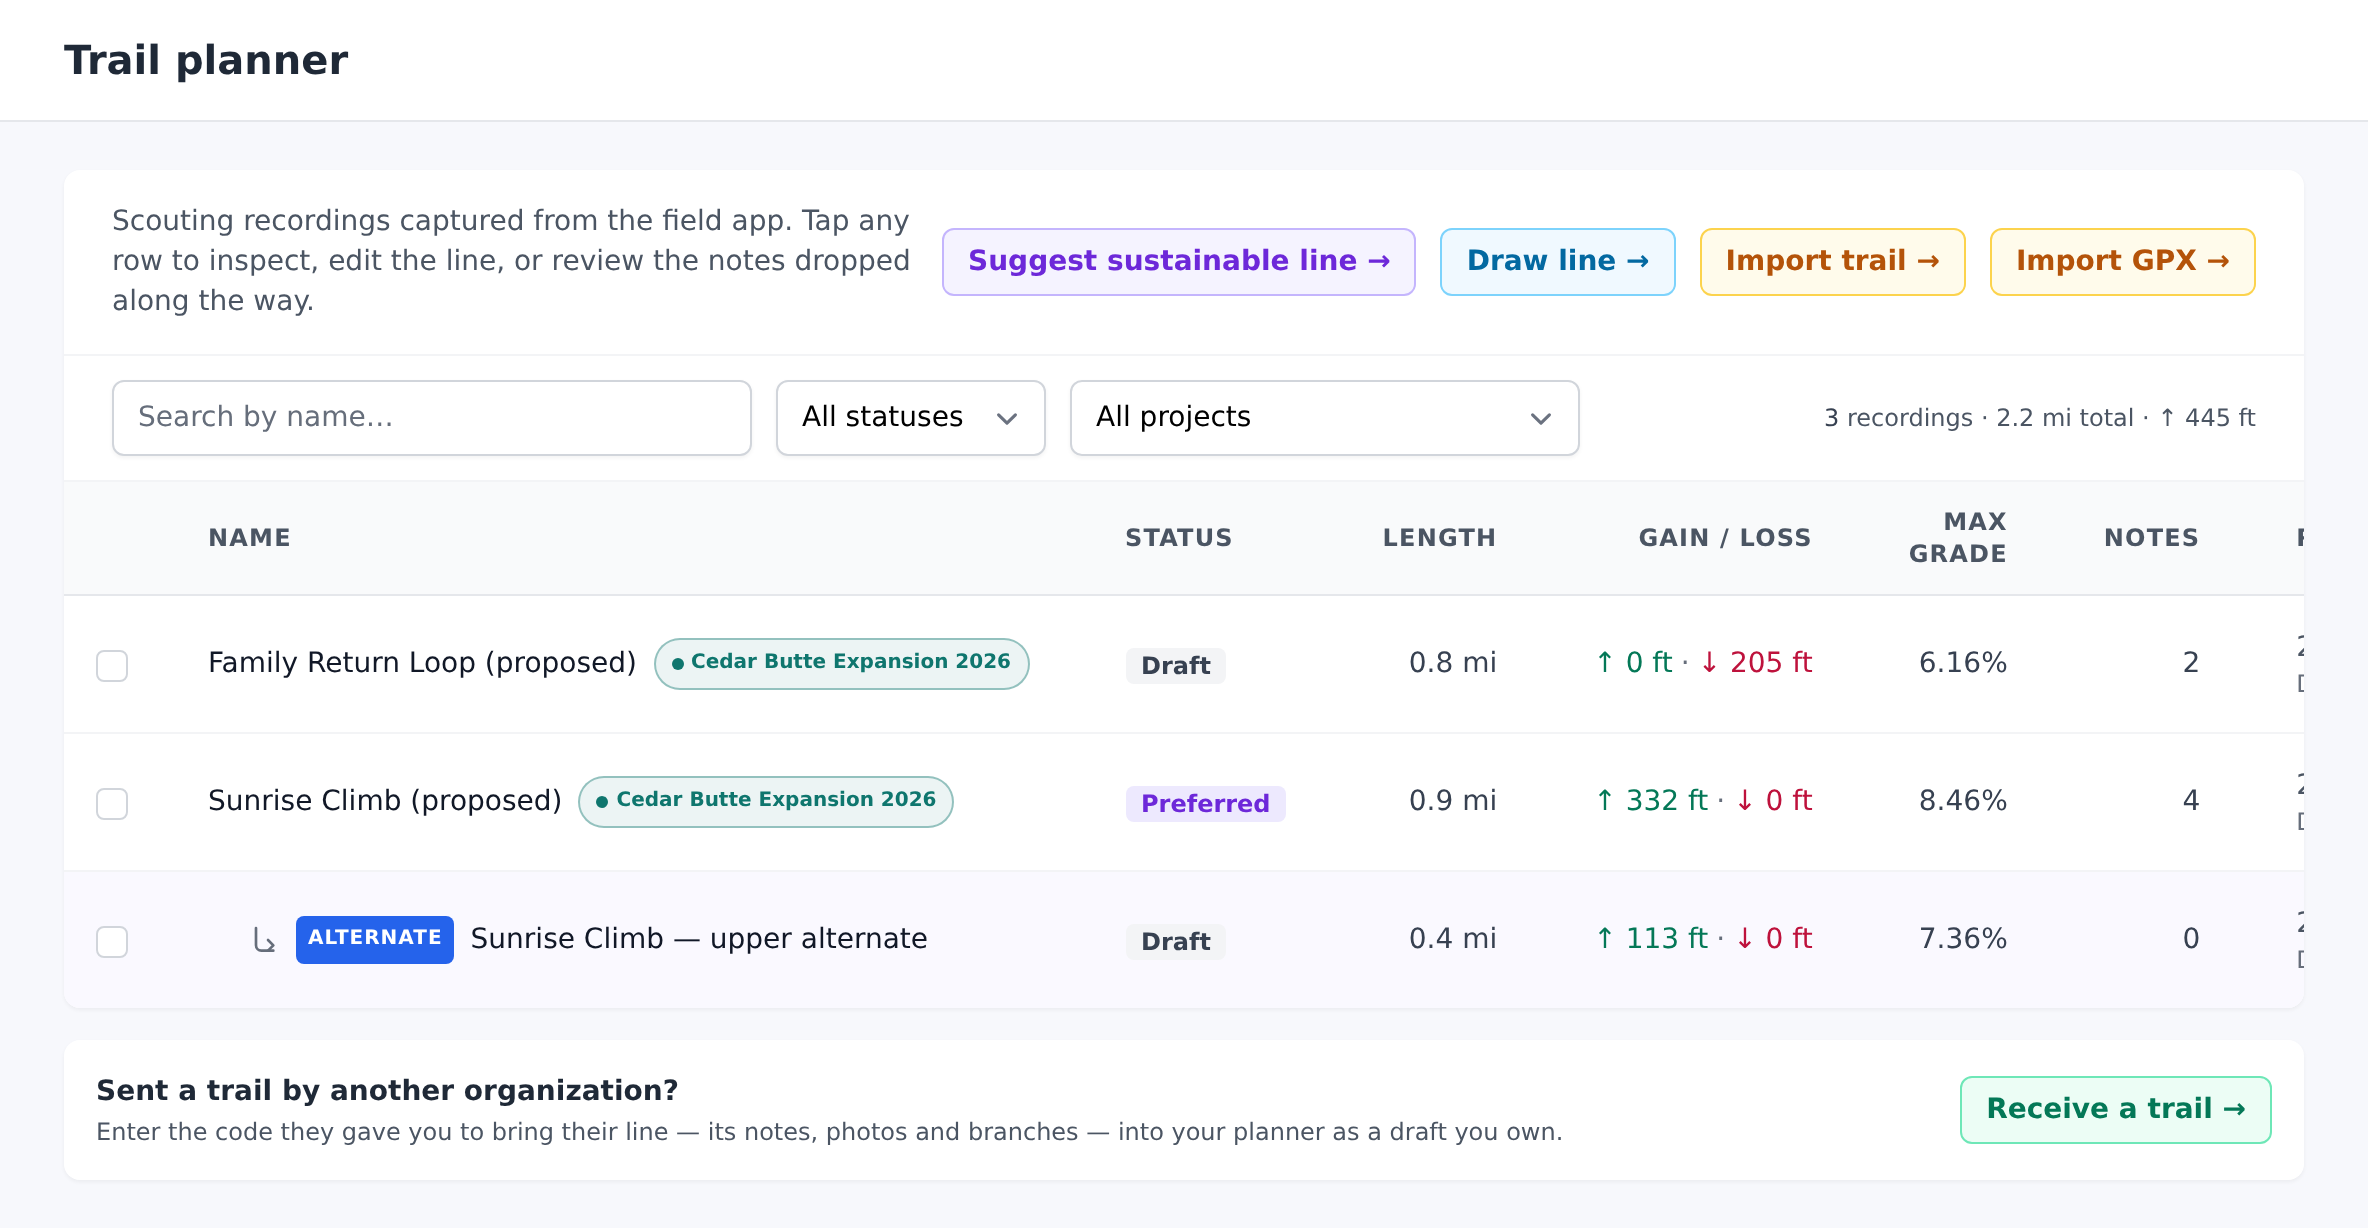
Ask for it. Trail Planner → Suggest. Drop a start and an end, pick what the trail is for, and the route finder searches the hillside for a sustainable line between them. See below.
All three produce the same thing — a planner recording — and everything after this point applies equally to whichever you used.
Suggest — let TrailsIQ find the line
Suggest runs a route search across the elevation grid, weighing grade, cross slope, turn radius and fall-line alignment against each other, and returns the best line it can find between your two points.
The result reports two different things, and it is worth knowing which is which. This line is the line you are being offered, measured exactly the way it will be measured once you save it — the share of it that satisfies the half rule, the feet that run with the fall line, and the average hillside it crosses. Search underneath is the finder's own working: how many of the steps it considered ran into each limit while it was choosing between them. The first describes the trail; the second describes what the terrain made hard. When they disagree, the top row is the one about your line.
Line type sets what you are building and colors it on the map: Alternate, Reroute, Spur, or Connector.
Preset sets the search's temperament:
| Preset | What it optimises for |
|---|---|
| Balanced | The default sustainable-line search |
| Flow | Sweeping curves, moderate grade |
| Tech | Steeper grades OK, sharper turns allowed |
| Chill climb | Strict 5% cap, tight traverse, avoids wetlands |
| Aggressive descent | Steep grades, straighter lines acceptable |
Under the presets, every individual constraint is exposed as a slider — grade ceiling, turn radius, and the rest — so a preset is a starting point rather than a box you are stuck in.
When the finder cannot meet your constraints, it does not fail silently or quietly bend them. It returns the best line it found and tells you plainly which constraint it had to relax to get there. That banner is the useful part of the answer: it is telling you the terrain does not permit what you asked for, which is worth knowing before you flag anything.
Those banners are checked against the line you got. Preset grade cap relaxed names the grade the suggested line actually reaches, and only appears when the line really does exceed your cap. It used to be able to appear over a line at a tenth of a percent — the search abandons a pass when it runs out of time, which looked from the inside exactly like a pass that had proved the terrain impossible, and got reported as one. A claim about the hillside is now backed by a measurement of the line.
Search cut short is the separate notice for that case, and it means what it says: the search ran out of time before it finished testing your constraints, so the line came from a relaxed pass and the constraints were never disproved. The figures on the line are measured from the line and stand. Endpoints closer together give the search room to finish.
Activity profiles
Picking an activity applies an envelope of what that use can physically carry. It sets the turn radius the line must respect and the corridor width the cost model prices.
| Activity | Min turn radius | Grade ceiling | Default width |
|---|---|---|---|
| Hiking | 2.5 m | 15% | 2 ft |
| Trail running | 4 m | 12% | 2 ft |
| Mountain biking | 6 m | 15% | 3 ft |
| E-MTB | 7 m | 18% | 3.5 ft |
| Adaptive / accessible | 10 m | 8% | 5 ft |
| Equestrian | 8 m | 12% | 4 ft |
| XC ski (groomed) | 15 m | 10% | 10 ft |
| Snowmobile | 20 m | 15% | 10 ft |
| ATV / OHV | 12 m | 18% | 6 ft |
These are platform baselines drawn from the usual references — IMBA difficulty guidance, USFS trail class matrices, groomed-surface norms — and every one of them is overridable on the constraint sliders. Choosing Any activity removes the envelope entirely.
The turn radius is the number that changes the shape of the answer most. A snowmobile corridor and a hiking trail across the same hillside are not the same line, and the finder will not pretend otherwise.
How sustainability is judged
TrailsIQ uses the half rule: trail grade should stay under half the hillside's cross slope, so water sheds across the tread instead of running down it.
That rule alone misbehaves on flat ground — with no cross slope there is nothing to shed across, and a bench or a valley floor would be condemned for being level. So the real threshold is:
the greater of half the cross slope, or 5%
A 6% side slope allows 5% grade (the floor). A 14% side slope allows 7% (the half rule taking over). On gentle terrain the failure mode is ponding rather than fall-line erosion, and outslope and knicks handle that fine at 5%.
Fall-line alignment is flagged separately — a line running straight down the slope erodes regardless of whether it passes the grade test. That check only applies where there is a real fall line to align with: at least 3% grade and at least 5% cross slope. Below that the flag would be noise.
Both checks read the trail over 25 meters, not from one point to the next. A walked line has a fix every few meters, and a grade measured between two of those is mostly the wobble in the GPS rather than the shape of the ground. That made a good trail score worse the more carefully somebody walked it, and it put fall-line flags on stretches that were crossing the slope rather than running down it. Grade and direction are now both read over a fixed 25 meters — the same scale the hillside's cross slope is measured at — so the same trail scores the same whether it was drawn on the map or walked with a phone in your pocket.
If you have lines recorded before this, their scores will change the next time you open them, and mostly in one direction: less amber and less red than you were seeing.
The same thresholds drive the planner's analysis, the route finder's cost function, and the red segments on the map. A stretch that reads red here reads red everywhere.
Reading the analysis
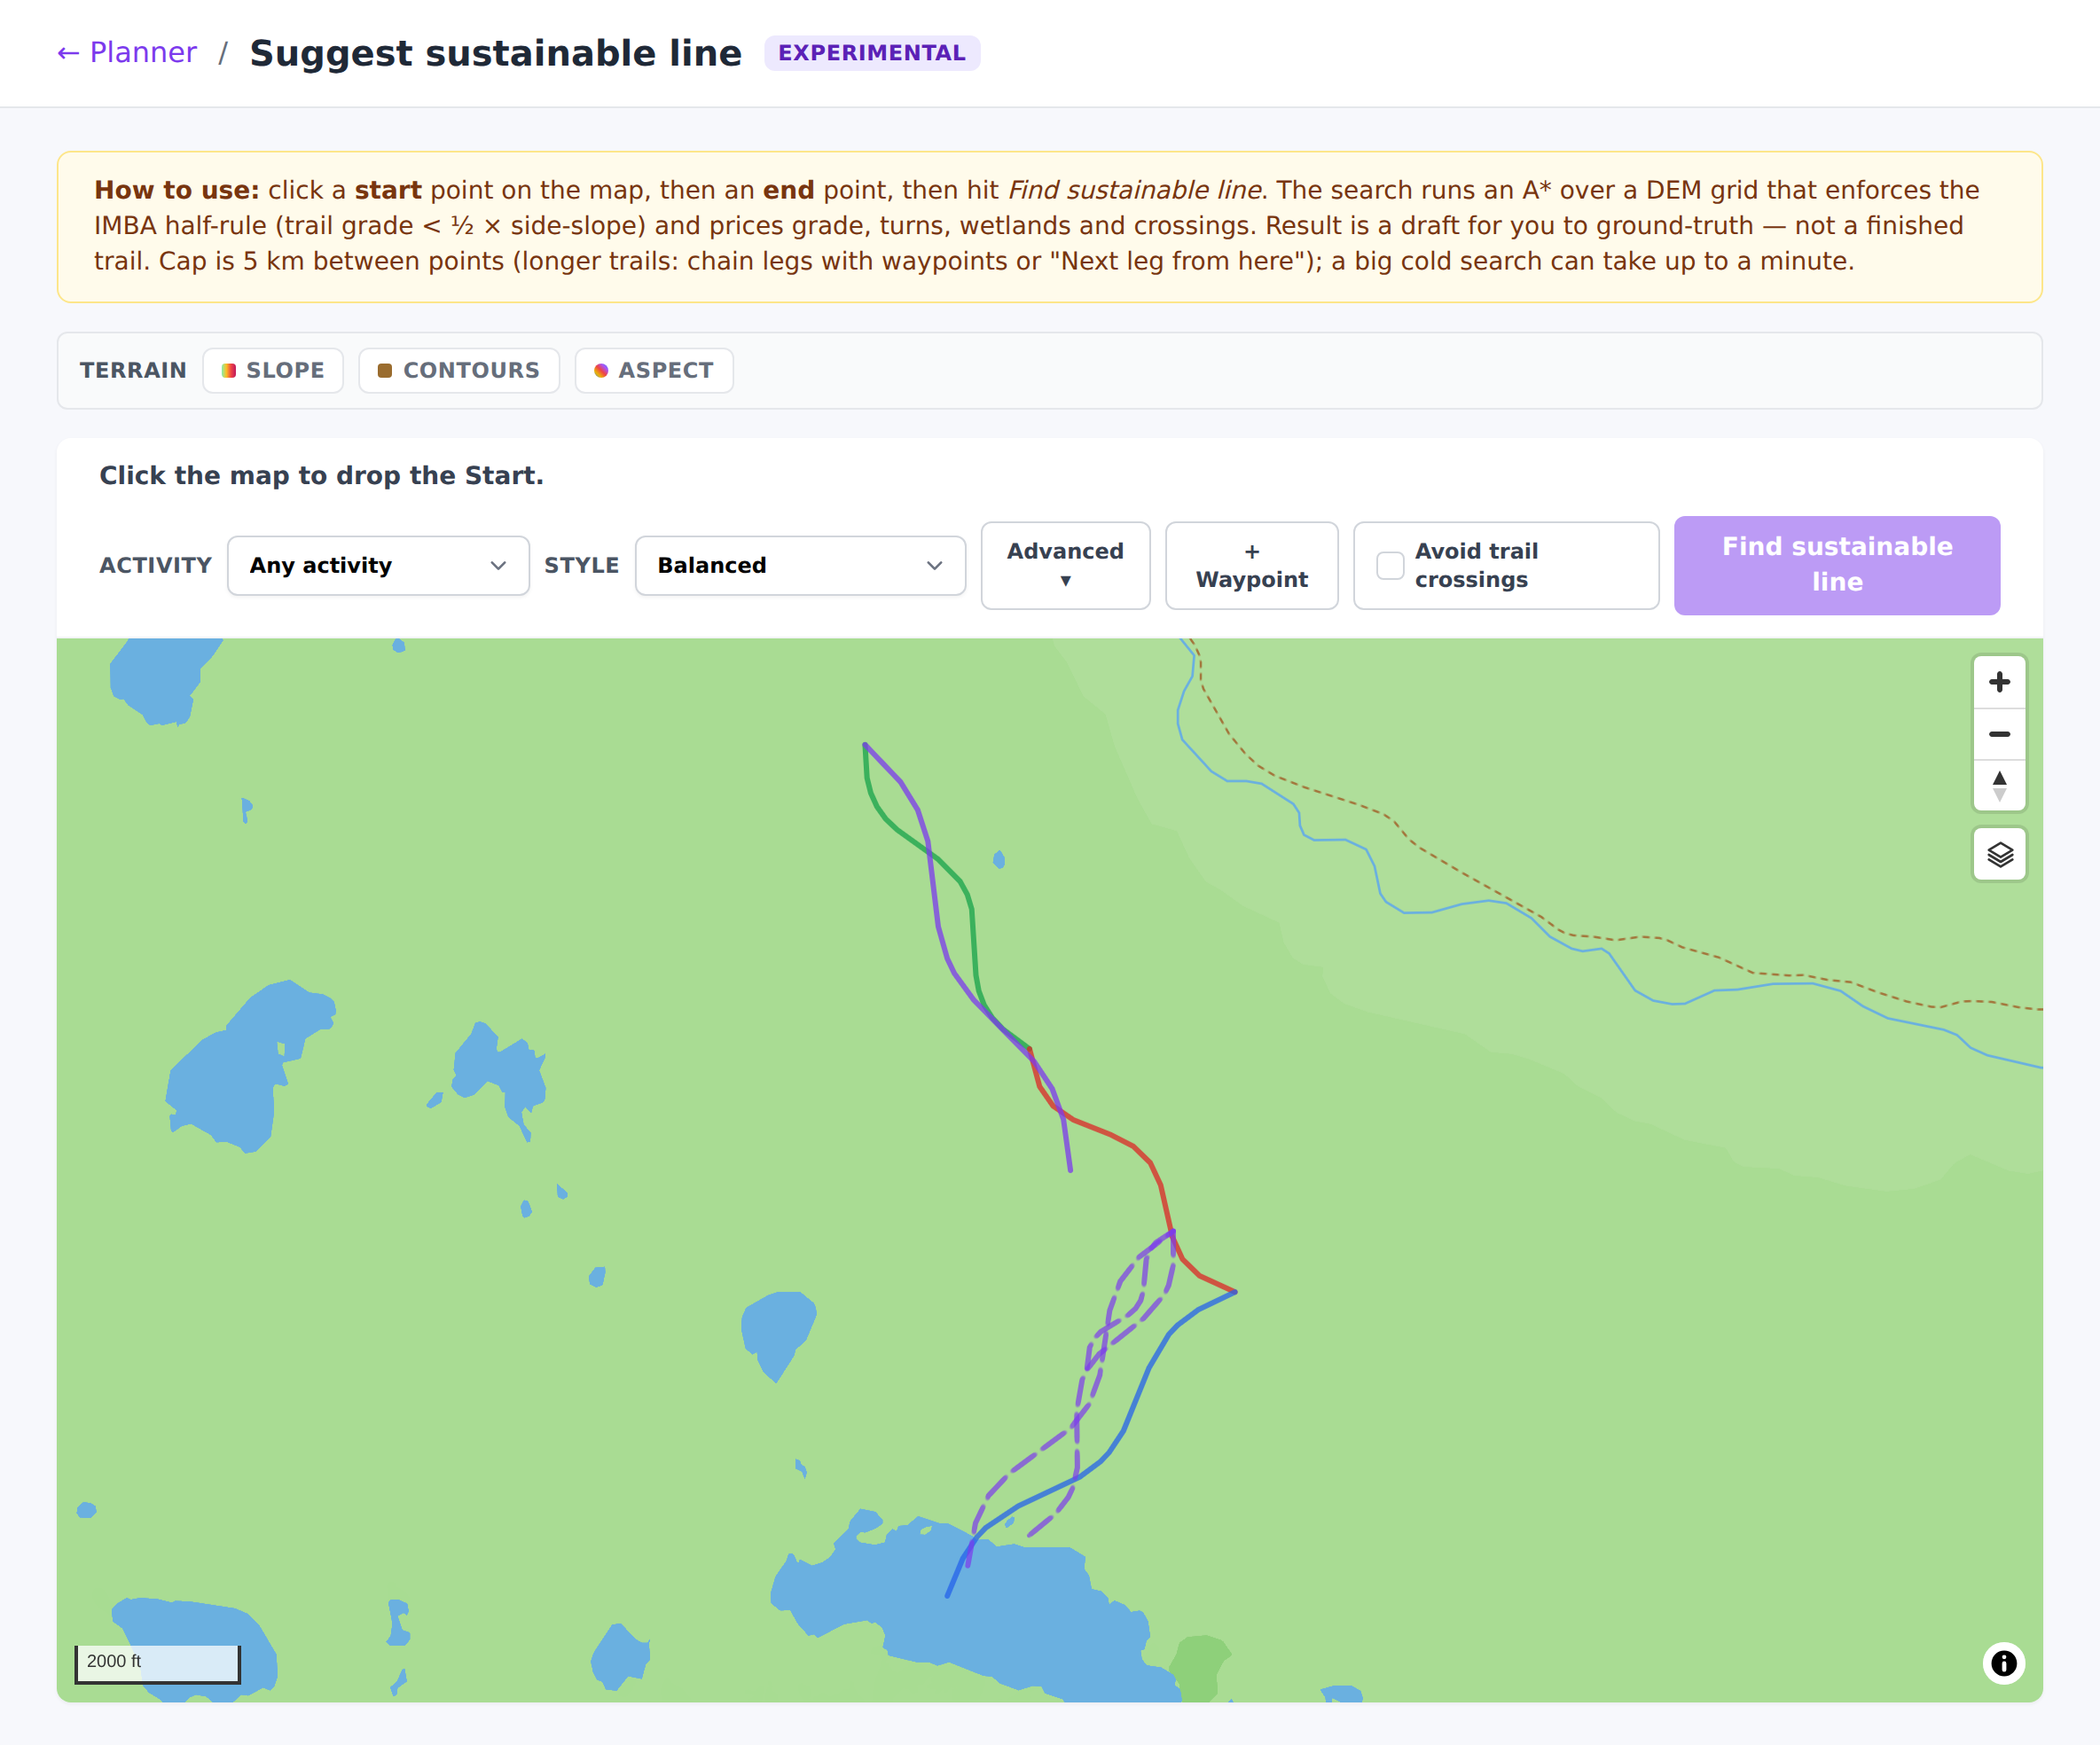
Every planner line carries a terrain analysis, recomputed whenever the geometry changes:
- Grade — the steepness of the tread itself, as a percentage.
- Side slope — the cross slope of the hillside the tread crosses. The input to the half rule.
- Sustained grade — how steep the line stays over a distance, rather than at one point. A brief 20% step over a rock is a different thing from 20% held for 200 feet, and only the second is a maintenance problem.
- Fall-line segments — where the line runs with the slope rather than across it.
Red on the profile means the half-rule threshold is exceeded for that stretch. It is not a veto — plenty of good trail has short steep sections, and armoring and structures exist for exactly that. It is a list of the places that will need attention, and the cost estimate prices them accordingly.
Cost estimates
Every planner line gets a build-cost estimate, derived from its own measured terrain rather than a flat per-mile figure. Tread on 60%+ side slope is priced as structural work because that is what it is.
You can switch cost estimates off entirely. Settings → Workspace modules → Build cost estimates removes them from the planner page, from projects, from the field app, from the comparison table and from the proposal a client sees. Some organizations would rather the figure were not on the screen at all — it is a model rather than a quote, and a number read over somebody's shoulder gets repeated as though it were one. Nothing else about the planner changes: the line, the grades, the sustainability score and the drainage analysis are all still there. The switch is on for every new workspace, and it is per workspace, so a team that quotes for a living and a club that does not can share an account. See Workspace modules.
The rates live in Settings → Trail build rates and are yours to set:
- Tread construction, split three ways by side slope — easy (under 25%), hard (25–60%), and structural (over 60%)
- Rock armoring, per foot
- Rolling grade dips, each
- Stream culverts, each
- Bridges, per foot
- Crew rate per hour, plus finishing hours per foot for each difficulty from Green through Double-black
- A width sensitivity factor, a hand-build multiplier, machine mobilization, and a contingency percentage
- Per build type, a features rate added on top of the itemized estimate, and a single all-in rate per foot
The build type is what you are building, and terrain cannot see it. Side slope tells the estimate how hard the bench is to cut; it says nothing about a pump track, which sits on flat ground and is far more work per foot than a singletrack across a hillside. So every planned line has a Build type on its estimate card: corridor clearing, natural-surface singletrack, flow trail, jump line, pump track, skills area, or surfaced path. A line with none set is priced as singletrack, exactly as before build types existed.
The build type changes the estimate in two ways. It adds a Features & shaping line for the work that kind of build carries on top of the tread: berms and rollers on a flow trail, lips and landings on a jump line, the whole shaped profile of a pump track, the base and surfacing on a path. And it drops the lines that do not apply. Corridor clearing cuts no bench, so it has no tread construction, rock armoring or drainage dips, only clearing and finishing. A pump track or a skills area is not a line water runs down, so neither gets rolling grade dips.
You can price a build type with one number instead. Many crews quote a pump track or a flow trail at a single rate per foot that covers everything, and the card lets you do the same. Under Price it, choose All-in per foot and the tread, rock, drainage, finishing and features lines are replaced by one line at your all-in rate for that build type. Stream crossings and machine mobilization stay as their own lines, because they depend on the site rather than the foot; untick them if your rate already covers them. You can type a different all-in rate for one trail, and the card offers your organization's rate back when you have.
Both prices are always worked out, and the card shows the one you are not using. Each option on Price it carries what it comes to per foot, and the line under them says what the other way of pricing would total and how far apart the two are. That comparison is the quickest way to a price you can defend: set your all-in rates to what you actually charge, and when the itemized estimate for a trail lands far from it, one of the two is missing something about that ground.
The features and all-in rates for each build type are in Settings → Trail build rates, under Build types. The defaults are a starting point; put in your own.
Tread width decides which machine can get in, and that decides the price. Machine work and hand work are different rates, so the estimate has to take a view on which one a stretch gets. Width comes first, because it settles the question before the terrain can: a bench is only cuttable by something narrow enough to stand on it.
Width also scales the cost directly — a wider bench is more dirt to move per foot, and more finishing behind it. The rates are set against a 3 ft singletrack bench, so a 6 ft tread costs about twice as much per foot to cut.
A second walk of a trail is built to the first one's tread width unless you say otherwise, because it is the same trail. That holds whenever you look at it rather than only at the moment the walk was saved, so widening the trail updates every walk of it, and walks recorded before you set a width are costed correctly from then on. Set a width on the second walk and that answer stands — a spur really can be narrower than the trail it leaves.
Without this, a second walk is costed as singletrack whatever the trail is, and the comparison between the two walks is a comparison of two different trails rather than two readings of one.
| Tread | What can build it | Up to side slope | Up to grade |
|---|---|---|---|
| 24″ | Hand only | — | — |
| 30″ | Narrow-gauge mini-excavator | 35% | 20% |
| 3 ft | Mini-excavator | 45% | 25% |
| 5 ft | Standard excavator | 60% | 30% |
| 8 ft | Full-size excavator or dozer | 75% | 35% |
Past a row's limits the machine stops and that stretch is hand work, which is why a line often comes back Mixed — the gentle two thirds machined, the steep pitch and the fall-line sections by hand. Short machine runs get absorbed into the hand work either side of them: nobody hauls an excavator in, walks it down and turns it around for a hundred feet.
A 30″ tread used to be hand-only and is not any more. The narrow-gauge machines trail crews actually own — retracted tracks around 27″ — cut a 30″ bench by sitting on the bench they are cutting. They have their own row rather than sharing the mini-excavator's, because what they do not have is its reach: the same 40% side slope a mini-ex takes in its stride will put a narrow-gauge machine back on foot. If your 30″ lines got cheaper and grew a machine mobilization line, that is why.
You can overrule all of it. The build-method control on a planned trail takes Auto, Hand, Machine or Mixed, and you can mark individual stretches by hand on the map. The table is our guess from the numbers; you are the one standing on the ground.
Branches can be priced with their parent. On a line that has branches, the build-estimate card offers Include this trail's branches in the price. It prices the whole thing as one job: every branch is still measured on its own terms — a hand-built spur off a machine-built parent is priced as hand work — but machine mobilization is charged once instead of once per line, because one excavator gets hauled in once. The card names the saving against pricing them separately, so the number holds up when somebody asks why it is lower than the sum of the parts. The line-item list breaks into a section per trail, each headed with that line's name and its own subtotal, so you can see at a glance which stretch of the price belongs to which piece of trail — the parent first, then each branch. The setting is stored on the trail, not on your screen: the dashboard, the field app and a shared public proposal all quote the same figure.
A branch can have branches of its own, and each switch governs one hop. If you put a reroute on an alternate, that spur is priced into the alternate when the ALTERNATE's switch is on — and reaches the primary's total when the primary's switch is on as well. Turning a switch off takes everything below it out with it, so an alternate marked "not in the price" removes its own spurs from the quote too. The trail's page lists the whole family whatever the switches say — a nested line is labeled with the line it hangs off — because the switches decide what a line COSTS, not whether it exists. The estimate card reports how many branches it actually priced, which is the number to read when the two differ.
Every line has a tick box, and so does the contingency. The estimate is a model, and you are allowed to argue with it. A crew that owns its own machine has no haul-in to charge. A club supplying its own rock does not want the armoring line in the client's total. A job with a signed fixed scope behind it carries no contingency at all. Untick a line and it leaves the price; the card keeps it below the total under Not in this price so you can see what you took out and put it back with one tick.
A line you switch off is absent from the proposal and the contract, not struck through. Those are the client's documents, and a crossed-out row tells them precisely what you decided not to charge them for — which is a conversation you should choose to have rather than have chosen for you. Only your own estimate card shows the excluded lines.
Contingency has three settings and the middle one is easy to miss. Leave it alone and it follows your organization's rate, so changing that rate in Settings moves every trail with it. Type a number and this trail keeps that number whatever Settings later says. Untick it and the trail carries none — which is a decision, and it survives the organization's rate changing too. When you have set it yourself the card says so and offers you the way back.
The setting lives on the trail, not on your screen: the dashboard, the field app, a shared public proposal and a contract draft all quote the same figure. A contract picks it up while it is still a draft and freezes when you send it — adjusting an exclusion afterwards cannot rewrite a document somebody has already signed.
On a line that is pricing its branches with it, the rows are the parent and its branches added together, so a single row can belong to more than one trail. The tick boxes step aside there and the card says where to find them: switch a line off on the trail it belongs to.
The defaults are reasonable US figures, not a quote. Put your own crew rate and your own material costs in before you show a number to anybody — the estimate is only as good as the rates behind it, and a board will ask.
Width matters to the total, which is why the activity profile feeds it: a 10-foot groomed corridor and a 2-foot hiking tread across identical ground are not the same job.
Editing a line
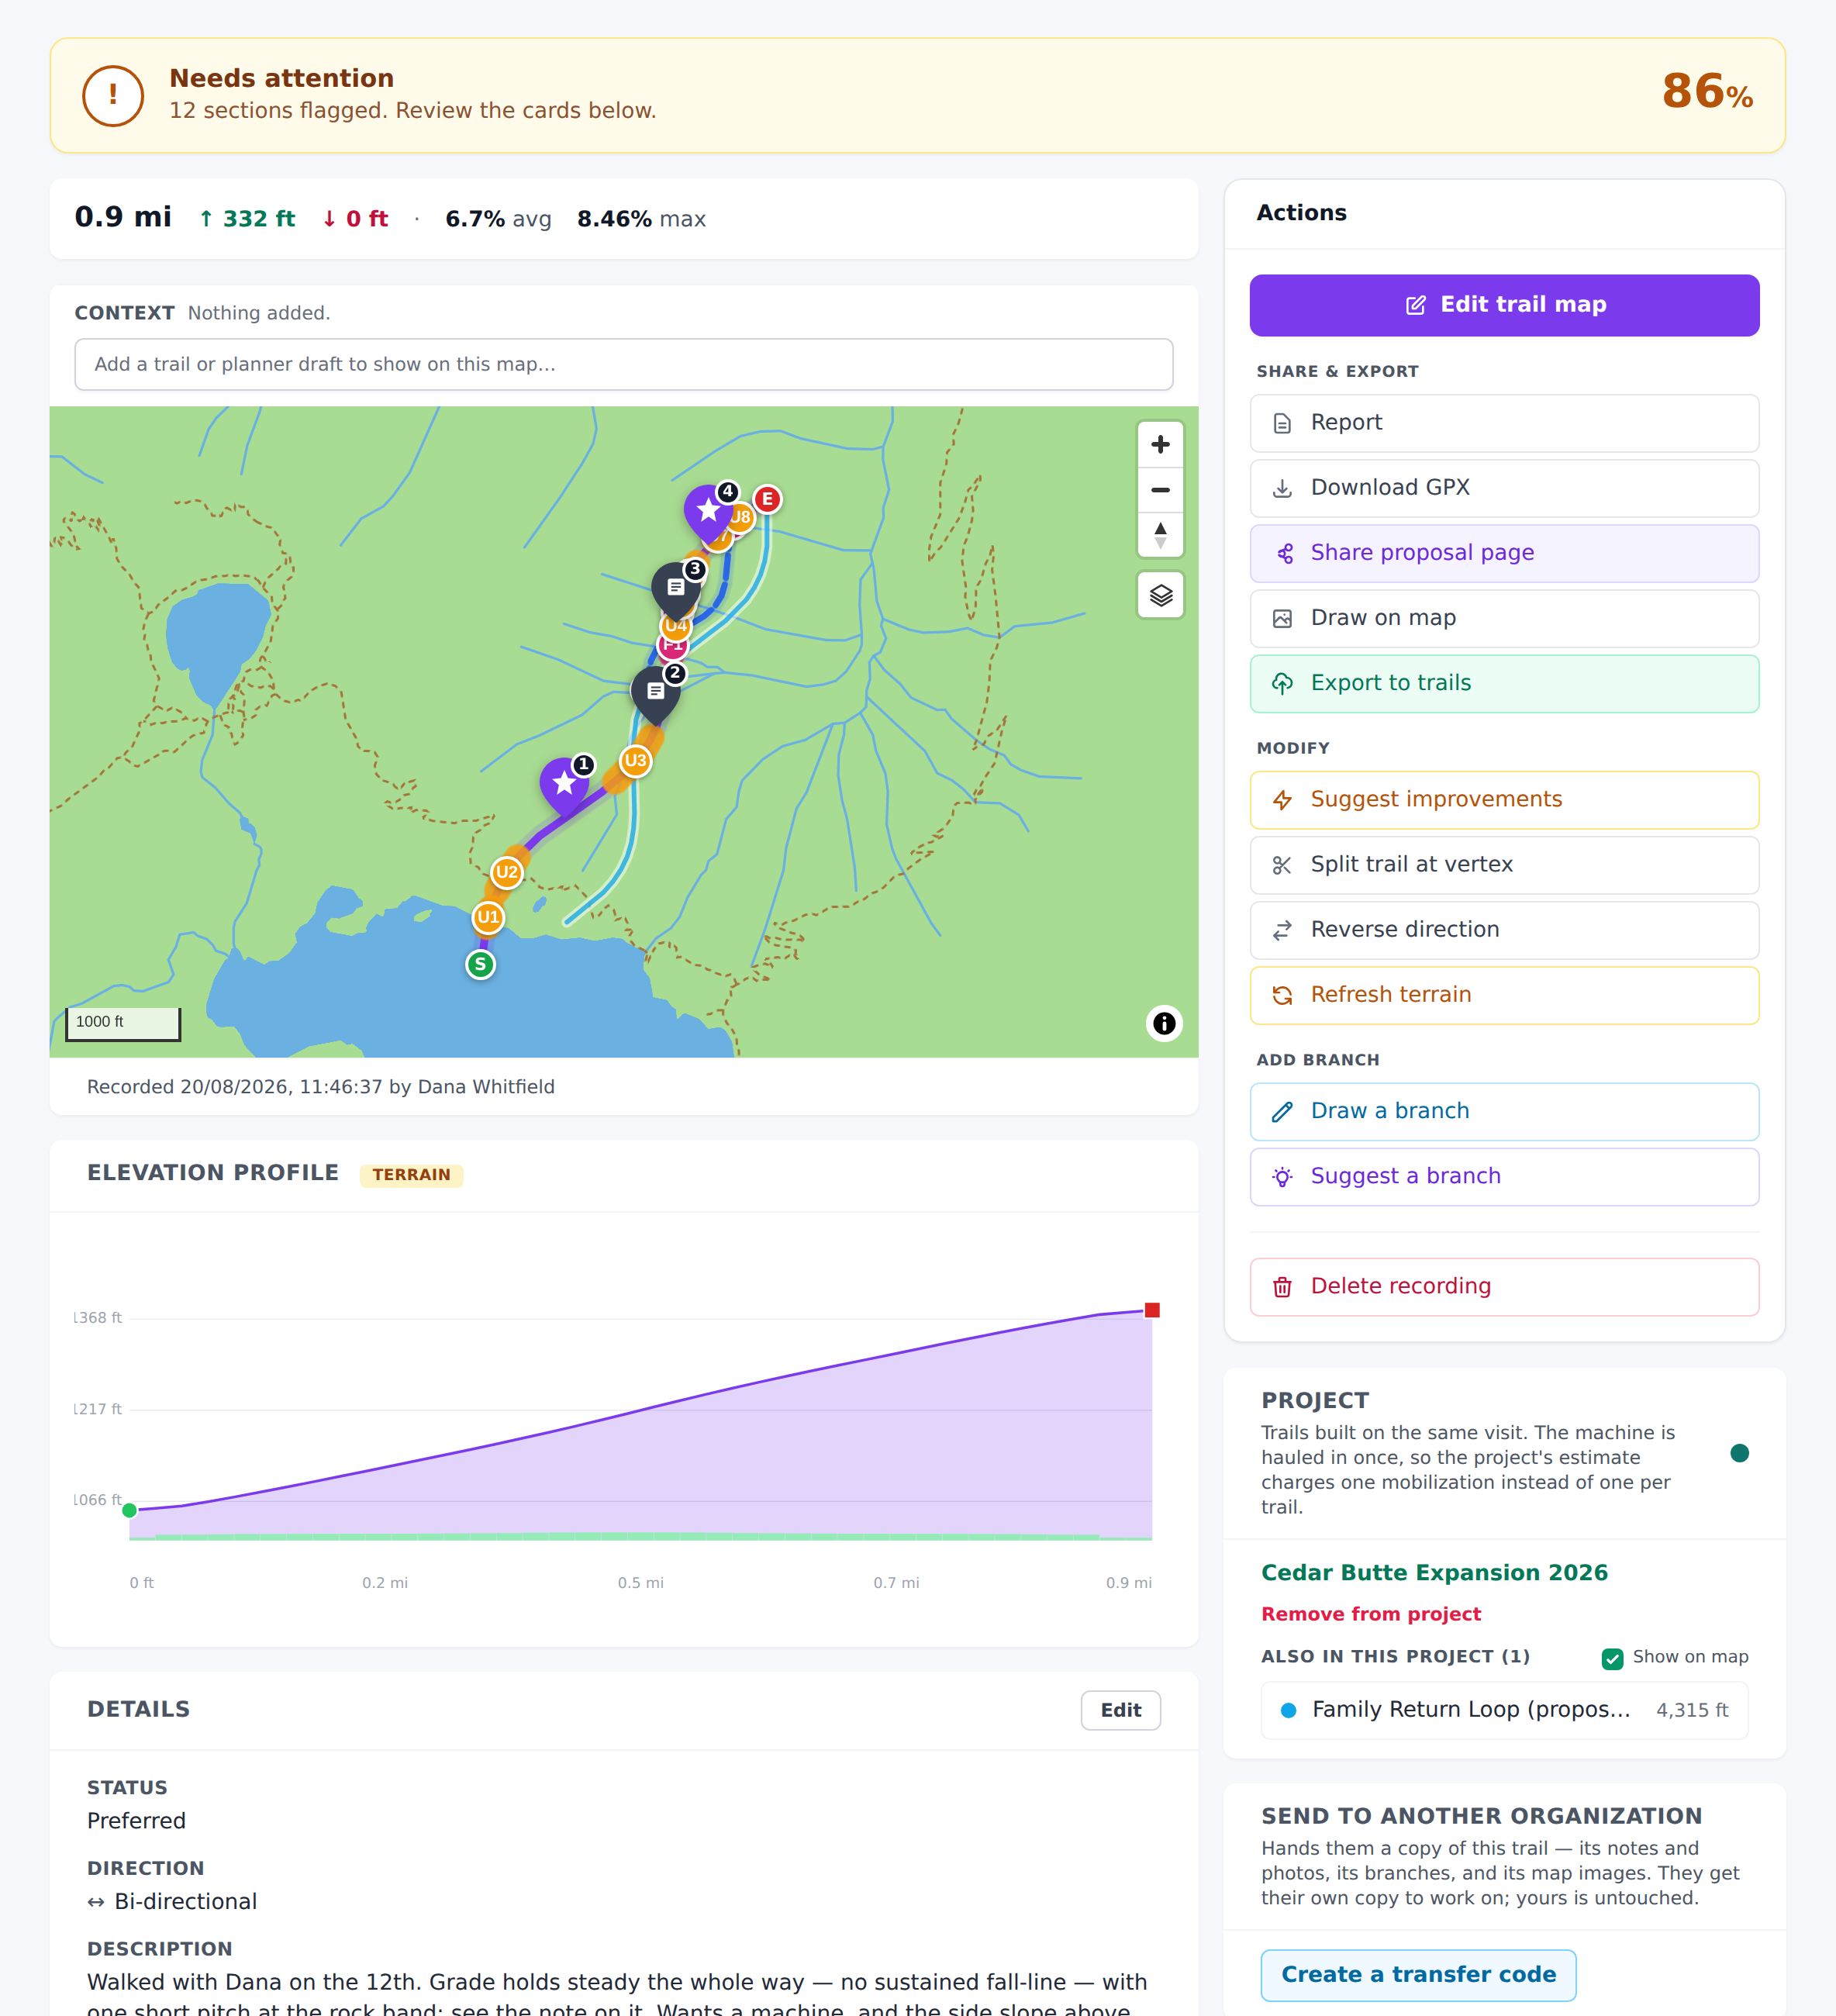
Open a planner recording and use Map editor to work on the geometry directly — drag vertices, insert and delete points, and watch the analysis update as you go.
Beyond point editing:
- Reverse — flip the direction of travel. Worth doing before you analyze a descent you recorded uphill.
- Append tail — keep drawing from the end of an existing line.
- Close the loop — on Draw and in the Map editor, joins the last vertex back to the first in one click, for a circuit. No distance limit here: every vertex on those screens is one you placed. The Field App's recorder has the same button with a cap, because there the two ends are wherever you stopped walking.
- Branch — split a new line off an existing one, keeping the shared section.
- Add branch — open Draw or Suggest with the existing line as the parent. The parent's own work comes with it. Its notes appear as numbered pins, with a numbered list under the map so you can read what each one says; the pins do not respond to clicks on these two screens, deliberately, because every click there is placing a vertex or an endpoint and a note pin sitting on the parent line would swallow the ones aimed at the ground beneath it. The number is how you get from a pin to its text. Its map drawings are replayed too, over the ground they were drawn on rather than as a picture stuck to the screen, so they stay in place as you zoom. A chip row above the map turns either layer off — both start on, and the reason to switch one off is usually that a drawing sits exactly where the new line has to run. The same untappable-pins treatment applies on the split-at-a-vertex picker, where the pins would otherwise cover the vertex dots you are trying to hit.
- Splice — join lines together.
- Swap into parent — promote a branch so it becomes the main line.
- Recompute terrain / analytics — force a re-measure after an edit or after new elevation data has been generated.
Several trails built together belong in a project. The Project box on a planner trail groups it with the other lines going in on the same visit — pick an existing project or start one right there, on the dashboard or in the Field App. The other trails in the group are drawn on the map beside this one so you can see the shape of the job, with a switch to take them off when they are sitting where the new line has to run.
Grouping is not filing. The reason to do it is the price: a project's estimate charges machine mobilization once across every trail in it, instead of once per trail, because the excavator is hauled in once. And a project can be shared as a single public proposal covering the whole job — one link, one map, one number. See Projects and work planning.
Notes can be corrected from the dashboard. Each note in the Notes along the trail list has Edit and Delete. Edit opens the note in place, under the map, so you can see where it sits while you rewrite it — a note typed with a thumb on a hillside is not always the note you want a landowner reading. Deleting one takes its photos with it and cannot be undone, and the pins renumber immediately so the map and the list never disagree about which note is number three.
Map drawings show on the recording's own map. Each entry in Map images has a Show on map button that replays its strokes over the live map, on the ground they were drawn on rather than as a picture stuck to the screen — so they stay put as you zoom and pan. Show all on map does the lot. Drawings start switched on, and switching one off is saved on the drawing itself rather than in your browser — so it is off for everyone, including whoever opens the public proposal link. A drawing saved before capture positions were recorded shows the button grayed out — there is nowhere on the map to put it.
A drawing's title is editable in the list. Click it, type, press Enter. An empty title goes back to Untitled map image. New ones are made from Draw on map in the right-hand column, which opens a full-screen map you can arrow, label and freehand over.
In the Field App a planned line opens on four tabs. Route is the line itself — the elevation and grade profile, the notes along it and the structures on it. Health is the sustainability reading, the fall-line stretches, the drainage and the side-slope, and it carries the number of flagged sections on the tab, so you can tell there is something to read without opening it. Edit is every way of changing the line, from swapping its start and end to walking it again. Share is the proposal — its photos, the export to Trails, and sending a copy to another organization. Length, climb, drop and average grade sit above the tabs and stay there, because those are the numbers you check most and they should not move when you switch.
Editing also works from the Field App, so you can fix a line standing on the ground it crosses rather than remembering the problem until you are back at a desk. Edit line, on that Edit tab, opens Cleanup, which takes over the screen: the map fills it, the name of the line and Save float at the top, and the bottom of the screen carries one tool at a time.
Pick the tool first. The row along the bottom is Vertices, Trim, Smooth, Redraw and Loop, and tapping one puts its controls just above the row — the trim sliders, the smoothing amount, the button that closes the loop. Tapping the tool you are already on folds the controls away and leaves you the row and the map. One tool at a time is what keeps the map the size of the screen; the same trims, simplifier and vertex handles are all still there.
Length, gain and loss sit in a strip under the title, updating as you edit. Tap the strip to open the full before-and-after table — length, gain, loss, average grade and max grade, saved against edited — and tap it again to shrink it back. The two buttons below it undo the last change and discard every change.
The rest of the app steps out of the way while Cleanup is open: the bar of app-wide buttons along the bottom is hidden, because editing a line is one job with one way out of it. Save keeps the edits; the × at the top left leaves without them.
One thing changes on the map while you are placing or moving points in the Field App: note pins stop responding to taps. They stay on the map, because a note saying wet through here is exactly the context you want while deciding where the line goes — but tapping one no longer opens it, which used to slide the panel up over the line you were working on. This already applied while drawing and suggesting; it now covers editing too. Read a note from the numbered list under the map instead, or leave the edit and tap the pin.
Tap the line itself to add a point — anywhere along it, roughly rather than exactly. The tap does not have to land on the line to the pixel; anything close enough counts, and the new point is inserted into the nearest section rather than at the start. Tap an existing middle point to remove it, and drag any point to move it. The two ends can be dragged but not deleted.
On a long line, not every point carries a handle. A walked recording takes a fix every few meters, so a two-mile line is thousands of points — far more handles than a thumb could aim at, and enough of them to slow the map down while you drag a trim slider. Cleanup draws handles for the points currently on screen, up to a few hundred at a time, and tells you how many of how many you are looking at. Pan or zoom in to reach the others. Trimming and smoothing always work on every point in the line, whether it has a handle on screen or not.
Comparing options
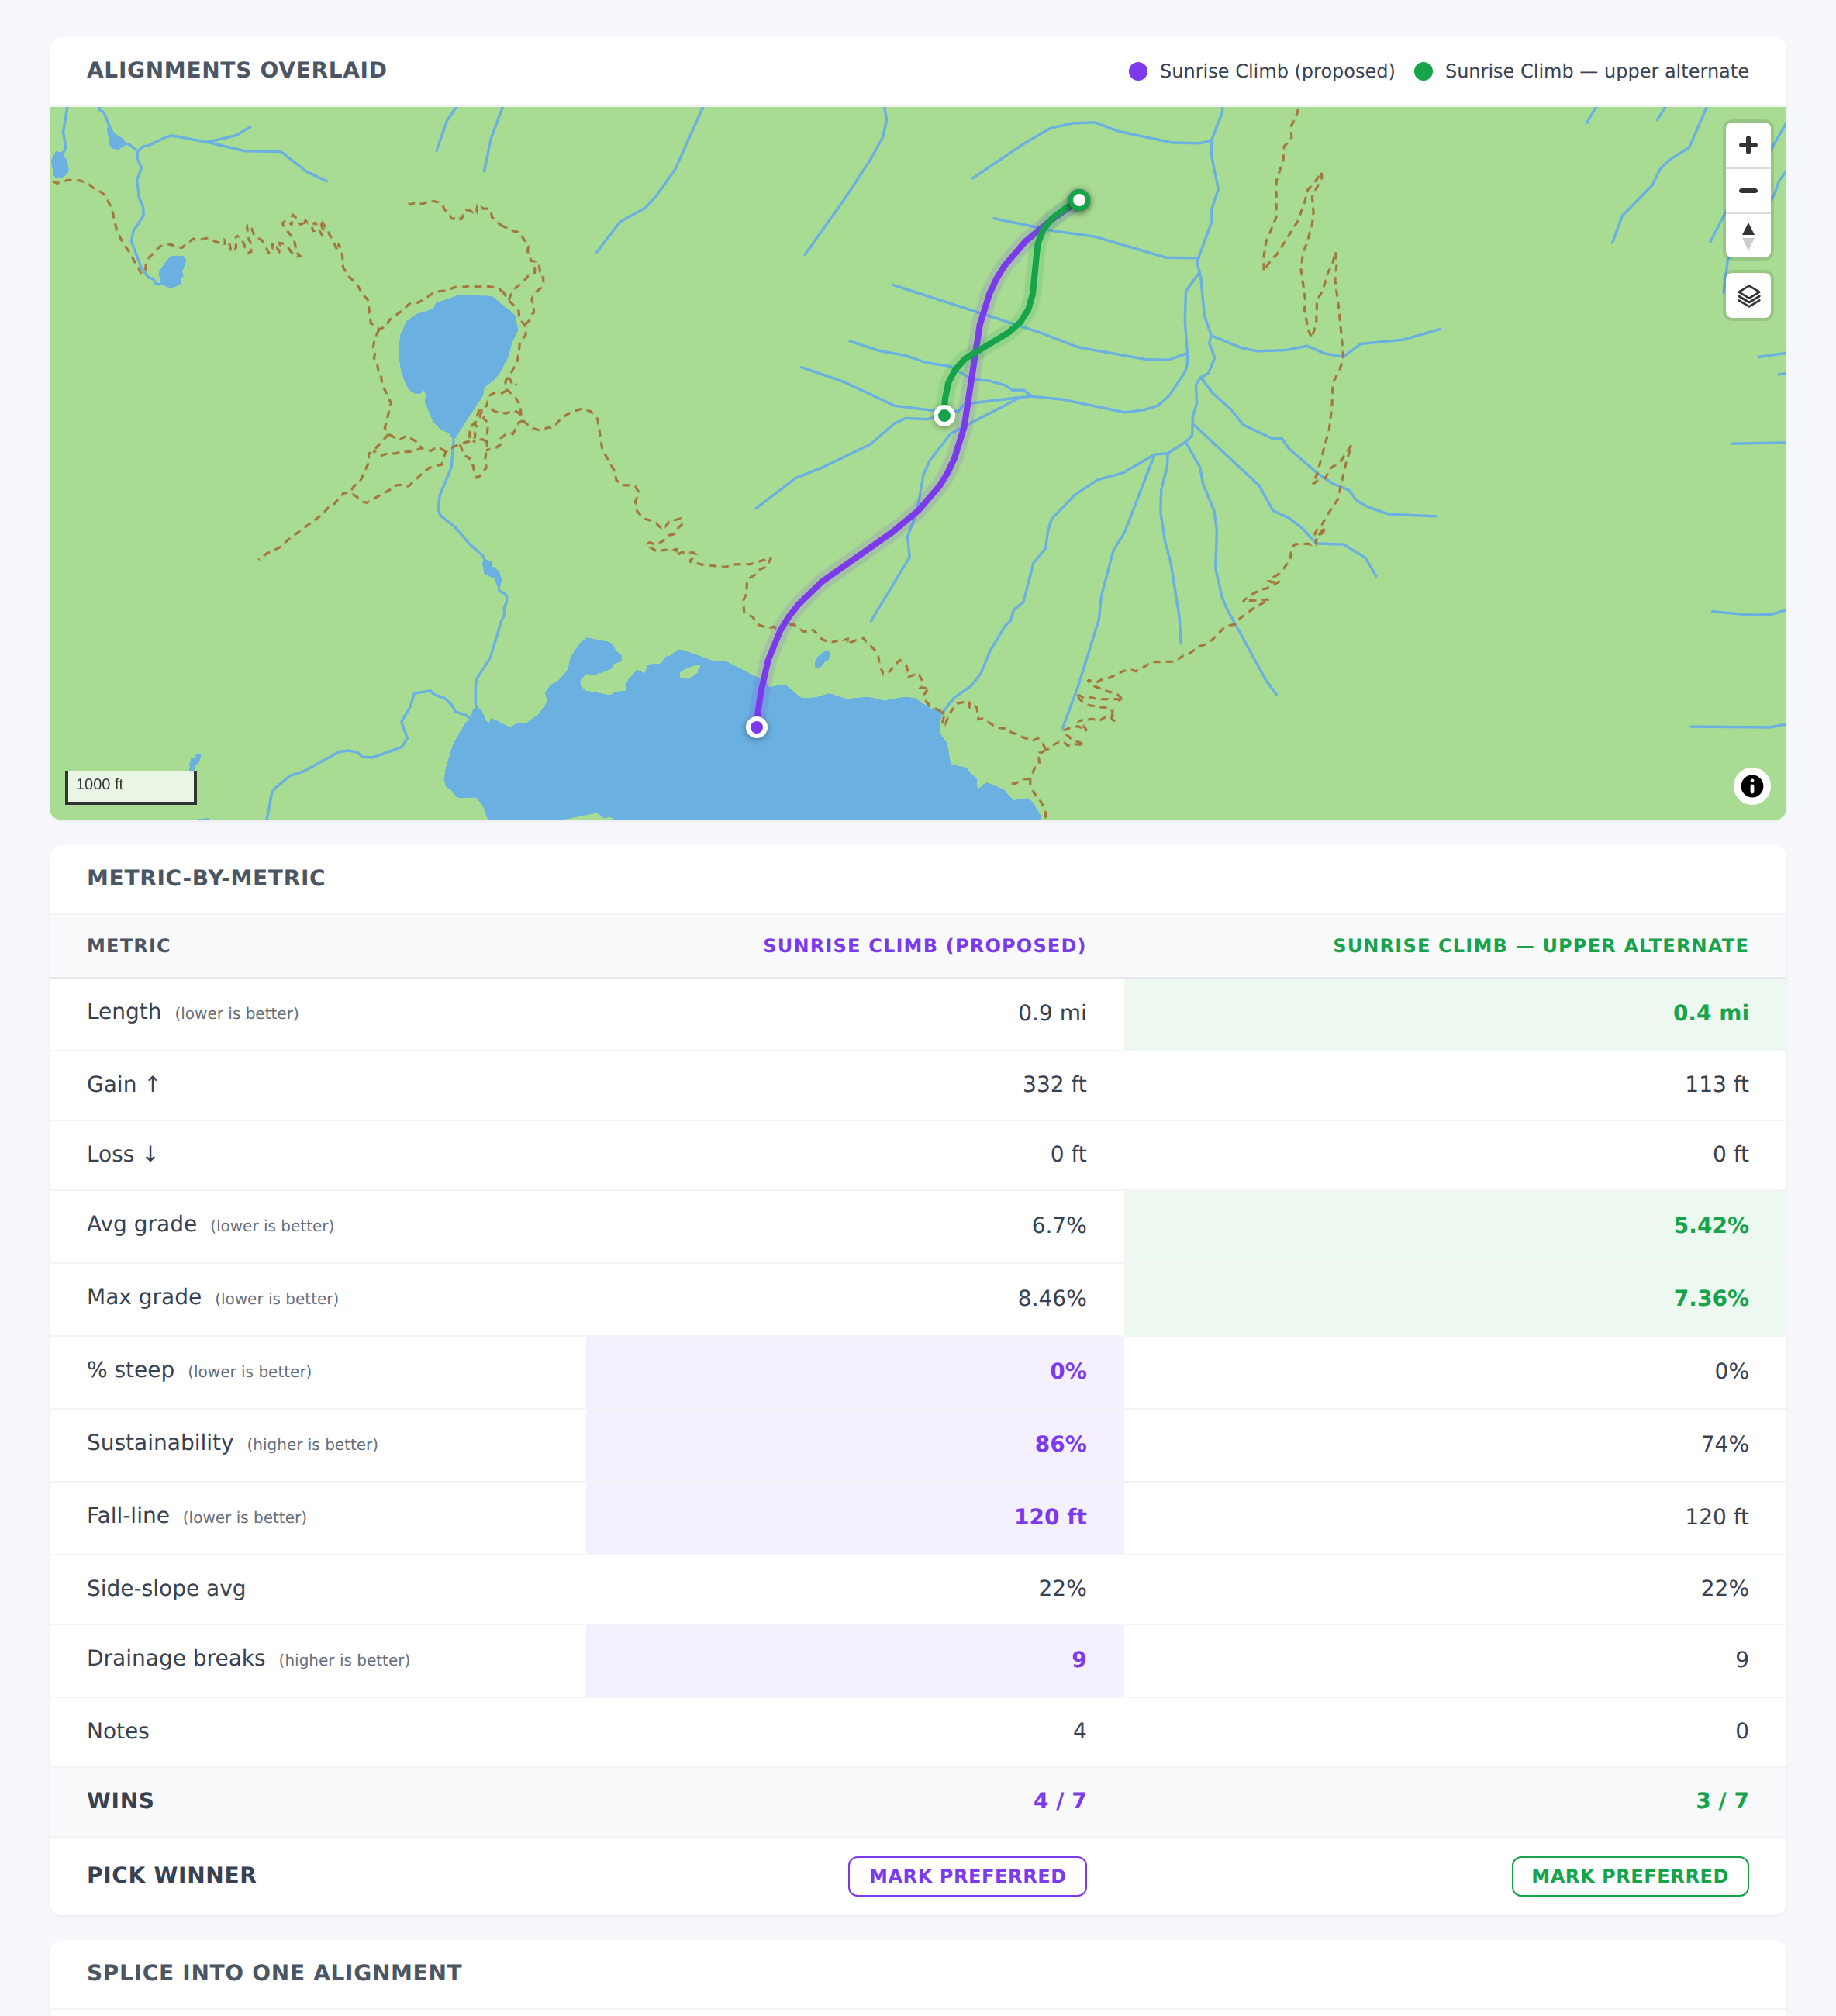
Trail Planner → Compare puts two or more lines side by side — length, climb, grade distribution, sustainability, and estimated cost.
This is the screen for the conversation that actually happens: not "is this line good" but "is this line better than that one, and by how much, and what does the difference cost." Two reroutes around the same wet section are far easier to choose between with the numbers next to each other than one after the other.
A ring marks the cell that wins its row, and the count under each column name says how many of the scored rows it took. An equal reading wins nothing for either line. Two alignments that both come out at 120 ft of fall-line have nothing to choose between on that row, and it counts for neither — so the two counts will usually not add up to the number of rows scored, and the difference is the rows where the lines agree.
The same screen answers a second question when you reach it from a trail's Compare walks button — not "which of these routes" but "the same route, walked more than once, do the traces agree". See Walking a line more than once.
Walking a line more than once
Ground changes and first passes are rough. You walk a line in April with the brush still up, come back in June once it is cleared, and want to know whether the grade through the wet section really holds. Both walks are worth keeping, and they are the same trail.
The Field App's planner list pulls down to refresh, the same as the maintenance list — drag from the top and let go. Worth knowing because the list is the one place a line another crew member recorded shows up, and the app is deliberately quiet about going to the network on its own. Compare sits in that list's header now, beside the close button.
Field App → open the planned trail → Walk it again. It records like any other session and saves as a walk of that trail rather than as a trail of its own. Each walk gets its own color on the map, so two tracings of the same hillside are told apart at a glance, and each keeps its own notes, photos, elevation profile and analysis. They appear under Other walks of this line on the trail — separately from Branches, because they are a different kind of thing.
Each walk has a Show on map button on its row, and Hide all on map in the card's header takes the lot off at once. Five traces of one ridge is exactly when a map stops being readable, and this is a view setting rather than a property of the walk: it is yours, it is not saved, and it changes nothing anyone else sees.
Start it wherever you are. Unlike a branch, a walk does not have to begin on the recorded line — a trailhead a hundred yards off the old trace is fine, and often where you actually park.
A walk is a record of the ground, not extra trail. That distinction is the whole point, and it is enforced rather than left to you to remember:
- It is never in a total. Three walks of one trail is one trail's worth of work. No switch changes this, including the include-branches one — a walk is out of every estimate, on the trail, in the project, and on a proposal. It does have a figure of its own, which is a different thing; see What a walk would have cost below.
- It never appears on anything a client reads. Not the public proposal, not the report, not the poster. A landowner looking at a quote does not want three squiggles over the same hillside.
- It is not counted as a trail. A project with three planned trails and six walks of them still says three.
- It cannot be published to your live trail network. That would put a second trail over the first, with its own maintenance, on one piece of ground. Publish the planned trail it belongs to instead.
- It does not count against your plan's planned-trail limit. Walk a line as many times as it is worth walking.
The one place walks do come along is the GPX download, labeled as walks. That is deliberate: having your previous trace on the handheld while you walk the line again is most of why you kept it.
Saving with no signal
Recording happens where there is no bar of coverage, which is why a save has never needed one. Tap Save out of signal and the line joins the phone's queue and uploads by itself later — nothing is lost, and closing the app is fine.
It is also on the list and the map immediately, in amber, marked On this phone only, and it is the row the app opens on. That is the difference between a line you have saved and a line you can look at: the reason to see a trace the moment you finish it is to decide whether to walk more of it, and that decision is made standing on the ground, not back in signal.
Tap the row and the panel underneath says what is real yet. The length is final — it is measured from the points themselves and does not change when it lands. The elevation gain is from the phone's GPS and is replaced by the terrain figure on upload, so treat it as a rough one. Grade, side slope and sustainability need the server and are simply absent rather than shown as zero, because a zero would read as a measured flat trail.
Continue walking picks the line back up and records onto the end of it, exactly as extending an uploaded trail does — same warmup, same guard about standing near the line. While you are out there the app holds that recording back rather than uploading half a trail; when you save, the whole longer line goes up as one. If the app restarts mid-walk it comes back to it on the next launch and the extension is still part of the same line.
An extension of a trail that has already uploaded queues as its own amber line marked Extension queued, drawn beside the trail rather than merged into it. What is filed and what is still on your phone are different things until the queue drains, and the map says which is which.
Everything queued is counted in the N pending badge in the header, the same as any other offline write — see Field App.
In the rare case the server refuses a queued save — a validation error, or a workspace change since you recorded it — the line stays on your phone. The sync panel behind the pending badge marks it Rejected by the server with the reason code, and offers Retry and Discard. Nothing you walked is ever deleted because an upload failed; discarding is always your tap, never the app's.
Every queued recording in that panel also has a Save GPX button — no signal needed. It hands the walked line out of the app entirely, through the share sheet, so whatever happens to the upload you can always keep the file and import it on the dashboard later.
Reading works the same direction: open the planner once on signal and every planned trail is saved to the phone in full — waypoints, elevation and grade chart, and the build estimate all open with no bars. It refreshes itself quietly on every visit with signal, so the only line that can be missing offline is one somebody created after the last time your planner saw the network.
What a walk would have cost
A walk is a second measurement of the same hillside, and two measurements disagree — about length, about side-slopes, about grade. Those three are exactly what the build estimate is computed from, so what would this walk have quoted is a real question, and usually the one you went back to settle.
Open a walk and its card reads What this walk would cost, with the trail's own figure beside it and the difference between them: +$4,180 (+14%), and the length gap underneath that mostly explains it. The line items are there too, the same breakdown any planned trail gets.
Both sides are one line each. The trail's number here is the trail on its own, even when its page elsewhere quotes its branches in as well — otherwise a bypass off the trail would turn up as a difference between two walks of the same ground.
It is a measurement, not scope, and the product treats it that way. It is in no total, adds nothing to a project, and never reaches a quote, a proposal, a report or a poster. The trail is priced once, on the trail. Two controls that would imply otherwise — Hide build cost from shares and include this trail's branches — are simply not on a walk, because neither has anything to act on there.
If Build cost estimates is off for the workspace, none of this appears, the same as everywhere else.
Putting the walks side by side
Compare walks, on the Other walks of this line card, opens every walk of the trail against the trail itself — the lines overlaid on one map in their own colors, and a column of numbers each.
It reads differently from comparing two alternate routes, and deliberately so. Length, climb and note counts are properties of the trace, not of the trail: a shorter reading is a shorter reading, and one walk beating another at being the same piece of ground is not a result. Those rows are shown as a difference from the trail's own figures — +99 ft, same — rather than scored.
Estimated build cost is one of those measurement rows, and it is worth knowing why. Cost is computed from the length, side-slopes and grades each walk recorded, so between two walks of one line the cheaper column is the cheaper reading — not the cheaper trail. It is shown as a difference against the trail's own figure and never scored, and nothing in that row is extra work or belongs in a quote. The row is on the dashboard; on the Field App it is left off, because filling it costs a round trip per walk and the number is already on each walk's own sheet.
The rows that keep their verdict are the ones you walked it again to settle: average and maximum grade, percentage steep, sustainability, fall-line, drainage breaks. If June's walk says the grade through the wet section holds and April's said it did not, that is the answer you went back for, and the footer counts which walk is better on more of them.
A row where only one column has a figure is marked not yet comparable rather than scored. A walk's analysis lands a moment after the walk itself, so a fresh one can arrive with its length and climb and none of its grade figures. The Better on tally under each column counts only the rows that could be compared, and says how many those were — a walk saved a minute ago is not behind, it is unmeasured, and a score with no denominator cannot tell you which.
It is on the Field App too, on the same trail, under the map: Compare this line with its walks. The table opens as a panel with the map still on screen, so the lines it is describing stay in front of you; the walks paint over the trail up there in the colors their columns wear, and the table below reads the same way it does on the dashboard — differences against the trail on the measurement rows, a verdict only on the rows worth one. Merge these walks sits at the bottom of that panel, so the decision and the thing you do about it are one tap apart. Reading two traces of your own ground against each other changes nothing, so unlike Merge walks it needs no extra permission: a volunteer who walked the line can see how their trace compares.
Adopting a walk
When one of them is plainly the better line, press Use this walk — on the comparison, on the walk's own page, or as Use this walk as the trail in the Field App. The trail's line becomes that walk's line, and everything hanging off the trail — its branches, its price, its proposal — follows.
Nothing is lost doing this. The line that was there is kept automatically as another walk, named previous line, so a decision you want back is one click away rather than gone.
Merging sections of several walks
Adopting a whole walk assumes one of them is the better line all the way along, and often none of them is: June's trace is better through the wet section because the brush was down, April's is better over the rock band because the GPS had sky. Merge walks, on the same card, builds one line out of a stretch of each.
The editor is a bar representing the trail from start to finish, split into sections. Add switch point cuts the longest section in two and gives the new half a different walk, so the line changes the moment you press it. Drag a handle to move a switch point along the trail, double-click one to remove it, and click a section to choose which walk supplies it. The whole trail is always covered — there is no way to leave a hole in the line — and the map above redraws the assembled line, in black over the walks, every time you change anything.
If nothing on the map is moving, every section still comes from the trail itself. Sections cut out of one line and joined back together reproduce that line exactly, so switch points between them change nothing and Use this as the trail's line stays greyed out — the panel says so when it happens. Pick a walk for a section and the black line moves.
A switch point is a distance along the trail, not a point on a walk. That is the only thing the walks have in common: they are separate traces with different numbers of points, wandering a few yards apart the whole way, so no vertex in one has a counterpart in another. TrailsIQ takes the place you picked and finds the nearest point on each walk to it — measured across the line rather than along it, so two walks that run parallel but start at slightly different spots still get cut at the same place on the ground.
Steps at the switch points are reported, not smoothed away. Where two walks join they are usually a few feet apart, and the panel lists every joint with how far across it is. Small ones are normal. A wide one is a real jog in the finished line and is highlighted — nudging the switch point to where the two traces cross usually closes it. Nothing is quietly interpolated to hide it: a line that reads cleaner than the ground it came from is not a help to whoever builds it.
Merging keeps the trail. Its id, its branches, its project, its proposal link and its notes are untouched; only the line changes, because the merge is a better description of the same trail. The line that was there is kept as a walk called previous line, and the recipe — which walk supplied which stretch — is saved with it, so Merge walks reopens where you left off and a switch point can be moved later rather than the whole thing rebuilt from memory.
It is on the Field App too, on the same trail, under the map: Merge walks into one line. Same three gestures: Add switch point to make one, drag its handle to place it, tap a section to pick its walk. The assembled line draws on the map above the sheet in black over the walks, which is most of why it is worth having on a phone — the person deciding which walk was better through the wet section is usually standing in the wet section, and can look up from the screen and check.
Merging is the one planner action that needs signal. Everything else on the phone queues and syncs later; this one cannot, because the line is measured on the server and merging blind would be a decision made against numbers nobody had seen. Offline it says so and keeps your sections while you wait.
Merging needs the Manage the trail planner permission, like anything else that rewrites a trail's line. Comparing walks does not.
The structures on a line
A planned trail is rarely just tread. A creek wants a bridge, a wet stretch wants a boardwalk, a pitch wants steps — and those are decisions made on the hillside, standing on the ground they are about, not back at a desk.
Drop a note on the line and give it a structure type and it becomes a planned structure. It keeps its place on the map, it takes measurements, and the bridge materials calculator works from those measurements exactly as it does for a bridge you already have.
The Field App's planner has two tabs — Trails and Structures. Trails is the lines. Structures is everything being built on them, newest first, whichever line each one sits on, so what are we putting in this season is one screen rather than a trail-by-trail hunt through the notes.
The amber button at the bottom of that screen is where both start. It reads Add trail on one tab and Add structure on the other, and either way it opens on What are you adding? with both kinds on it: a trail — Record, Suggest, Draw or Import — or a structure, from whatever structure types your organization has set up. Pick a structure, pick the line it goes on, and tap the map where it belongs. The note sheet opens knowing what it is, with that type's measurement fields already on it.
The sheet leaves the map on screen, and your marker is on it. The moment you tap, a pin appears at that point and the sheet opens under it rather than over the whole screen — so you can see where the thing is going while you describe it, and pan or pinch to check it against the creek before you commit. The pin wears whatever you have picked: choose Feature and then Bridge and the pin on the map becomes a bridge. Drop here at the bottom saves it exactly where that pin is standing.
Each row gives the structure's size and a chip or two:
- Materials listed — every measurement the calculator needs is filled in, so you can open it and get a cut list.
- Needs measuring — somebody has decided on it and nobody has been back with a tape. The calculator declines until they have, and this is the chip that tells you who to send.
- On a planned trail — it sits on a line somebody walked or drew, rather than standing on its own.
Tapping a row opens the line it belongs to with the structure selected — which is where the measurements are typed and the calculator is reached.
A planned structure is still a plan. It does not appear in your infrastructure list, nothing schedules an inspection for it, and it has no structure code yet; all of that arrives when you export it.
Sharing a proposal
A planner line can be published as a public proposal page — a read-only page showing the line on a map with its stats, carrying your organization's branding, viewable by anybody with the link and no TrailsIQ account.
From a planner recording, enable sharing and you get:
- A share link to copy.
- A QR code you can download as a PNG — for a trailhead sign, a public meeting handout, or a printed proposal.
Sharing is off by default and stays off until you turn it on. You can disable it again at any time and the link stops working.
Turning sharing on or off needs the Manage the trail planner permission — owners and managers have it, and it can be granted to anyone else from Settings → Roles & permissions. Copying or showing a link that is already live is open to the whole team.
A rejected branch stays off the page. Mark an alternate Rejected and it disappears from the shared proposal — map and list both. The page is your pitch, and painting a discarded option beside the line you are proposing invites the reader to compare against something you have already decided against. If you want a reader to see both options, leave both as drafts (or mark one Preferred): only Rejected is filtered.
Choose what the page leads with. Top of the page offers Map image or Live map. Live map shows a real map the reader can pan and zoom, with the line, its branches and the numbered note pins on it — the right choice when the question is where does this actually go. Map image shows a still picture instead, which is the right choice when the page has to survive being printed or forwarded. This choice appears on both the dashboard and the Field App, and is stored on the trail, so both agree.
The picture is one you frame yourself. Under Proposal image, Capture from map hands you the map full-screen, starting fit around the whole trail and its branches. Zoom and pan to the shot you want, capture it, and the annotator opens on it so you can add arrows or labels before it goes public. Retake it after you change the line, or the proposal keeps showing the old shape. Until you take one the page falls back to a simple outline drawing.
Live map opens where you framed the picture. The two options are meant to be two views of the same ground, and only one of them was ever composed by a person — so the live map now starts at the center and zoom you captured from, rather than backing off to fit every line. A reader can still pan and zoom from there; it is a starting view, not a lock. Proposals captured before this, and any whose picture you have cleared, keep the old fit-to-the-whole-trail opening. A reader on a much wider or narrower screen sees a little more or less around the edges — the scale and the middle are what carry over, not the exact rectangle.
It is worth knowing what this replaced, because the old behavior looked deliberate and was not. The page used to lead with your newest map image, and a map image is a drawing — composed at whatever zoom, over whatever ground you happened to be annotating. It was never a picture of the trail, and the usual symptom was the top of the line missing. Existing shared links still fall back to your newest drawing until you capture a real image, so nothing already in somebody's inbox suddenly turned into an outline sketch.
A proposal can carry photos, not just the map. Under the proposal card there is a Proposal photos box. Add the site pictures that explain the job — the creek crossing, the staging area, the rock band the price assumes, last season's finished trail that says what your crew builds. Each one can carry a description. The reader sees a grid of thumbnails and taps any of them to open it full size, description and all, and the same pictures go into the PDF.
You can also add a map image you have already drawn, instead of exporting it and uploading it back. Pick it from Add a map image and the proposal points at the original — so if you re-open that drawing and change an arrow, every proposal showing it changes with it. It also costs you no storage, because the file is already yours and is only counted once. Uploaded photos do count toward your organization's storage, and the box says which of the two each picture is.
Removing a picture that you uploaded deletes the file and gives the space back. Removing one that points at a map image only takes it off the proposal — the drawing stays on the trail it belongs to.
A job's photos live on the project, and a single trail's live on that trail, which is the same split as everything else about the two proposals: each page shows its own.
You can add them from the field app, on the planned trail's own sheet under Proposal photos — which is usually where the picture is. The button opens the camera, and the photo is on the proposal by the time you walk back to the truck. It needs a connection: a photo uploads straight away rather than waiting in the outbox with your tasks, so the app says so up front rather than queueing something that might sit there.
The reader can download it as a PDF. Every proposal page carries a Download PDF button, and it needs no account and no permission — it is there for whoever you sent the link to. The document leads with the map, then the trails and their options, the notes you chose to publish, and the estimate if the page is showing one. It is the same page in a form somebody can keep: a link can be forwarded and lost, and you can stop sharing it, which is right for the live page and wrong for the copy a client is deciding from with two other quotes on the desk beside it.
Which map ends up at the top follows what the page is showing. If you framed a proposal image, that is the picture in the document — you composed it deliberately, and nothing a reader does on the page overrides it. If the page is on Live map and you have taken no picture, the document uses the map as the reader had it on screen, at their zoom and position, with your drawings baked in. So the same proposal can produce two readers two slightly different covers, which is the point: they downloaded what they were looking at.
The numbers in it are ours, not the reader's. Trail names, lengths, grades, notes and the price are read on the server from the same records the page reads, so a downloaded proposal cannot be edited into a document that still looks like it came from you.
Your drawings can ride along. Show map images on the proposal replays them over the ground they were drawn on — so they sit on the right piece of hillside at any zoom, rather than being a picture stuck to the screen. On the live map they are a layer the reader pans around with; in a captured picture they are baked in. On by default when you have any, and switchable from the dashboard or the Field App.
The Live map option only appears on the TrailsIQ map — see The TrailsIQ map. A proposal link is one you have deliberately given away: it can be forwarded, printed as a QR code, and opened any number of times by people you never sent it to. A provider-backed map is metered per open, so a live map on a page like that would eat your organization's monthly map-load allowance on views you never made. Rather than hand you a switch that quietly does that, we leave it out and the page shows your map image. Switch your organization to the TrailsIQ map and the option appears — including on lines where you had already chosen it.
You decide which notes a reader sees. Every note carries a Shows on the proposal page switch, on the dashboard and in the Field App. Notes start visible. Switching one off keeps it in the app for you and your crew and leaves it out of the shared page entirely — not hidden in the page, genuinely absent from it, so there is nothing to find by poking at the page source. This is for the working notes that are exactly right for the crew and not the first thing a landowner should read: wet through here, check with the neighbor before the survey.
The trail's own notes box stays private unless you say otherwise. Map-pin notes are one thing; the free-text Notes field on the trail is another, and it is where working commentary tends to accumulate — including the line TrailsIQ itself writes on a suggested or imported draft. It no longer appears on the proposal page at all unless you flip Show trail notes on the proposal in the share panel. If you had a shared proposal before this change, its notes came off the page — flip the switch if you meant them to be read.
For a printed version there is also a report (a full write-up, also available as markdown) and a poster (a single-page map-led layout) — both made by you, on the dashboard, unlike the proposal PDF, which the reader makes for themselves. Between them, the same line covers a landowner conversation, a grant application and a public meeting without being redrawn for each.
Sending a trail to another organization
A proposal link lets somebody READ a trail. This hands them a copy to WORK on — the line, its notes and photos, its branches, and its map images, dropped into their own Trail Planner as a draft they own.
Useful when a consultant plans a line for a club, when two clubs share a boundary and one has scouted the connector, or when a contractor hands the built alignment back to the land manager.
Creating, withdrawing and accepting transfer codes all need the Manage the trail planner permission — a copy of your planning is real data leaving (or entering) the organization, and that is a decision, not fieldwork. Looking up what a code holds is open to anyone, so a crew member handed a code can still see what it is and pass it to the right person.
How it goes. On the trail, Send to another organization → Create a transfer code. You get something like TIQ-K4RM-9XPT, and a line you can attach to it. Send that code however you already talk to them — email, a message, out loud. They open their own Trail Planner and hit Receive a trail — on the dashboard it is the panel under the list; in the Field App it is inside Bring in a trail, the sheet behind Import — which is in the Add sheet, with Record, Suggest and Draw — next to the picker for importing one of your own trails. Either way they type the code and see what is in it before agreeing to anything: who sent it, what it is called, how long, and how many notes, photos, branches and map images come with it. Then they accept, and it lands.
Both halves work from the Field App as well as the dashboard, which is the point of reading a code out over the phone while two people are standing on the ground it crosses. The one thing that needs signal is the moment itself: a code has to be created on the server to mean anything, and accepting copies real files, so neither queues for later the way a note or a drawing does. The app says so rather than pretending to have done it.
It is an offer, not a delivery. Nothing appears in anybody's account until a person there accepts it. That is deliberate: one organization should not be able to write rows into another's account, any more than you can let yourself into somebody's office to leave a folder on their desk.
A code works once, expires after 30 days, and can be withdrawn any time before it is used. Sending the same trail to three organizations is three codes — which also means the record of who received what stays unambiguous.
They get a copy, and it is theirs. Editing it changes nothing on your side, and editing yours changes nothing on theirs. The photos become their files, counting against their storage rather than yours, so nothing breaks if you later delete the original. Their copy carries a From {your organization} badge, which matters more than it sounds: the numbers on it were measured against YOUR build rates, and its notes were written by people they cannot ask.
What does not travel, and why:
- The project it was grouped under — that is your grouping of your work.
- Any live proposal link. A share token is not transferable; they mint their own if they want one.
- The proposal image, which is a picture of your map with your settings on it.
- Its status. It arrives as a draft however you had it marked, because "preferred" is a decision about your pipeline, not theirs.
Send the parent, not a branch. Branches go with their parent automatically; offering one on its own is refused, because half a trail is not a thing anybody can work on.
Turning a plan into a trail
When a line is agreed and built — or when you simply want it in the live network — use Export to trail. That creates a real trail from the planner geometry, at which point it behaves like any other trail: conditions, maintenance, infrastructure, the public hub, all of it.
The planner recording stays where it is. Exporting copies the line forwards, it does not consume it, so the planning history behind a trail remains readable afterwards.
You can also import an existing trail into the planner to work on a reroute of something already built, without touching the live trail until the reroute is settled.
Publishing needs the Manage the trail planner permission — it creates a real trail, with everything that follows from that.
GPX in, GPX out. Download GPX on a trail's page carries the line, its branches (each as its own named track) and every note as a pin — the file you hand an excavator operator, load into a handheld, or open in Gaia or Avenza to navigate to the flag line. And the planner list's Import GPX button goes the other way: a .gpx or .kml file — a consultant's proposed alignment, a track logged on any device — lands as a fresh draft, with elevations filled in from terrain data when the file carries none, and the same analysis every drawn line gets.
Common gotchas
- Deleting a trail keeps its branches. They become standalone recordings — the scouted lines survive, they just stop being branches of anything. And deleting or re-lining somebody ELSE's recording needs the Manage the trail planner permission; your own are always yours to bin.
- The planner is not your trail network. Nothing you draw appears on the public hub, in trail conditions, or on the field app's trail list until you export it. This is deliberate — half the point is somewhere to think out loud.
- A relaxed result is telling you something. When Suggest reports which constraint it had to loosen, that is the terrain answering your question. Loosening the constraint yourself and re-running gets you the same line with no warning on it, which is worse.
- Estimates use YOUR rates, and the defaults are not yours. Set Settings → Trail build rates before quoting anybody.
- The first line on ground you have never worked is slower, and the overlays trail it. This is only about NEW ground — somewhere well away from your existing trails, that nobody in your organization has planned on before. On and around your own network it does not apply at all: everything there is already prepared, and a Suggest comes back as fast as any other. Out on new ground, the numbers are still right — grades, side slope, sustainability and the cost estimate are measured against real elevation wherever you plan. What it costs you is time, because that elevation is being fetched rather than read from what we already hold, so the first Suggest there can take the better part of a minute. Contour lines and slope shading are the part that genuinely is not there yet: they stay blank over ground nobody has planned on, with their toggles still on. Drawing there sets that preparation going by itself, and the overlays fill in within a few minutes — no reload, nothing to press. Every line after the first one on that hillside is quick, for you and for everyone else in your organization. See Terrain analysis.
- If elevations are missing, the planner says so — believe it. Where some points could not be resolved, the result carries a line naming how many. Those sections were measured against flat ground, so their grades are not real, and on Suggest the line's shape through them is not either. It usually means generation for that area has not finished; wait a moment and run it again rather than acting on the numbers.
- Recording uphill and analyzing downhill. Grade sign follows the direction of the line. If you walked it the wrong way, Reverse before you read the profile.
- Grouping trails changes the price, on purpose. Once two machine-built trails are in the same project, the project's estimate charges one machine mobilization rather than two. Each trail's OWN page still quotes its own haul-in, because on its own that is what it would cost — so the two figures differ, and the project's card names the difference rather than leaving you to find it.
- A transfer is a copy, not a link. Once they accept, the two trails are separate. Fix a mistake on yours after sending and they will not see it — send a new code, or tell them.
- A shared proposal is genuinely public. Anyone with the link can see it — that is the point, but check the line is one you want seen before you print the QR code.