Field app
TrailsIQ Field App — install, login, and daily use
The crew mobile app — install on iOS / Android / PWA, log in with your TrailsIQ credentials, flip trail + lift conditions, file maintenance items with photos, drop POIs, record GPS traces, and rely on the offline queue to sync when signal comes back.
The TrailsIQ Field App is the mobile app your crew uses out on the trail. It's map-first, works offline, and covers everything a person walking, riding, or grooming would need to do — flip trail conditions, flag a hazard, file a maintenance item with photos, record a GPS trace of a new trail, mark a lift on wind hold, log work hours, or take a note straight into the daily report. Every action syncs when you're back on signal.
What the Field App is
The Field App is the same Vue app the dashboard is built on, but rendered in a full-screen, mobile-first shape at /field-app. Same login, same data, same permissions — no separate account. There is no desktop sidebar and no top nav — a slim header at the top and a bar along the bottom are the whole frame — so it reads like a native app, even in a browser.
There are three ways it can end up on a phone: the App Store native shell, the Play Store native shell, or as a PWA (Progressive Web App) installed straight from the browser. All three load the same Vue and hit the same API — feature parity is exact.
Under the hood, native shells wrap the Vue with Capacitor and add a small custom TrailsLocation plugin that talks to Apple's CoreLocation / Android's LocationManager directly. That's what makes GPS recording reliable — a straight browser Geolocation API drops fixes when the screen locks and returns cached values that make trails look scrambled. The native shell also has a document-scanner plugin for capturing paper forms.
Installing the app
iOS (native): Search "TrailsIQ" on the App Store, or open apps.apple.com/us/app/trailsiq/id6766642278. Free download.
Android (native): Search "TrailsIQ" on the Play Store, or open play.google.com/store/apps/details?id=com.trailsiq.fieldapp. Free download.
PWA (browser install): Open your org's dashboard in Safari on iOS or Chrome on Android and navigate to "Open field app" (or go straight to /field-app). Then:
- iOS Safari — tap the Share button, scroll down, tap Add to Home Screen. Safari will also show a smart banner nudging you to the native app.
- Android Chrome — tap the three-dot menu, tap Install app (or Add to Home Screen).
The PWA installs with the TrailsIQ green icon, launches like any other app, and works offline against a cached shell.
For most crews the native shell is the right choice — it gets background GPS, native push notifications, and the fastest camera. The PWA is a fine fallback when App Store / Play Store installs aren't practical (a shared iPad, a device that can't install profiles, etc.).
Logging in
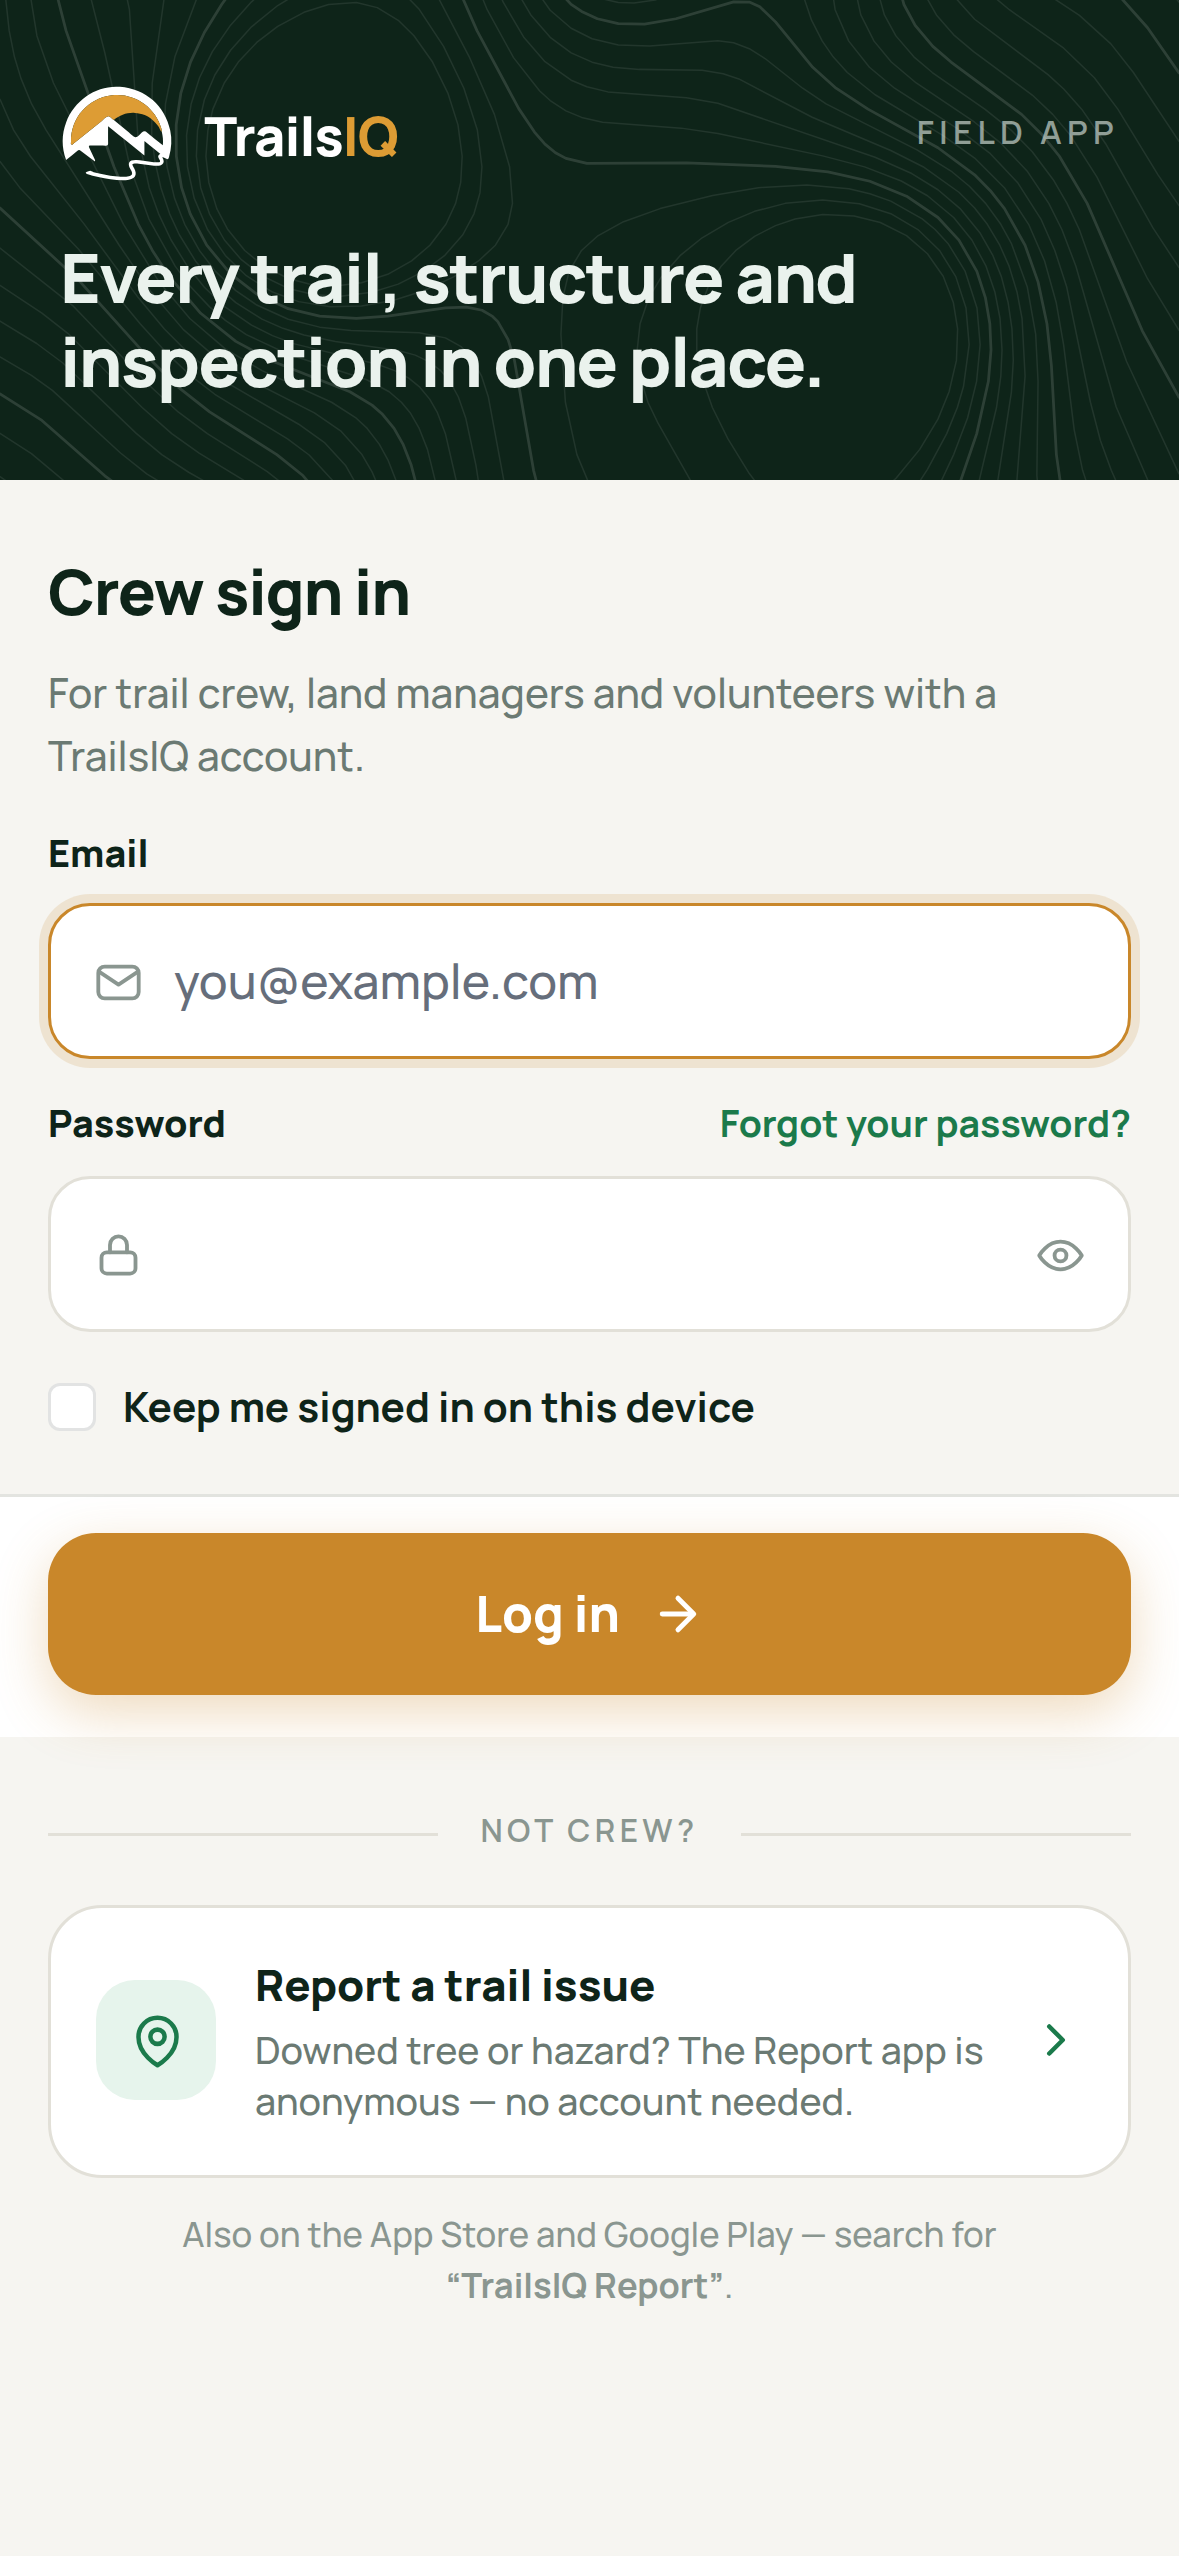
The app uses your regular TrailsIQ email + password. If you can log into app.trailsiq.com, you can log into the Field App. No separate account.
First launch:
- You land on the standard
/loginpage. - Sign in with email + password.
- If your account belongs to more than one organization, an org picker appears. Choose the org you're working in today.
- The app opens on the Home tab.
If your session expires while using the app you'll see "Your session has expired. Please log in again." and be bounced back to /login.
Home screen — what you can do
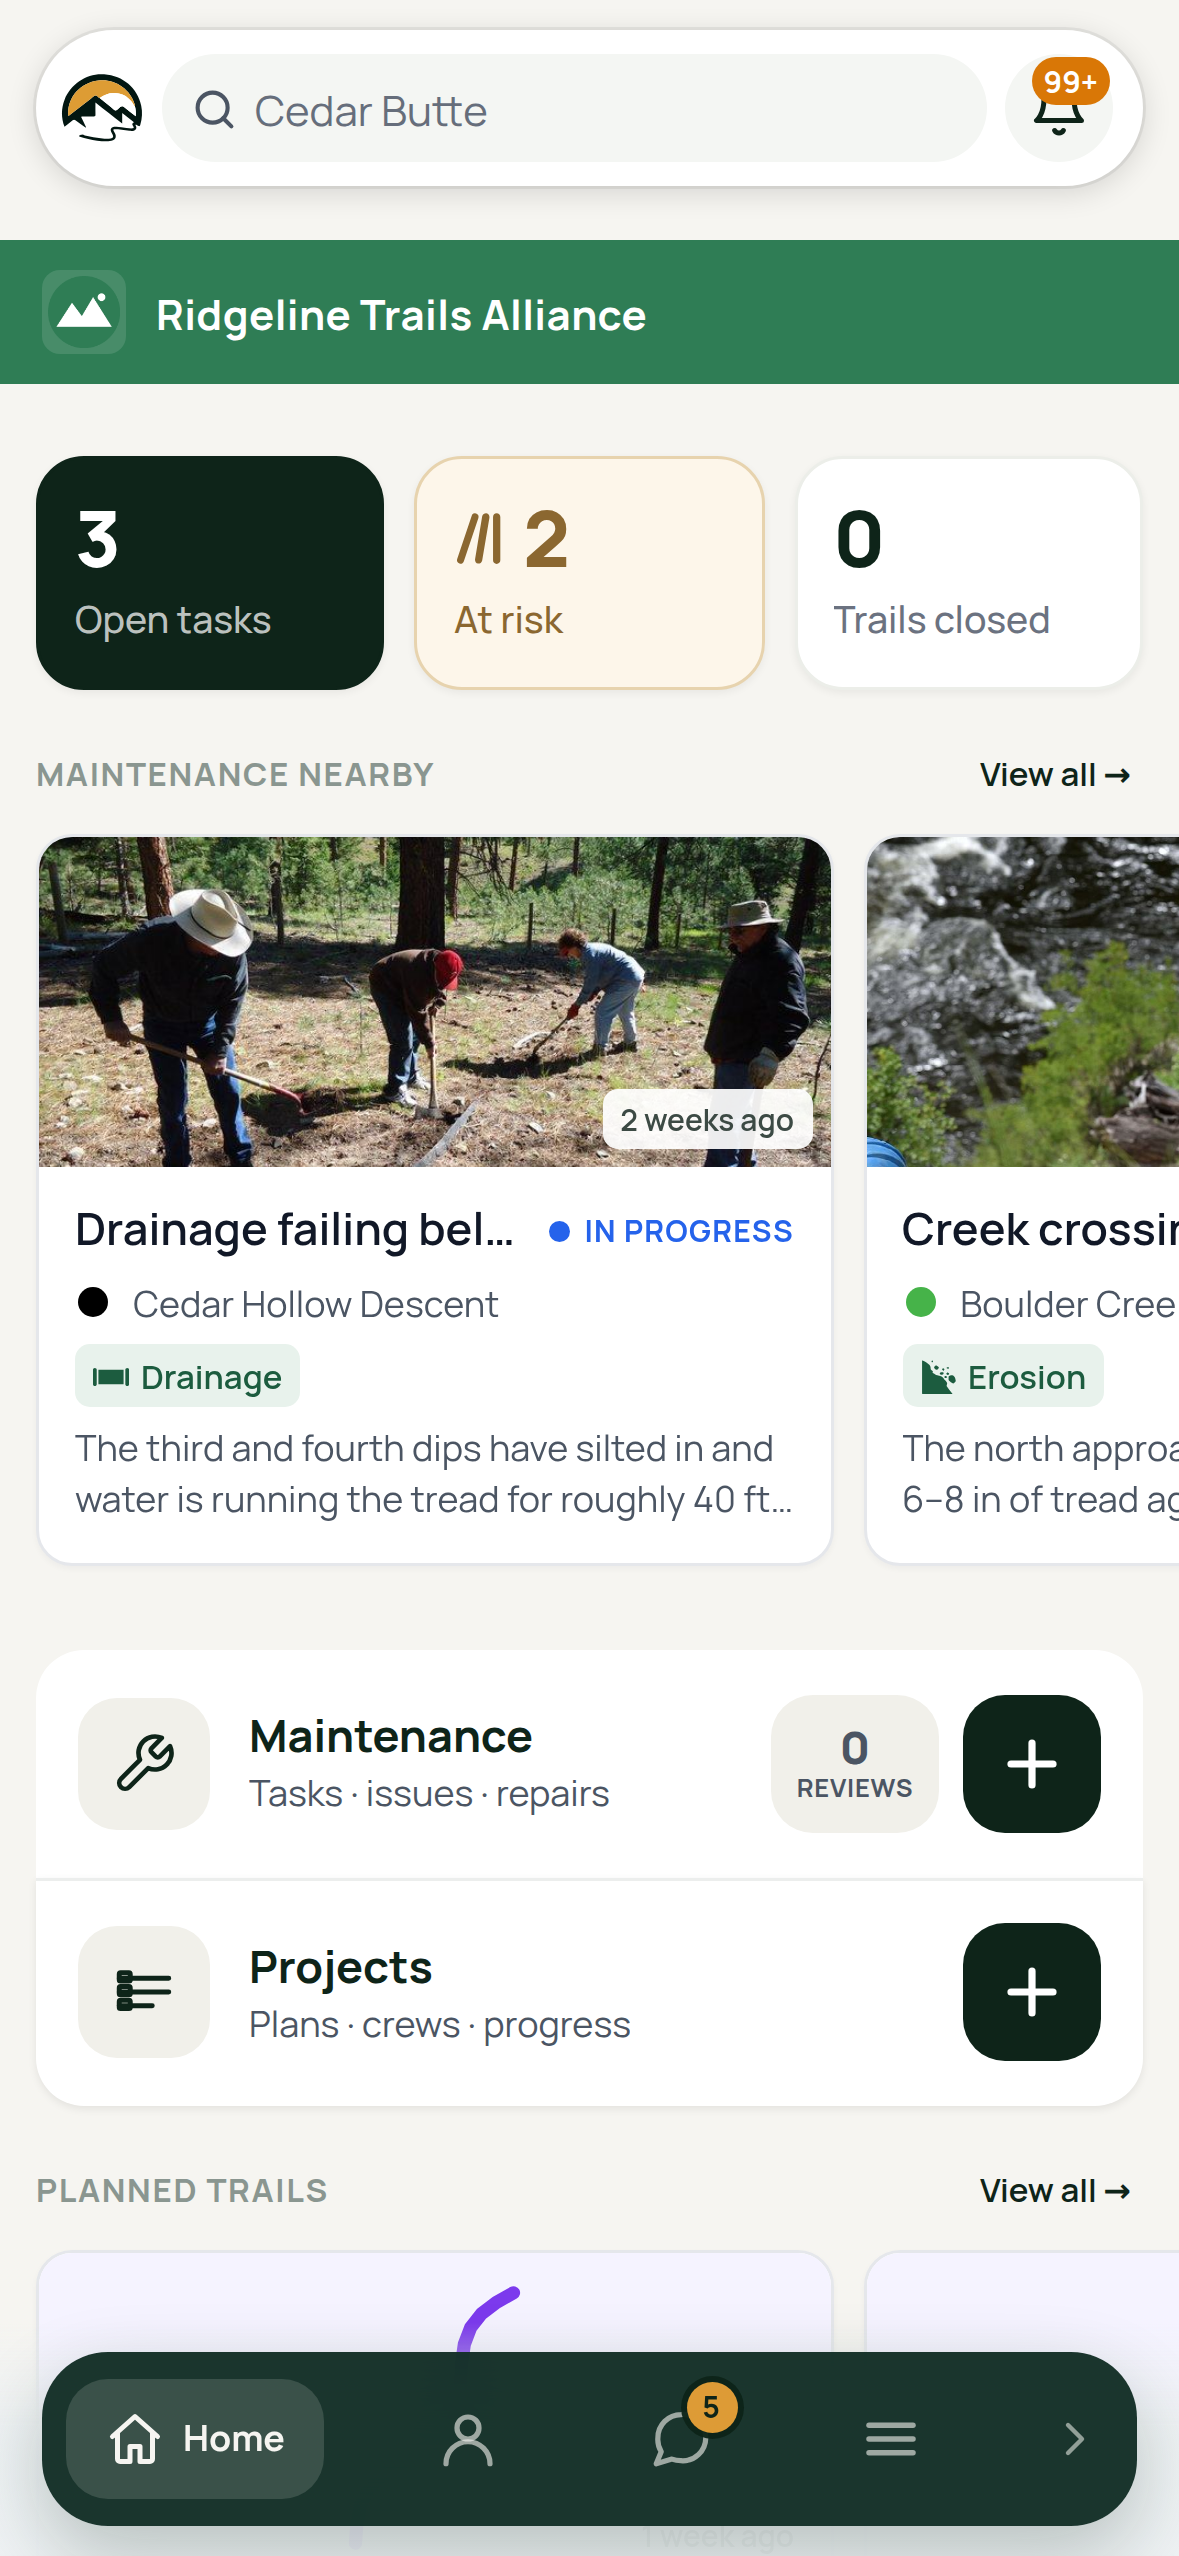
At a glance is the first thing on the home: four numbers in two rows — Open tasks, Structures at risk, Public hazards and Trails closed. Open tasks, structures and closed trails are the same numbers the Dashboard shows on a desktop, counted the same way, so the two never disagree.
Each one opens the list it came from with the filter already applied: tapping Structures at risk lands you on Infrastructure showing only what is rated poor or failed, and tapping Trails closed lands on Trail Status showing only what is shut, with a chip you tap to clear it.
Public hazards counts what people outside your crew are being warned about right now — every task and structure with Warn the public turned on, exactly as your public trail pages show them. Tapping it opens the list, most serious first, each with its level, its trail and the day it was reported or inspected. Tap a hazard to open its task or structure. Resolving the task, or an inspection that rates the structure fair or good, takes it off the list and off your public pages together. At risk is a condition rating rather than a decision — those structures are rated poor or failed, which is the point at which somebody should look, not a queue anybody has accepted.
A dash instead of a number means the app has not been able to refresh them yet — usually a launch with no signal. It is not a zero.
Under it, weather — a card for where you are and one per network — and then the sections and tiles that take you into the rest of the app:
- Home — weather, your recent work, and the quick-action tiles.
- Maintenance — every open + in-progress maintenance item, with a Pending Reviews child tab for public reports awaiting triage.
- Trail Status — every network, area and trail with its status, and the trail's own page behind each name.
- Infrastructure — bridges, signs, culverts, kiosks and any other structure cataloged for your org.
- Points of Interest — trailheads, parking, viewpoints, water, camp, shelters, landmarks.
- Climbing — crags + routes (present when the org uses the climbing catalog).
- Daily Report — read + post today's crew updates from the trail.
Home also has tiles for Plan / Record Trail, Expenses, and Work Hours.
The frame — a strip at the top, a bar at the bottom
Two pieces of chrome, and they are on every screen rather than only this one.
The header is a slim strip at the top: the org logo, the search box, an offline indicator when relevant, a sync-queue button, and a notification bell.
The bar along the bottom is how you move around. Left to right: Home, your account, the green +, Discussions — with a count on it when somebody is waiting on you — and the menu. Three things about it are worth knowing:
- Home gets you out of wherever you are. Most screens in this app open on top of another one — the planner, a wizard, a sheet, an item you are part-way through editing — and Home closes what is open before it lands you on the home screen. It is the way back rather than one tab among several, which is why it is always there and always lit.
- The + is in the middle, and it follows the screen. On Maintenance it files a task, on Infrastructure a structure, on Points of Interest a point, on Climbing a crag or route. On a screen with nothing to add it is not there at all, and the rest of the bar spreads out to fill the space rather than holding a gap open.
- The chevron on the right folds the bar away, down to Home on its own — worth doing when you want the whole screen for the map. Landing on Home opens it back up, so a bar you folded once is not folded for good. It also folds itself while you are adding something, so the only way on is the screen in front of you.
The home screen has a Planned trails rail, beside the maintenance one, showing your most recent planned trails. The picture on each card is the line itself, drawn from the trail's own shape — so it is there in a valley with no signal, and a line you walked with no signal is on it before it uploads. Tap a card to open that trail in the planner.
A workspace set up as a trail-building business opens on it. One set up to run a trail network starts with it hidden — the planner is there either way, and the Plan / Record Trail tile is the way in, but a club that plans a trail a season should not give a band of its home screen to a rail that is empty the rest of the year. Switch it on for yourself in Customize home, below.
What comes first depends on how the workspace was set up. A workspace created as a trail-building business opens on Planned trails, with maintenance below it; one created to run a trail network opens on maintenance. Both have both — a builder still uses maintenance as the punch list before handover. That order is the workspace's, and it is where everyone on the team starts.
You can rearrange it. At the bottom of the home screen, tap Customize home. Drag a row by its handle to move it — the up and down arrows do the same thing if that is easier with gloves on — and tap the eye to hide a section you never use. Done saves it.
The list holds each piece of the home separately, including the two halves of maintenance: Recent maintenance is the strip of task cards, and Maintenance is the bar under it with the wrench, the review count and the green +. They start next to each other and do not have to stay that way — put the buttons at the top and the cards further down if that suits how you work.
Quick actions opens into its own tiles. Under that row you get one line per tile — Plan / Record Trail, Expenses, Daily Report, Work Hours — and the same two controls: drag or arrow them into the order you want, tap the eye to take one out of the grid. Hide every tile and the block itself stops appearing, which the list says out loud before you leave it.
And most things can move between the two. Every row carries a small grid button. On a section it means put this in Quick actions: it becomes a square tile, and loses whatever the full-width bar had that a square cannot carry — usually the green +. On a tile it means take this out: it becomes a full-width bar of its own, landing where Quick actions sits rather than at the bottom of the page.
So Plan / Record Trail can be a bar at the top of your home, and Inventory can be a tile in the grid, if that is the way round you use them. The button is only on rows where it can work — the two card strips and Quick actions itself are always sections.
Weather and Trails are two tiles. They start in Quick actions, side by side. Move either one out and it becomes a full-width bar like any other section — they are ordinary items, and there is no longer a Trails button riding along on the end of the weather box.
The two card strips have a setting the others do not. They are marked Slider in the list, and under each one is Cards to show — one to eight. A bar shows one thing and a tile shows one thing, but a rail shows as many as you tell it, and how many is worth having on your own home rather than ours. Turning it down to one does not switch the rail off; the eye does that.
Three things worth knowing about it:
- It is yours, not the team's. Your arrangement follows you to any device you sign in on and changes nothing for anybody else. Reset puts you back on the workspace's order, and keeps following it if the workspace's order later changes — it asks before it does, because there is no undo behind it.
- Hiding is not switching off. A hidden section is hidden on your home screen only — the tab, the data and everybody else's home are untouched. The list shows what your workspace has, so a section your organization does not use is not there to hide.
- New sections still find you. When we add one it appears in your list rather than being left out because you arranged your home before it existed.
Saving with no signal is like everything else here: it queues and goes up when you have bars, and your home looks right on the phone in the meantime.
Trail conditions from the field
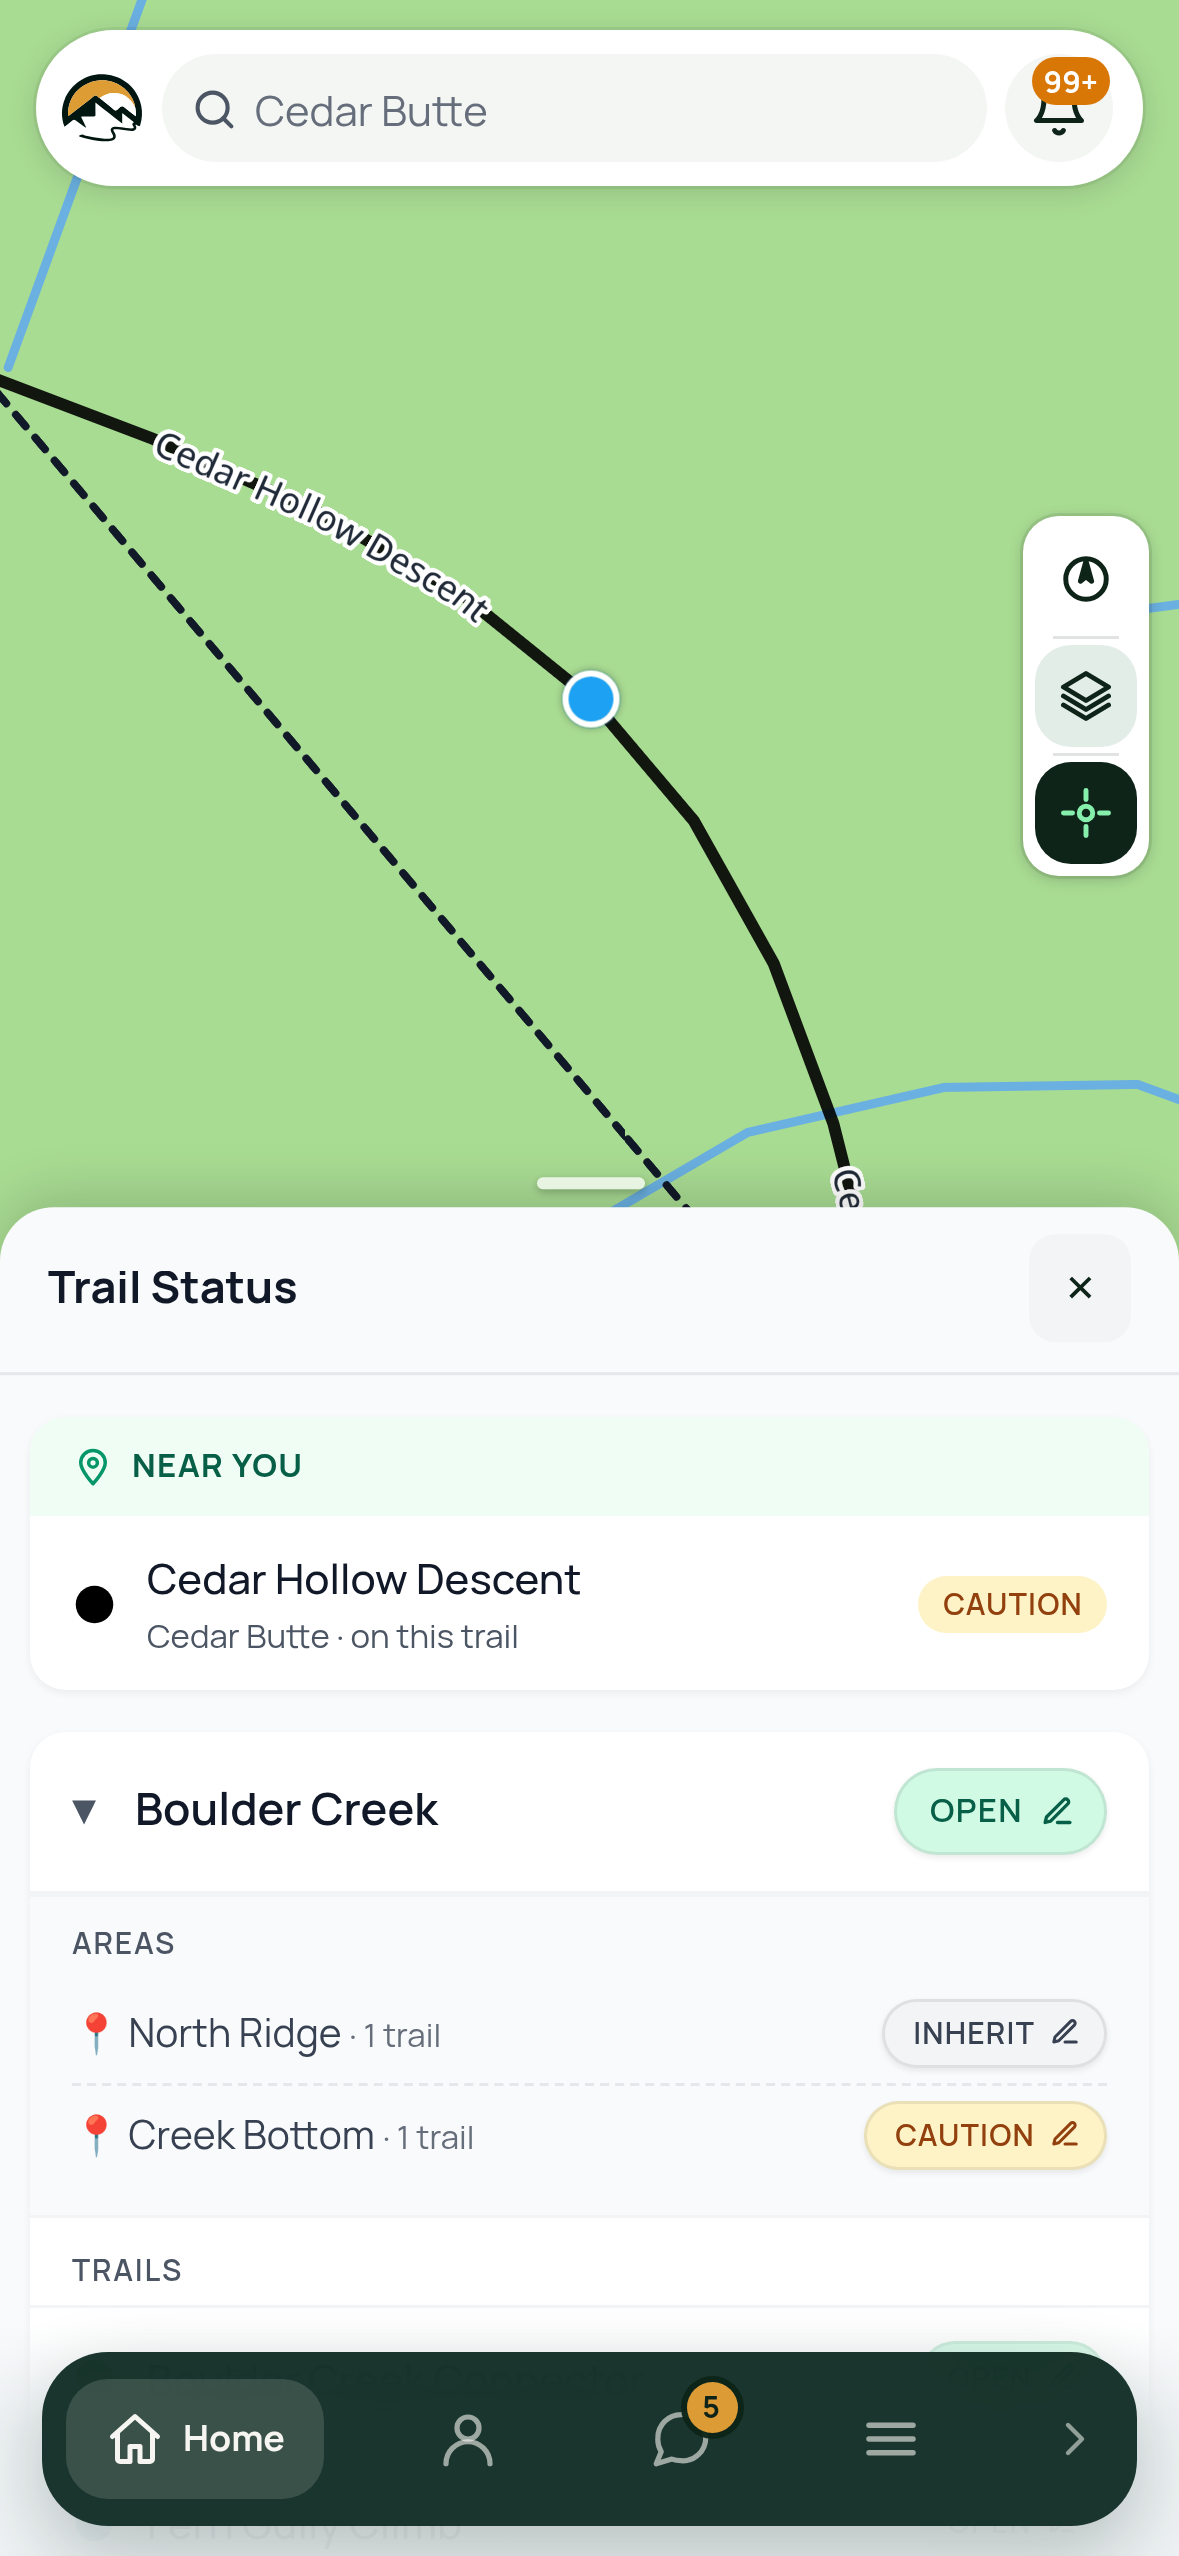
Open the Trail Status tab. Each network is a card with its own status as three buttons: Open, Caution and Closed. Open a card and its areas and trails are listed underneath, each with a status button of its own.
Tapping any of them opens a short sheet rather than changing anything straight away. The status you tapped is already picked; add a public comment if it helps ("blowdown at km 3, needs a saw", "tacky, ride carefully") and press Save. A trail or an area can also be set back to Same as network, so it follows whatever its parent says, and the button shows what that currently is. That way a network-wide closure closes every trail in it unless a trail has a status of its own; the card's line under the name counts those as overrides.
Tap a trail's name, not its status, to open the trail itself: its status and where it comes from, grooming, how wet the trail is, the elevation profile (drag across it to trace the trail on the map), its length, climb and grade, the latest inspection with a Start inspection button, and its open tasks.
Wetness is the weather engine's reading for that one trail, the same number the trail recommendations use: a word for how wet the ground is (Bone Dry, Drying, Damp, Wet, Very Wet, Saturated) and a percentage. Its color is what the engine recommends for that trail, and when that differs from the trail's status the line under it says so (suggests Caution). It shows when weather automation is turned on for your organization, and needs a connection to load.
Grooming is part of the same sheet for a trail: Groomed, Partial or Not groomed. A groom counts as fresh for 24 hours and then stops being flagged (the trail is still open, just no longer "freshly groomed"), so what the public hub shows is always current.
Who can change conditions: field workers, managers and owners. Volunteers see the statuses read-only unless you've turned on the Change trail conditions permission for them in Settings → Roles & permissions.
Every change is recorded on the daily report and, unless you turn Notify crew + TrailsIQ Go followers off before saving, goes out to your crew as a push notification ("{Trail Name} is now closed", "{Trail Name} was just groomed") and to anyone following your organization in TrailsIQ Go.
Recording a planner trail (GPS)
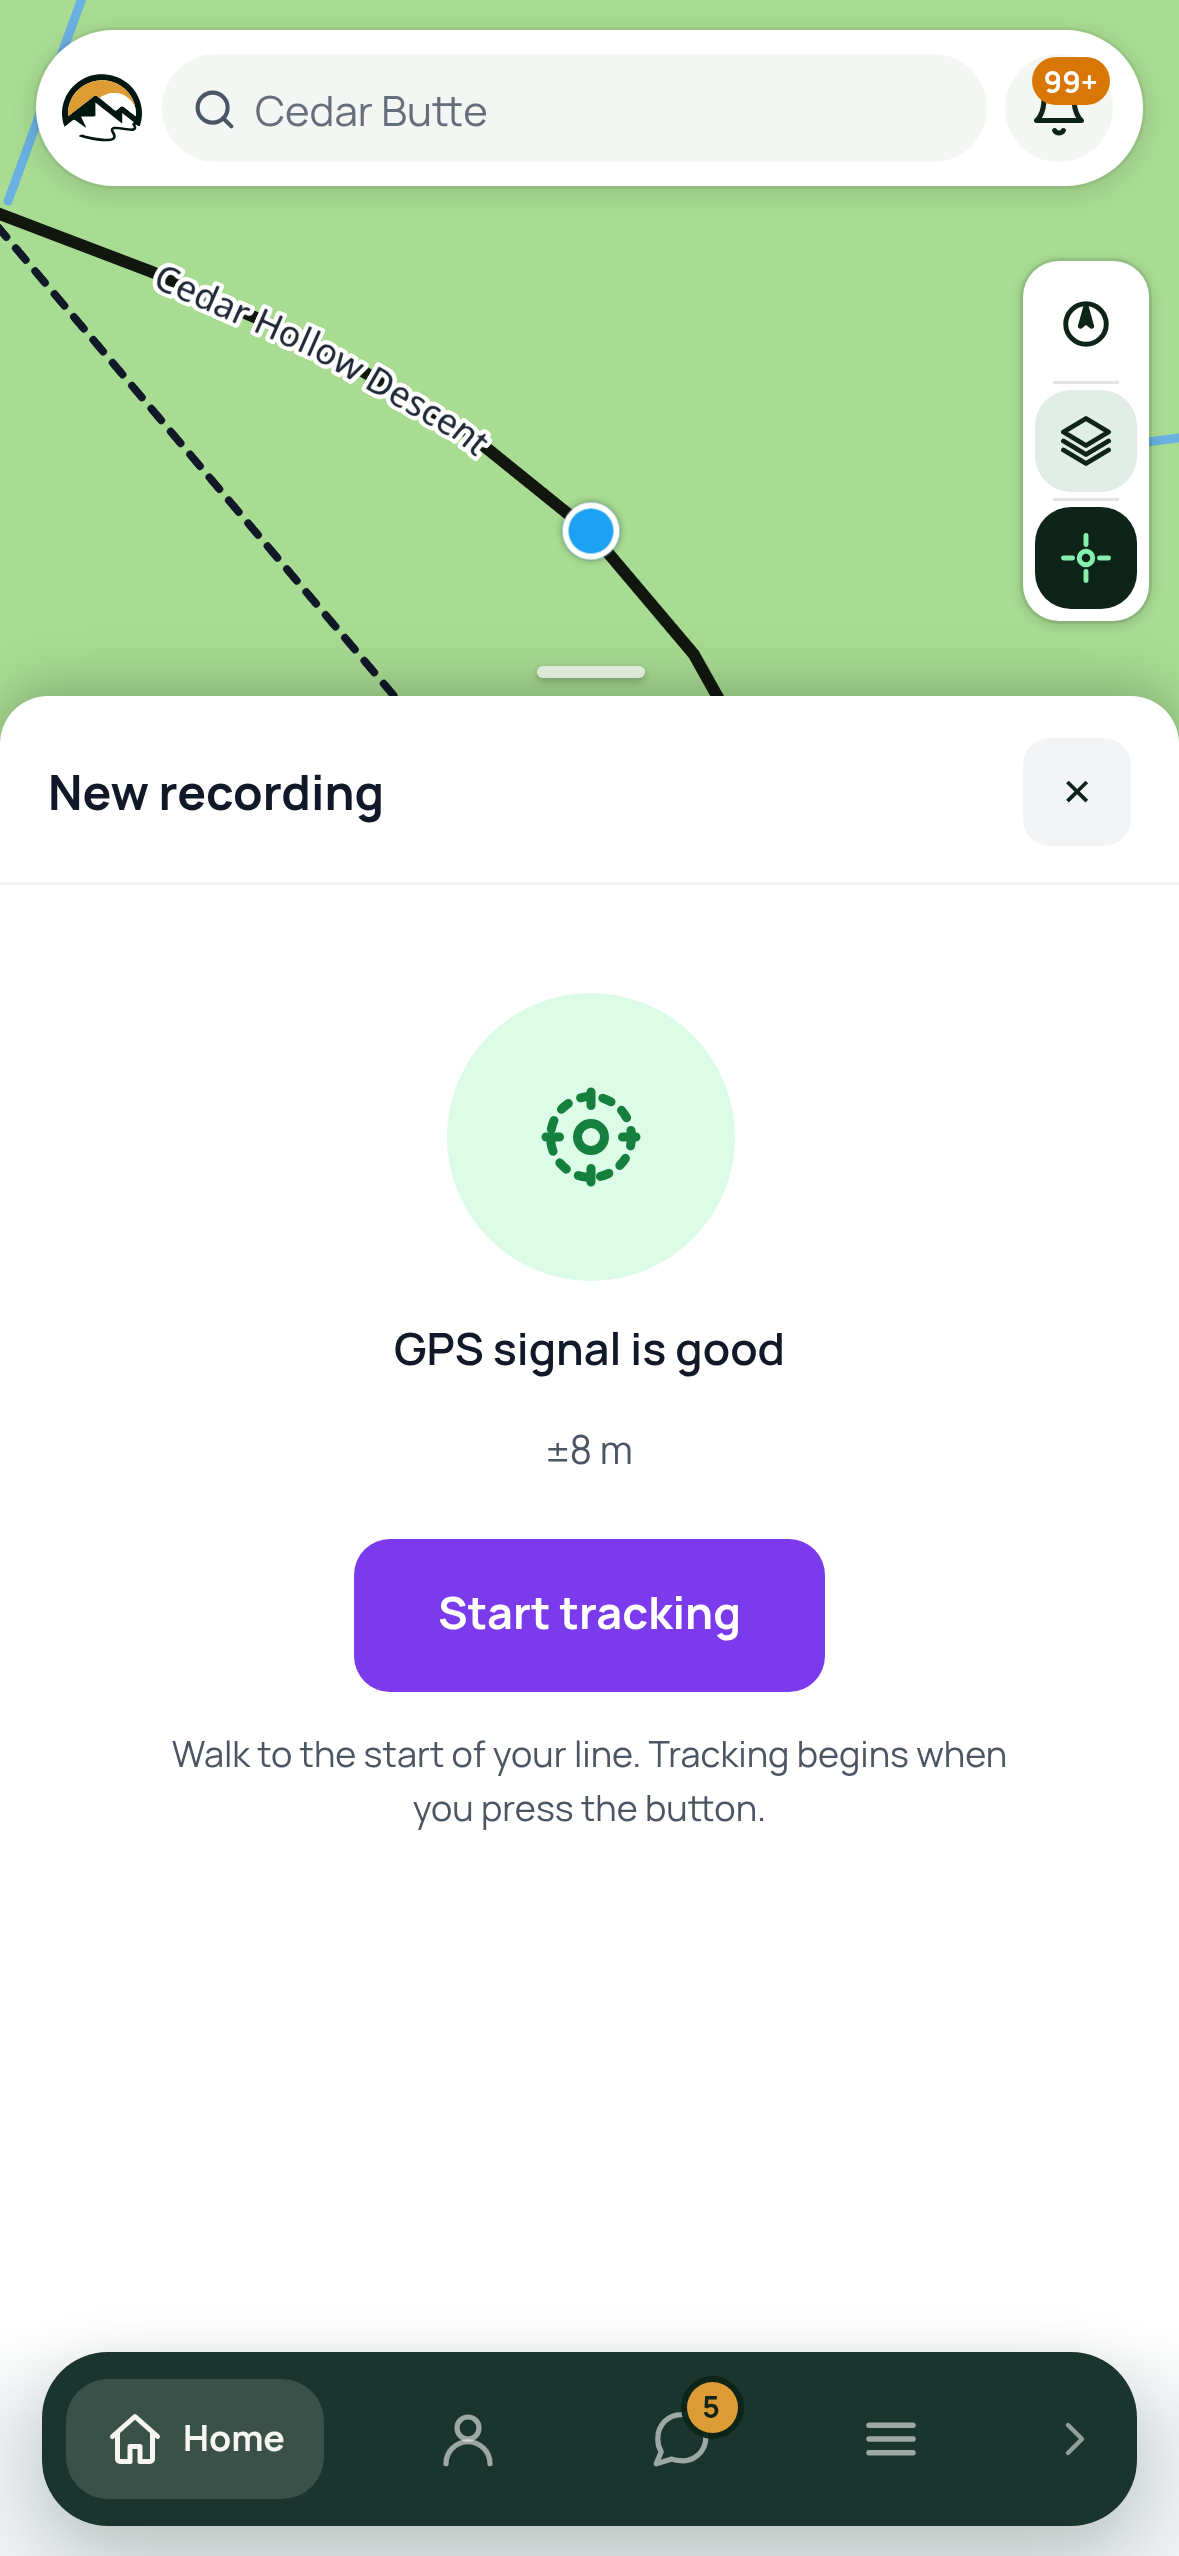
Home → Plan / Record Trail starts the GPS recorder. It's built for realistic field conditions — bad first fix, canopy jitter, phones going into pocket — with several passes of smoothing so the trace is usable straight away.
Four phases:
- Warmup — the app grabs fixes and colors a status pill by accuracy: good below 15 m, fair up to 20 m, and above that it keeps waiting. Start tracking unlocks at 20 m, the same reading a fix has to beat to become a point on the line, so the button is available exactly when the recording could begin. The line starts at the spot you are standing on when you press it.
- Recording — the first point is that spot, so the walk is recorded from the step you took, not from wherever the phone caught up with you. Every new fix under 20 m accuracy and at least 3 m from the last accepted point is appended after it. Speeds above ~32 km/h are rejected as glitches (comfortably above a slow bike); in the first few seconds a reading that far out moves the start point instead of being thrown away, because a receiver that has had a few more seconds to settle knows more about where you are than the one that placed it. A 5-fix inverse-accuracy weighted moving average smooths canopy multipath.
- Paused — resume where you left off. Recording keeps going in the background on the native shells; iOS will prompt for "Allow all the time" location access so it doesn't lose the trace when your screen locks.
- Review — the raw trace is simplified via Douglas–Peucker with a 3 m tolerance so it's clean but faithful, then you can save with a name, add tags, or export as a real trail.
While you're recording you can Drop note to pin waypoints on top of the trace — hazards, decision points, signage suggestions, camera moments. Each note takes a description ("What did you see here?") and up to 4 photos. Later, the dashboard shows the note pins on the planner map alongside the trace, where they can also be edited or deleted.
A planned trail can also be sent to another organization from here — Send to another organization on the trail gives you a code, and Receive a trail on the planner list takes one. It is the same hand-off the dashboard does, described in Trail Planner; doing it from a phone is what lets two people sort it out standing on the ground rather than back at a desk. Both ends need signal, and say so if you have none.
Open a note and there is a Show on the proposal page switch. Notes start visible. Switching one off keeps it here for you and the crew and leaves it out of the public proposal page entirely — the shared page is built without it, rather than hiding it once it gets there. That is the home for the working notes that are right for the crew and not the first thing a landowner should read.
Draw on map on a saved line frames the map, lets you draw over it, and keeps the marks anchored to the ground rather than to the picture — so they sit on the right piece of hillside at any zoom. A drawing you save shows on the map straight away, and keeps showing every time you open that line. Turn its overlay off and it stays off — on that phone, across restarts — until you turn it back on. Each drawing remembers its own answer, so switching one off leaves the rest alone.
While a line is being placed — drawing an alternate, or picking the two ends for Suggest — note pins stop responding to taps so they can't swallow the point you're trying to drop. They stay on screen the whole time, because a note saying wet through here is exactly the context you want while choosing where the line goes.
Drawings stay on the map while you draw too, for the same reason. If you want either out of the way, the map-layers button has a Planner section with Trail notes and Map drawings — both on by default, because they are your own work rather than a reference layer. Turning Map drawings off hides all of them without forgetting which individual ones you had switched off; turn the group back on and those stay off.
Building a loop? Recording, drawing and editing all have a Close the loop button that joins the line's end back to its start. When drawing or editing it just does it — every point there is one you placed. When recording it tells you the gap first (Close the loop · joins 12 m) and refuses above about 60 m, because the join is a straight line across ground nobody walked: over ten meters that is the GPS gap you can see on screen, over two hundred it would be the app inventing trail on your behalf. Walk back closer, or add the last stretch by drawing it.
On a branch, the green Close loop on parent button is the different thing it sounds like — it reconnects the branch to the line it came off, rather than to its own start.
Saves POST to the API. If you're offline, the recording lives in the outbox and uploads when you're back on signal.
A recording you save with no signal is on the list and the map straight away, before it uploads — in amber, with On this phone only on its row, and it is the row the app opens on when you finish. So you can look at the line you just walked, in place, standing on it. Tap it and the panel underneath says what it is waiting for and what the numbers mean: the length is final, the elevation comes from the phone's GPS and gets recalculated when it lands, and grade and sustainability are absent until the server has seen it.
Continue walking on that panel picks the line back up and keeps recording onto the end of it, the same as extending an uploaded trail. Deciding whether to walk more of a line is the reason to look at it in the first place, and that decision does not wait for signal. While you are walking it the app holds the recording back rather than uploading half of it; save, and the whole longer line goes up in one piece. Close the app mid-walk and it comes back to it on the next launch.
A queued extension of a trail that is already uploaded shows the same way, as its own amber line marked Extension queued, drawn beside the trail rather than merged into it — what is filed and what is still on the phone are different things until the queue drains.
Filing a maintenance item
The green + in the bottom bar files a task while you are on the Maintenance tab. It fills the screen and asks one question per step — five for a task, four for infrastructure and points, which have no priority to set.
- What happened? — the type. Once you have filed a few on this phone, the three you reach for most sit above the grid under You log these most. The grid underneath keeps its own order either way, so nothing moves around under your thumb between one task and the next.
- Where is it? — the map fills the top of the screen above a card naming the trail the pin is on, its network, the position and how good the fix was. The card is green when the location is good to go and amber when it still needs a trail. Drag the pin to nudge it, or tap Use my GPS for a fresh reading. Change opens Choose location: search every network, trail, piece of infrastructure and climbing route, nearest to the pin first, and tap one to move the pin there. Tapping a network narrows the list to its trails. Use my GPS and Upload from photo sit at the top of that sheet too; the photo option reads the position out of a picture you have already taken. On a trail, How much trail? switches between A single point and A stretch — pick a stretch and a slider opens at the pin and grows in either direction along the line, which is how you say "200 ft of blown-out tread starting here".
- Show it — photographs. In the App Store and Play Store builds this step is the camera itself, with the shots you have taken so far along the bottom and a count beside them. Tap one to mark it up, or Skip.
- How bad is it? — two questions, Is anyone likely to get hurt? and Can people still get past?, and the app sets the priority from the pair. It tells you which one it picked and what that means for the crew's queue; Set it myself overrides it. Tasks only — infrastructure and points go straight to the last step.
- Anything to add? — everything already settled sits in a row of chips across the top, and tapping the type or the location goes back to that step to change it. The description comes first because it is the one thing only you can write; the title is filled in for you and is worth changing only when it needs to say more than the type does. A project, and on a climbing task a route, can be attached here, along with any custom fields your organization has configured.
At the bottom of that step is The work — what the job will take, for whoever schedules it. Est. hours and Crew · people step up and down with the + and − buttons or take a number typed straight in, and the strip under them multiplies the two into person-hours. Leave either one blank and it says so rather than printing a zero, because nobody has given that number yet.
+ Add tool and + Add material open a sheet over your inventory. Search it, filter by category, and tap a row to put it on the list — tap again, or use the stepper, for more than one. Anything you type that the shed has never heard of is offered as its own row and marked Free text, so a saw you have not cataloged still reaches the crew lead. The whole block is optional and none of it changes the priority.
From an open task's detail view you can edit fields, add photos, close/reopen, and open the Work log. A session records how long it took, an optional note about what you did, and everybody who was there — tap Add under Who worked? to put the rest of the crew on it, and each of them gets their own entry for the same time. Helpers without an account go in as a number under Volunteers not on your team; their time counts as volunteer hours, each for the full session. They roll up to the linked project's Hours-worked tile on the dashboard.
Marking a task done asks for the hours first. Tapping Mark as Done, or picking Resolved on the edit screen and saving, opens the work log with the task still open and one question on it. Put the time in and press Finish task, or press Skip logging to close it without any — both are one tap, and Not done yet backs out and leaves the task exactly as it was. Nothing is closed until you confirm, and a task that was already finished never asks again, so you can fix a title on a closed task without being interrupted.
If you open a task and get "This task isn't in your current organization — it may have been moved, deleted, or you've switched orgs. Refreshing now…", you switched orgs since the task was cached. The app auto-refreshes.
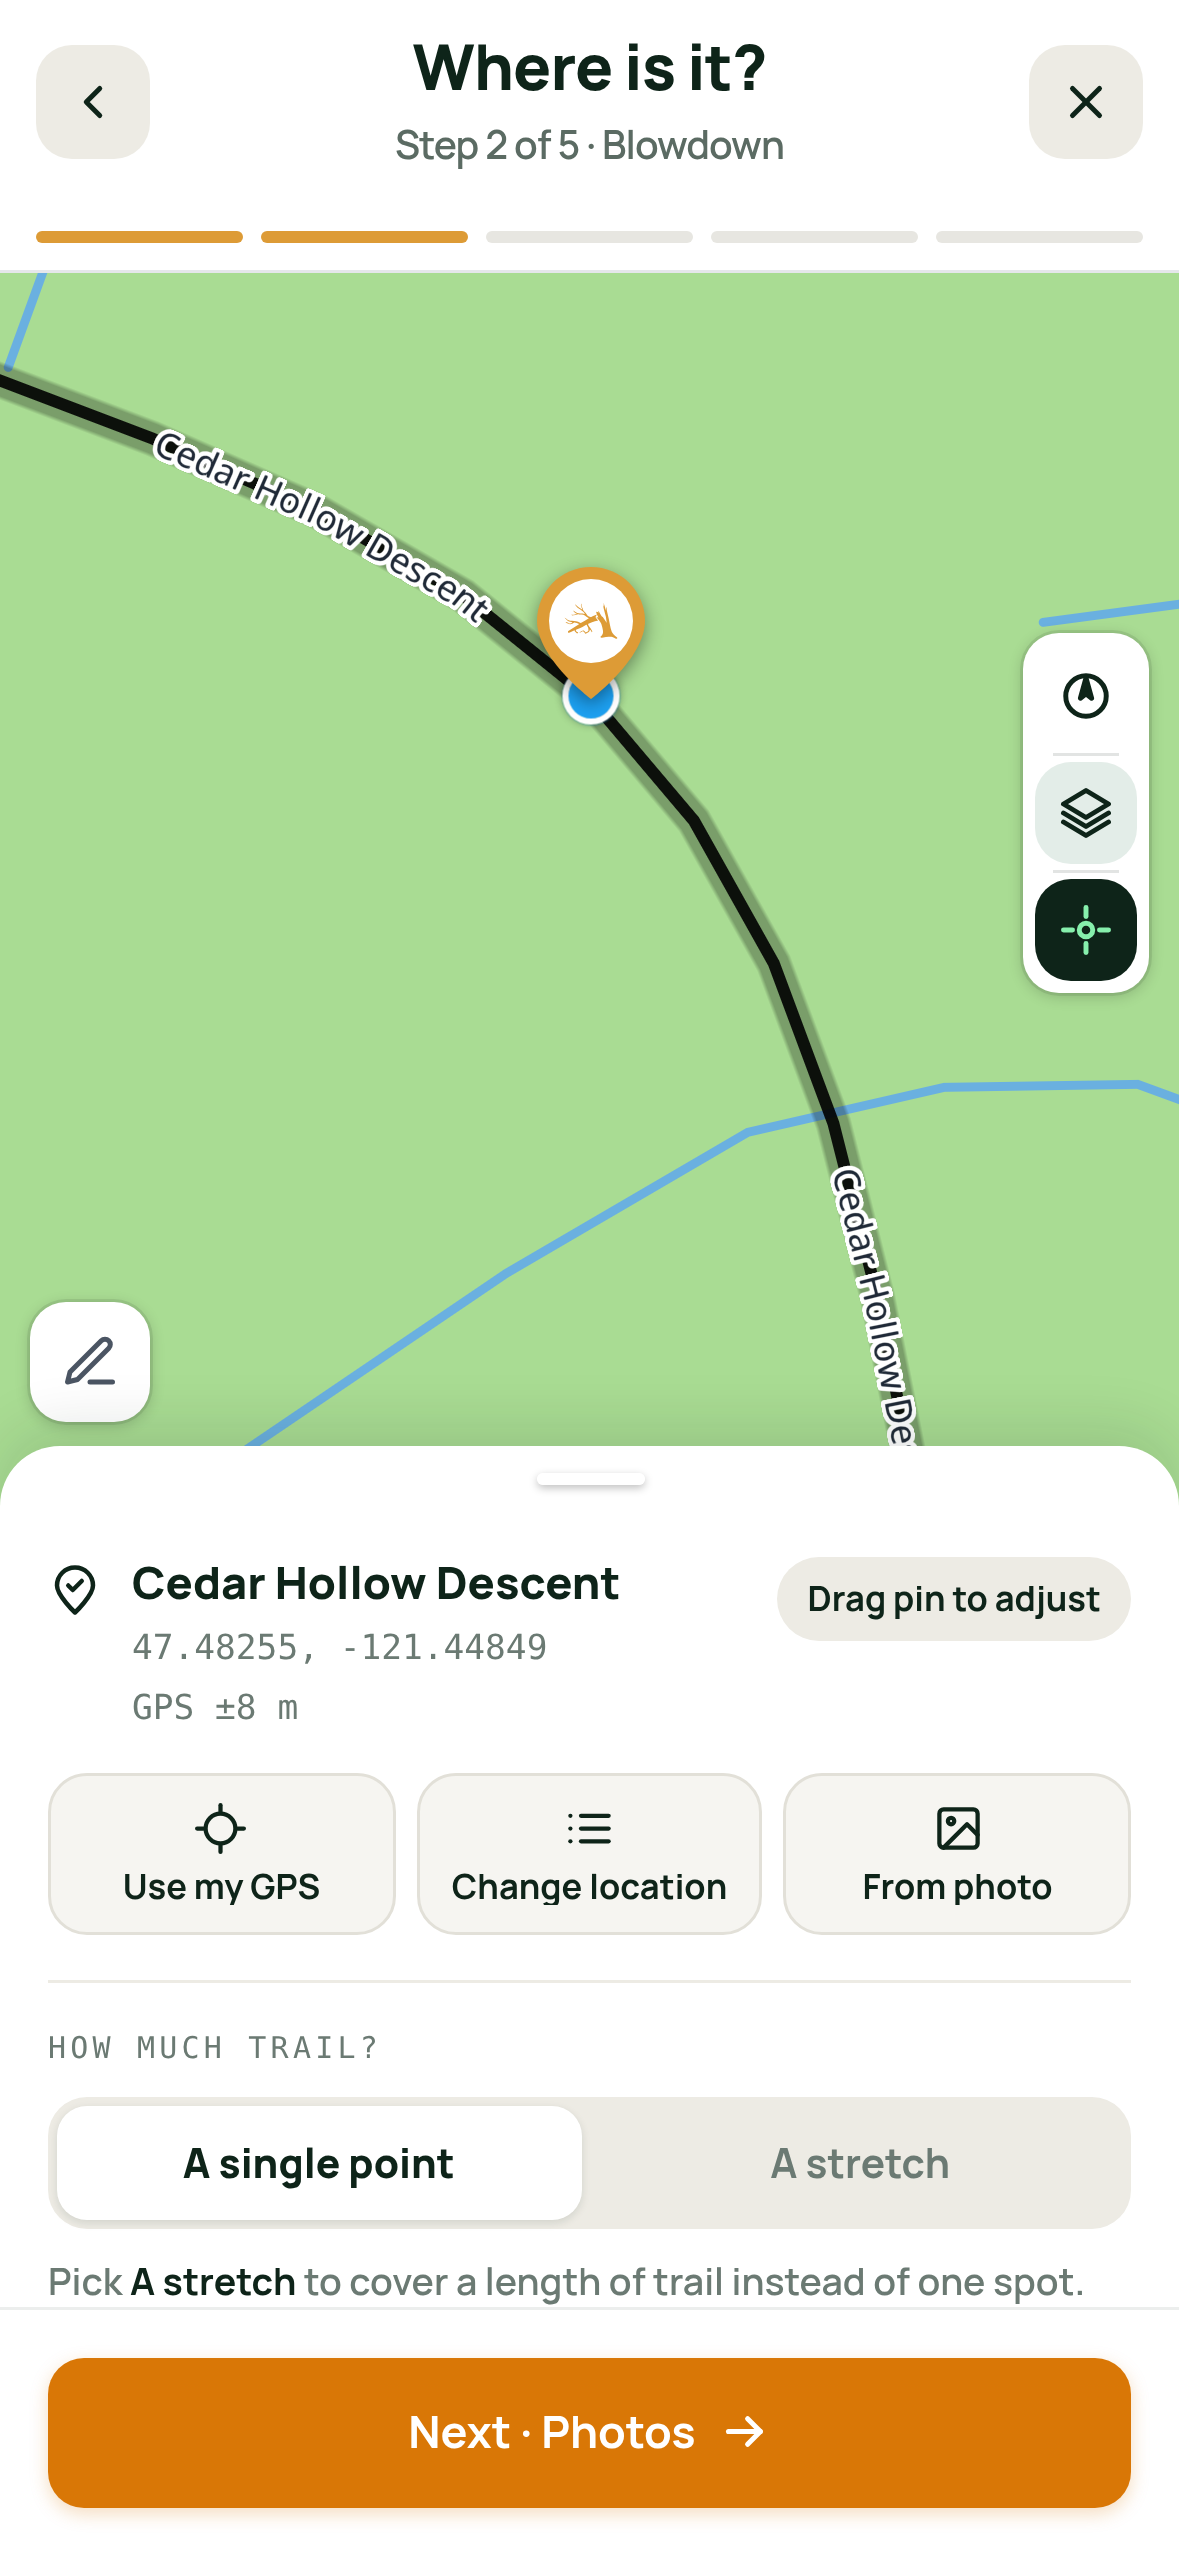
Dropping a waypoint / point of interest
The same wizard, opened from the Points of Interest tab — step 1 asks which kind of point it is. The Field App seeds these seven POI categories out of the box:
trailhead, parking, viewpoint, water, camp, shelter, landmark.
Infrastructure (bridges, signs, kiosks, culverts, etc.) works the same way from its own tab, and step 1 lists your organization's own infrastructure types under their categories (Settings → Structure types).
The + files whatever the tab you are on is for — a structure on Infrastructure, a point on Points of Interest, a crag or route on Climbing, a task on Maintenance — so there is one button to reach for and no menu in front of it.
Moving between items without going back
Open a maintenance item, a piece of infrastructure or a point of interest, and you can swipe left for the next one and right for the one before. The card follows your finger and pulls its neighbor in behind it, the map flies to whatever you land on, and a small counter tells you where you are — 4 of 18 — for as long as the swipe lasts.
It walks the list you are actually looking at, in the order you see it, filters and all. Narrow the list to one trail and swiping stays on that trail. At either end the card gives a little and springs back, which is how it tells you there is nothing further that way.
Everything else on the card keeps working. Scrolling down through a long item is unaffected, and a swipe that starts on a row of photos scrolls the photos rather than changing the item.
Which end of the list you see first
The Maintenance, Infrastructure and Points of Interest tabs each open with a line above the cards saying how the list is ordered, and a Nearest / Latest switch on the right of it.
Nearest puts the closest work first — in the cards along the top and in the rows underneath them, which are one list in one order. Latest puts the newest first. The choice is remembered and applies to all three tabs, so you set it once for how you are working rather than once per screen: walking the trail, or catching up at the truck.
The line always says what the list actually did. Ask for Nearest before the app has a fix, or with nothing within about six miles of you, and it orders by newest and the line reads Latest — a set of things that are all equally far away is not worth sorting by distance, and a heading claiming otherwise would be worse than none.
Distances settle rather than twitch. Two items a few paces apart keep their order while your fix wanders; one only moves ahead of the other when it is meaningfully closer.
Photos
Three ways to add a photo, all funneled through the same annotator so you can crop, mark up, or add arrows before you save.
- Take photo — opens the native camera through Capacitor's Camera plugin.
- Choose from Library — multi-select up to 10 images at a time from the device photo library.
- Web
<input type="file">fallback — the browser file picker on the PWA when the Capacitor camera isn't available.
Uploads flow through the offline outbox with byte-level progress so a slow LTE connection doesn't hide what's happening. Photos on Capacitor's capacitor://localhost/… webPath are converted to normal Files before upload so they cross the origin boundary cleanly.
If you see "Photo save is unavailable in this build." the app was compiled without camera permissions — reinstall from the App Store / Play Store and it'll clear.
Push notifications
Native shells register for APNs (iOS) or FCM (Android) push tokens on first launch. You'll see the standard system prompt asking to allow notifications — accept it once and the token gets sent to TrailsIQ so your org's activity can push to your device.
What you'll get pushed:
- Trail condition flips — "{Trail Name} is now closed" / "{Trail Name} is now open" / "{Trail Name} was just groomed".
- Lift status flips — "{Lift Name} is on wind hold" / "{Lift Name} is closed", etc.
- New maintenance issues — "New issue: {title}".
- Event reminders — "Reminder: {title} — today at HH:MM · {location}" the morning of or evening before, for events you signed up for through the app.
- Bell inbox items — anything worth logging to the notifications tray.
Tapping a notification opens the app directly on the relevant item (the specific trail, lift, task, or event).
Notification opt-in follows the OS. If you decline once and change your mind later, iOS: Settings → Notifications → TrailsIQ → Allow Notifications. Android: Settings → Apps → TrailsIQ → Notifications.
The PWA can't receive push notifications — that's an OS-level limitation of installed web apps. Use the native shell if push matters to you.
Offline mode
The Field App is offline-first by design. There's a small WifiOff pill in the header when the app detects no signal, with the tooltip "You're offline. Saved actions will sync when you're back online."
There are two halves to it: what the app keeps automatically, and what you deliberately download.
Automatic — the app keeps what you have looked at, so a screen you opened this morning is readable this afternoon with no signal.
Deliberate — you can download a whole network before a trip: trails, tasks, photos, infrastructure, points of interest, and contour and slope shading. That covers a trail system whether or not you happened to open the right screen first, and it is the right move for anywhere you know the signal drops. On an organization using the TrailsIQ map the base map comes too; where the background is a provider's, its tiles cannot be included for licensing reasons, so pan around the area while you still have signal.
What works offline:
- Reads — every maintenance item, structure, POI, planned trail, and photo that was downloaded or cached from a previous online session is browsable normally. If nothing was downloaded or cached before the trip, the list shows "You're offline and no tasks were cached from a previous visit yet. They'll load once you're back online."
Two different things keep data offline, and it is worth knowing which is which. A download (Offline downloads) is a deliberate act: you pick a network, it fetches everything for it, and it stays until you delete it. The caches (Settings → Offline Cache) are automatic: every list you load while on signal is kept, so the next time you open the app without signal it is still there. You do not have to plan ahead for the cache to help — but you do have to have opened the thing once.
Planned trails cache the same way — the Trail Planner list, plus every planned trail you actually open. That second half matters: a list you can see and cannot open is worse than an empty one, because it looks like the app lost the contents. So open the lines you expect to work on before you lose signal, and they will be there with their notes, branches, options and analysis. One that you never opened says so plainly rather than spinning: "Open it once on signal and it'll be here next time."
Each cache has its own switch and shows how many rows it is holding. Turning one off clears it immediately.
- Writes — every new task, structure, POI, edit, or photo upload made offline lands in the outbox queue. Same for trail-condition flips, lift status changes, daily-report posts, new quick time logs / work hours / expenses (with receipt image), and — on the trail planner — notes dropped onto a saved line and drawings made with Draw on map, photos and all. EDITS of an existing work-hours or expense entry stay online-only — the row has to be loaded to edit it anyway.
- GPS recording — recorder runs fully offline; the trace lives in local storage until upload.
- Planner notes drop instantly, signal or not. Tap Save and the sheet closes and the pin appears on the map right then; the upload happens behind you. With no signal the note joins the queue and the pin stays exactly where you put it. The only thing that takes a pin back off the map is the server refusing the note outright, which is not something a lost signal can cause.
Everything queued says so in one place: the N pending badge in the header. It appears the moment something is parked, counts everything waiting, survives closing whatever screen you were on, and opens the Sync queue when you tap it. That covers every planner write that can be queued — a note, a map drawing, an extension to an existing line, and a drawn or suggested line saved as a draft. So if you save anything out of signal and want to be sure it is really held, look up — not at the screen you were on, which by then is usually a different screen anyway.
When signal comes back the queue auto-flushes. You can also open the Sync queue panel from the header to see what's pending, retry failed items, or discard something you no longer want to send.
The panel shows per-item labels ("Maintenance issue — Trail X", "3 photos, 2.4 MB"), attempt counts, and per-item Retry / Discard buttons. An item stuck after 10 attempts turns red and needs your attention. Discard is permanent: "Discard {label}? The data won't be sent and can't be recovered."
Nothing you added leaves the queue until it is on the server. A new item, structure or point, and anything carrying photos, stays on the phone until the server has it. If the entry uploads and its photos do not, the photos stay behind as their own Photo upload row, named after the entry, and go up on the next flush. If the server refuses something outright, it is kept and marked rather than removed, so you can retry it or decide to discard it yourself. A dropped connection, an expired sign-in or a trailhead Wi-Fi sign-in page is never treated as a refusal. A photo in a format the server does not take, such as an iPhone HEIC from your library, or one that is too large is converted to a JPEG on the phone before it goes up; if the server still refuses it, the phone tries once more with a smaller copy.
Practical tip: on a big offline day, open the Sync queue panel before you cross out of signal so you know the app is in outbox mode. When you come back into signal, watch the pill flip and the queue drain.
App updates
The app updates when you tell it to, and at no other time — not overnight, not when you reopen it, not behind a form you are halfway through. Whenever there is a newer version, an Update available row sits in the menu: open it from the bottom bar, tap the row, and the app downloads the new version and restarts on it. Your phone stays on the version it has until you do.
A banner at the top of the screen appears only when we have checked a version over and think your whole crew should be on it — once for that version, not on a schedule. Later puts it away for good on that phone; the row in the menu stays either way, so you can update any day you like without waiting to be asked.
Very occasionally a version has to go out to everyone — a fix for something that matters. The banner then reads Update required and has no Later, and your phone moves onto it the next time you open the app. This is rare by design: the whole point of the rest of it is that nobody is interrupted for an ordinary improvement.
Updating needs signal, because the new version has to be downloaded before the app restarts — the app checks that the whole download made it before switching over. On a weak connection you may see Could not fetch the update: nothing is broken, and nothing half-updated. The app you were using keeps working; tap Retry when you have better signal.
Switching orgs / signing out
If you belong to more than one org, the sidebar has an org switcher. Tap to open the dropdown, pick a new org, and the app reloads on that org's data. First switch after login also busts the cached app shell so anything that changed (colors, logos, custom fields) reloads cleanly.
Platform admins (TrailsIQ staff) see extra orgs plus an "Act as a member" impersonation picker so they can help operators from inside their tenant.
Sign out is at the bottom of the sidebar as Sign out. It logs you out and drops you at the login page ready for the next person, or for you to log in again. Above the sign-out link the sidebar shows the field-app version ("Field App v{version}") — helpful when reporting a bug.
Force-quit vs sign out: the app doesn't need to be closed to save battery — Capacitor and the OS handle backgrounding. Sign out only when you're handing the device to someone else or debugging a login problem.
Common gotchas
- Web session cookie is the same as the dashboard. Log out of the dashboard and you're logged out of the app too, and vice versa.
- The build price can include a trail's branches. On a line with branches, Report options offers Include this trail's branches in the price. It prices the whole thing as one visit — each branch still measured on its own terms, but the machine hauled in once. Same setting the dashboard shows, stored on the trail, so both quote the same figure.
- You choose what a shared proposal leads with. Report options → Top of the proposal page picks Map image (your newest drawing, exactly as you made it) or Live map (a real map the reader can pan and zoom, with the line, its branches and the numbered notes on it). Stored on the trail, so the dashboard agrees. The Live map option only appears on the TrailsIQ map. A proposal link is one you have deliberately given away — it can be forwarded, printed as a QR code and opened any number of times — and a provider-backed map is metered per open, so on those organizations the page uses your map image instead.
- Push notifications require the native shell. The PWA can install and work offline, but iOS + Android don't let installed web apps receive server push. Use the App Store / Play Store shell for push.
- iOS background GPS needs "Allow all the time". During a Plan / Record session with the screen locked, iOS will prompt "TrailsIQ needs 'Allow all the time' location access to keep recording when your screen turns off. Open Settings now to change it?" Accept it once, or your trace stops mid-recording.
- The outbox is per-device. If you install the app on a new phone, the old device's queued items don't migrate. Finish syncing on the old phone before switching.
- Queued work belongs to the workspace it was saved in. If you work in more than one workspace and switch before signal comes back, those items wait rather than uploading into the wrong workspace — the Sync queue marks them "Saved in …" and they upload on their own when you switch back.
- Discarding an outbox item is permanent. No trash, no restore. Retry first; discard only when you're sure.
- A 404 on a task you opened usually means the task moved orgs or was deleted — the app shows "This task isn't in your current organization — it may have been moved, deleted, or you've switched orgs. Refreshing now…" and auto-refreshes.
- Volunteers see Trail Status read-only by default. Grant them Change trail conditions in Settings → Roles & permissions if you want them flipping states from the field.
- Home weather goes stale offline. After the freshness window, the card is swapped for a "last updated" placeholder rather than showing you fake-fresh data.
- Boot watchdog — if the app can't finish loading within 15 seconds the splash shows "App couldn't finish loading." with a Tap to retry button. If it happens repeatedly and you're offline, the app also says "If this persists, open the app once with a connection so it can finish caching."
- If push isn't landing, it is usually the device. Accept the notification prompt, then open the app once with a connection so it can re-register. If it is still quiet for everyone on your team at once, that one is ours — ask us.
What's next
- Get every crew member installed. Point them at the App Store / Play Store, and have them sign in with their TrailsIQ credentials. If they don't have credentials yet, read the Members, roles & permissions article for the invitation flow.
- Walk through Trail Status, Maintenance, and Plan / Record together on a real trail — the first 10 minutes on the trail teach more than an hour in the office.
- On offline-heavy days, open the Sync queue panel first so you know the app is in outbox mode.
- If push notifications matter for your ops (weather closures, wind holds), make sure every crew phone accepted the notification prompt on first launch.